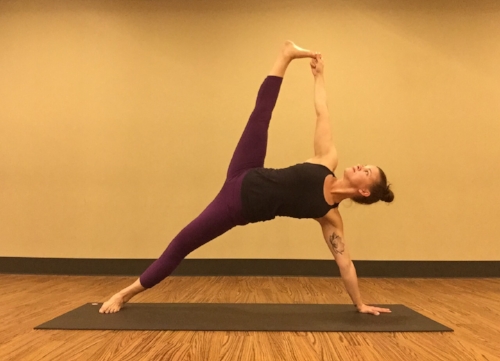
Vasisthasana B--Side Plank Variation

I wouldn't say that I love Vasisthasana, Side Plank, but I do think the posture has a lot of value. Especially in a Vinyasa class where Chaturanga is very prevalent, Side Plank teaches students to engage all parts of the body while balancing on one hand. I use this posture frequently as a gateway to many hand balancing postures to get students aware of the importance of shoulder alignment and stability.

Although I might not love Vasisthasana, I do love the expansive feeling of Vasisthasana B. Here's some tips on general alignment and form in traditional Vasisthasana and how to explore variation B.

Hand Placement in Vasisthasana:

When I first started to practice yoga I always moved my hand to the middle of my yoga mat the moment I heard the instructor say, "Side Plank". I would grimace and move my hand a few inches closer to my other hand and I was miserable for every breath I took while holding that godforsaken pose. Light bulbs went off once an instructor told me to keep my hand in the same place as High Plank when I transitioned to Side Plank. It now seems so intuitive! I gained more ease and strength in Side Plank with this revelation.

Notice the difference in the body alignment with the shift of the hand to center verses keeping the hand in place. When the hand is moved to center the body is forced into an angle and the hand has to be readjusted to transition back to High Plank. When the hand doesn't move the body is in a straight line and the joints align in a supportive manner with the shoulder stacked directly over the wrist. For some students a slight shift of the hand forward can be helpful. The body is still in one strong line with the shoulder over the hand and wrist. 

When I started to break down this transition in my classes, even with well seasoned practitioners, I had a lot of students thank me for pointing out this subtle yet important difference. One student said he voluntarily stayed away from Side Plank due to some shoulder issues, but he said that once he stopped moving his hand to the middle of his mat he was able to hold Side Plank without pain. Try it out!

A strong and stable Vasisthasana is essential before variations are added. Once you feel confident with traditional Side Plank, start to play with lifting the top foot. Eventually you may move towards Vasistasana B, however, there's quite a bit of prep work that needs to be done before you reach down, grab your big toe, and extend your leg up. 

Upavistha Konasana--Wide-Angle Seated Forward Bend

When attempting to lift the top leg in Side Plank, it's essential that the inner thighs, groin, and hamstrings are warm and ready. This seated forward fold variation does just that. Be mindful that the knees don't drop too far forward in the fold. Use your abductors and rotate the things slightly back to keep some engagement in the legs during the stretch.


Trikonasana--Triangle Pose

Triangle Pose is  really just Vasisthasana B  without balancing on your hand. In Triangle focus on simultaneously stretching and engaging the legs while lengthening both sides of the torso and rotating the top shoulder away from the floor. These same concepts translate into the big Side Plank variation.


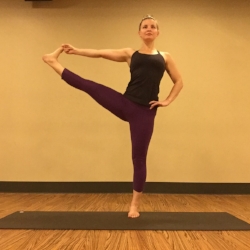
Uttitha Padangustasana--Hand to Big Toe Pose

Similar to Triangle Pose, Extended Hand to Big Toe Pose is Vasisthasana B in a different dimension. Stretch your standing leg and extend out through your lifted heel. Be sure to engage your abdominals to help with balance. The same muscles, and more, will have to be engaged when balancing on one hand with the big toe hold. 


Anantasana--Side Reclining Leg Lift (Vishnu's Couch)

I believe it's absolutely impossible to not grin in this posture. Try it out! Once you're able to balance I dare you not to smile! Vishnu's Couch is simply a lower risk Vasisthasana B. You're able to figure out the mechanics of grabbing your big toe without having to balance on one hand. Don't let this cute posture deceive you though. It's quite hard to balance on your side with one leg in the air. Engage your abdominals and extend up fully through your top heel and the balance will come. 


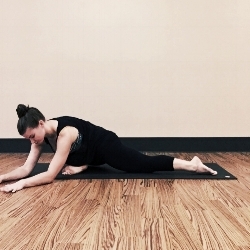
Vasisthasana--Side Plank

Of course the basic level of Side Plank is essential before you grab your big toe and extend your top leg. As pointed out in the video play with either keeping your hand in place or moving your hand a few inches forward when transitioning from High Plank. Engage your legs and abdominals, turn your top shoulder away from the floor, reach up through your top hand, and push down and slightly forward through your bottom hand. If you're still working on your balance in this one simply lower down to your bottom knee. 

Vasisthasana B

If you're ready to add on to your Side Plank start with your solid traditional variation. Actively push through your bottom hand and hug your abdominals in toward your spine. To add the big toe hold lift your hips away from the floor, bend your top knee and draw your heel toward your groin. Reach down with your top hand and grab your big toe. Although it seems like it'll topple you over, the extension of your top leg will help to balance you out. Broaden your chest and maybe even look upward. Revel in your ability to balance on one hand, kick your top leg up, and smile all at the same time. Enjoy! 


Eka Pada Galavasana--Flying Pigeon

For my first posture breakdown I'm going to tackle my least favorite arm balance of all time: Eka Pada Galavasana--Flying Pigeon Pose. Why start with my least favorite? Because it's important to do things you don't always enjoy!

To oversimplify Eka Pada Galavasana, it's equal parts Pigeon and Chaturanga. This posture requires very open hips, active arms, and a rounded spine. Hand balances come pretty easily for me due to my strength, however, my tight hips typically hold me back on this one. Here's a few postures that are essential when preparing for Eka Pada Galavasana.

Modified Eka Pada Rajakapotasana--Crooked Pigeon

Crooked Pigeon

Begin in Half Pigeon Pose but rather than folding forward over the front shin walk your hands about 45 degrees away from the front knee (i.e. if the right shin is forward walk your hands left). Your palms can stay down, but if available release your forearms down. Let this be an active posture. Press your palms or forearms into the floor, round through your spine, and press your hips in the opposite direction of your arms (i.e. if right shin is forward press your hips back and right). The movement of the hips back and to the side will intensify the stretch in your outer hip. Stay here for at least ten breaths. 

                                                                                                                                                   Eka Pada Utkatasana--Figure Four with Hand Press

Start in Utkatasana and cross one ankle over the opposite thigh to set up Figure Four. Once in the posture sink your hips down and back and actively push through your standing heel. Begin to hinge forward a bit to intensify the hip stretch. To get even deeper press your hand into the lifted foot (i.e. press your left hand into your right foot). Let the pressure be equal parts foot into hand and hand into foot. To help stabilize yourself it can be helpful to place one hand on the floor if accessible or on a block as pictured. Hold for ten breaths. 


Gomukhasana--Cow Face Pose

From a seated position cross your legs at your knees, draw your feet just to the outside of your hips, and connect your sitting bones onto your mat. This posture is not always the most accessible for all students so it can be helpful to sit on the front edge of a yoga block to get the knees closer. The posture can be done upright or you can hinge forward from your hips. Press both sitting bones equally into your mat or block. To take it one step further, if you're hinged forward, actively press your palms into the floor and dome your spine as you push back. Indulge and hold for a few minutes. 

                                                                                                                                                     Modified Ardha Pawanmuktasana--Half Wind Relieving Pose

This variation helps to stretch and lengthen the hip flexors and psoas while engaging the glutes and hamstrings of the extended leg. Place a block under your sacrum at its lowest height. Extend your left leg long on your mat and pull your right knee toward your right armpit. There's a good chance the extended leg will lift off your mat, but push through your heel and try to get your heel to your mat. Keep the leg active. You want the same length and engagement with the extension of the back leg in Eka Pada Galavasana. Hold for a few breaths on each side. 


Chaturanga--High to Low Plank

Since Eka Pada Galavasana is one part Pigeon and one part Chaturanga, it's important to work Chaturanga into the prep process. When working this pose focus specifically on the heads of your shoulders in relationship to your elbows. Depth isn't the goal here. Keep the heads of your shoulders slightly higher than the tips of your elbows. As you lower down draw your navel toward your spine and energize your heels back to engage the muscles in your legs. To alleviate pressure in the shoulders or wrists simply lower to your knees.

Time to Fly!

Two blocks can be extremely helpful when trying Eka Pada Galavasana, especially if you're a fellow member of the Short Arm Club or if you have tight hips. But heads up that the blocks bring you farther away from the ground and that can amp up the fear factor. 

  • From Figure Four hinge forward until you can place your hands on your mat or on your blocks.

  • Once you have a solid foundation bend your elbows straight back a la Chaturanga.

  • It seems like a minor detail, but hook your lifted toes around the outside of your opposite tricep (i.e. hook right toes around your left tricep).

  • With your shin resting on your arm, begin to tip weight forward into your hands.

  • Keep your gaze in front of you.

  • Round through your upper spine.

  • If you feel stable there try to pick up your back foot and pull your heel up to your hips.

  • When you're ready to take it further extend your back leg up and back. This final part is typically the trickiest.

  • Hug your abdominals toward your spine, continue to gaze forward, and do your best to keep equal pressure in both hands.

  • Do all of those things and remember to breathe! There's a lot going on in this posture, but help yourself out and continue to breathe.

Remember, your practice and you are more than just your ability or inability to move into a specific shape. Be patient with yourself and enjoy the journey of your practice. Never take yourself too serious and remember to laugh a little. A stumble or fall will probably bruise your ego more than your body. Also, face plants are an essential part of the practice. Enjoy it!! 

Looking for a more in-depth breakdown of Flying Pigeon? Perhaps a full practice that will prepare you for the hand balance?

Check out Level 2/3: Flying Pigeon Flow on Erin Jorich Yoga On Demand. Monthly subscribers will have access to unlimited content. You can also rent individual videos for up to 24 hours.