Slow Down Before Sleep

There’s a number of things I’m pretty good at and sleeping is not one of them.

As I’ve gotten older, I’ve noticed it has become harder for me to turn off my brain and stay asleep.

How about you? Do you have any pre-bedtime rituals that help you turn off your brain and drift off to dreamland? Have you thought about integrating a short yoga sequence into your pre-bedtime routine?

Consider trying on these shapes and see how it feels!

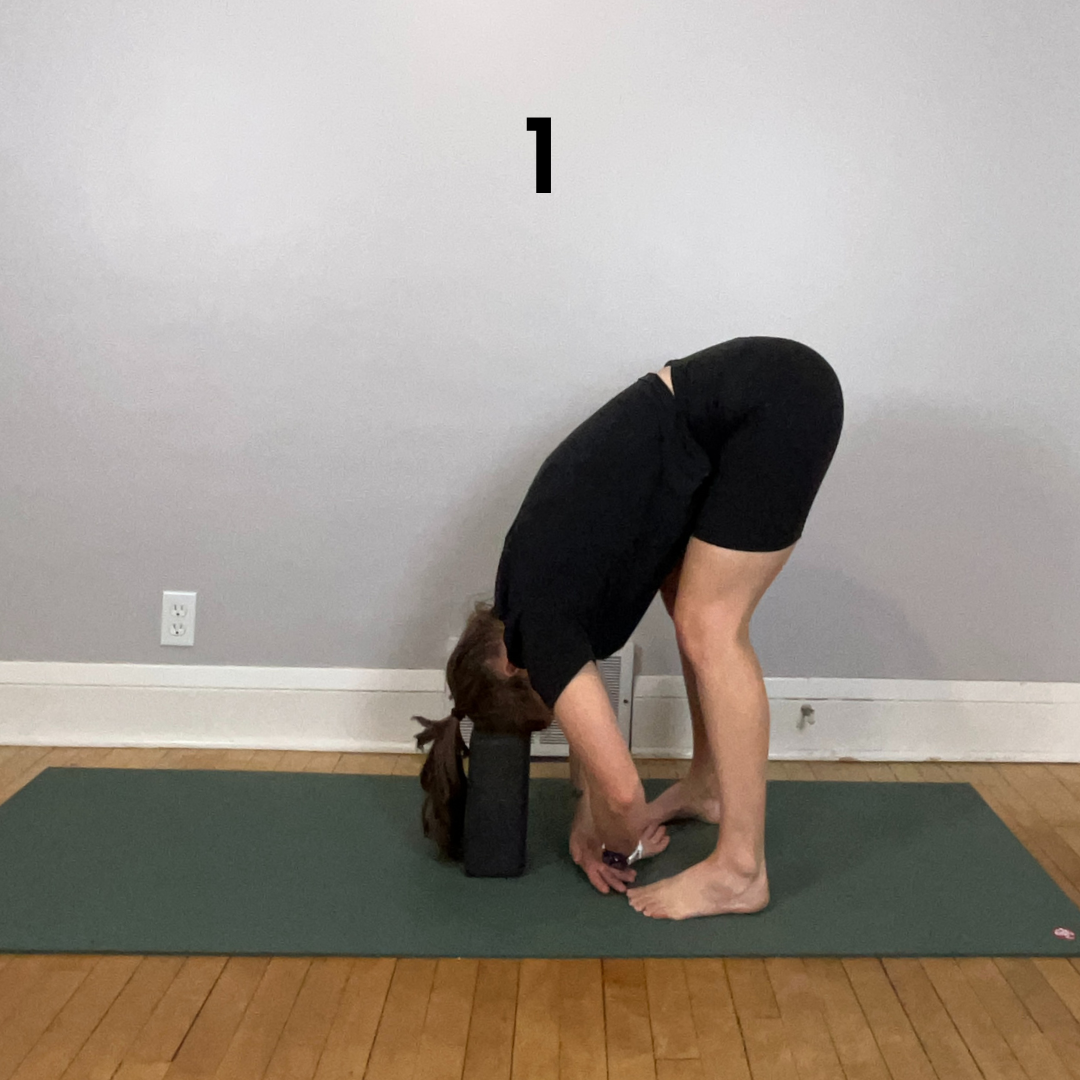
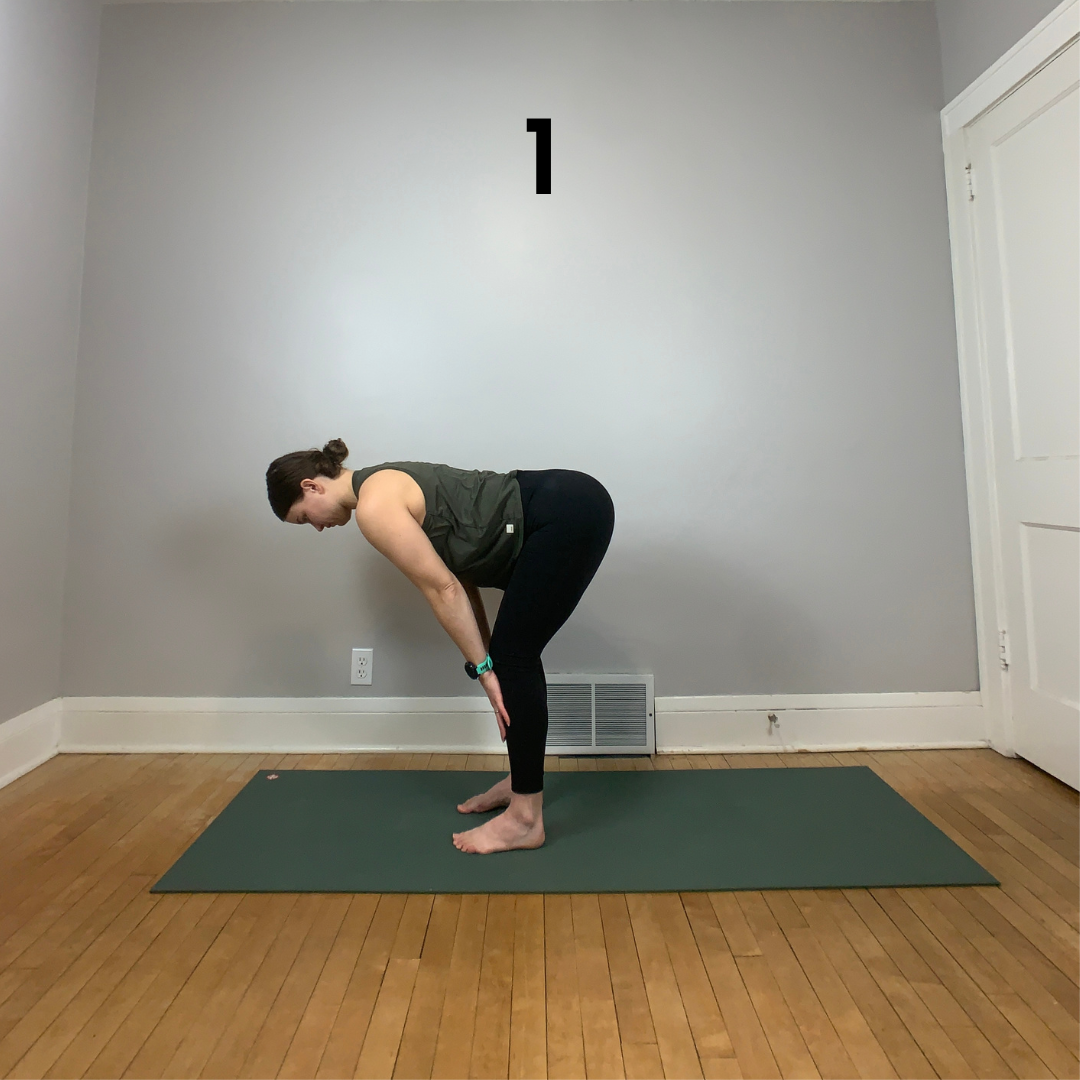
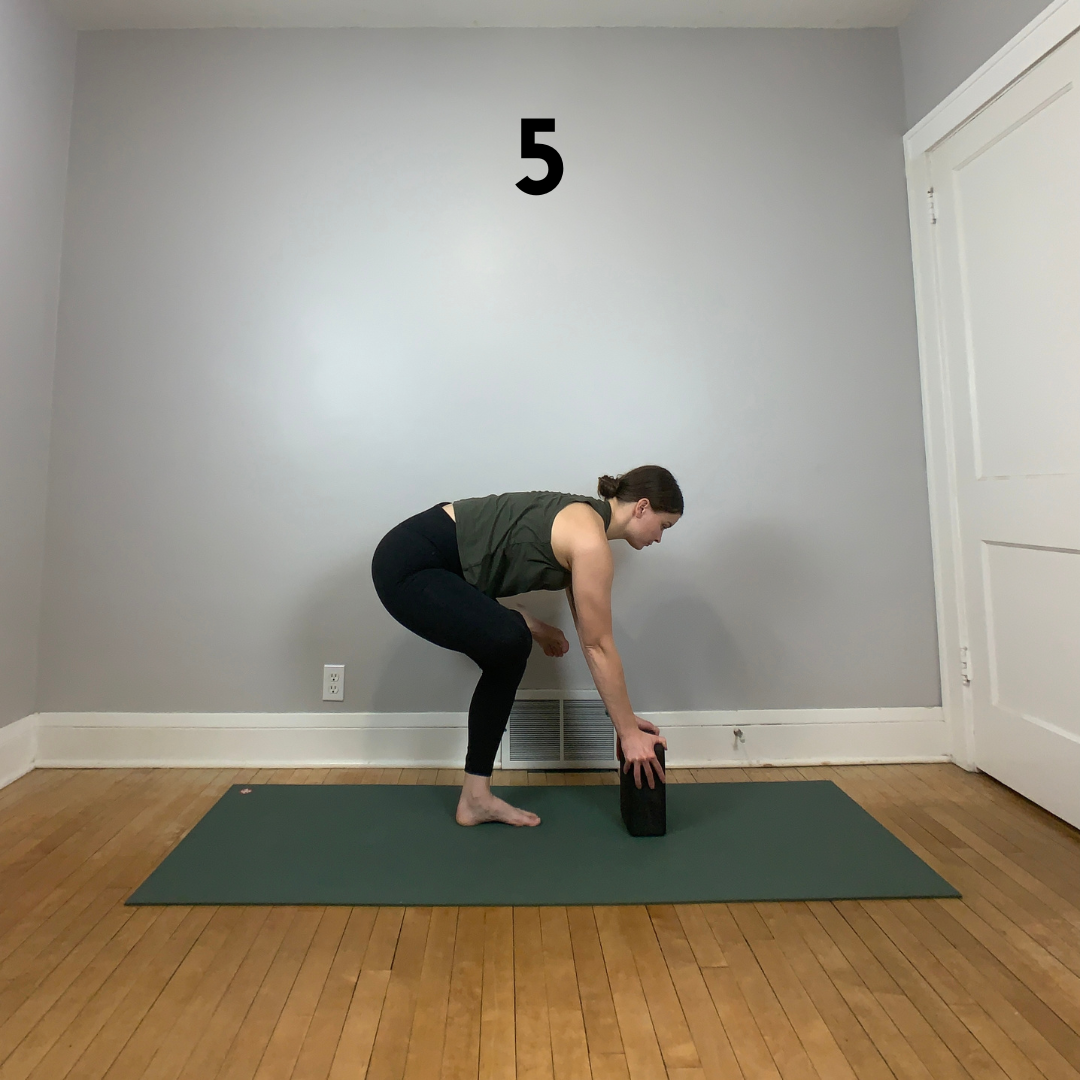
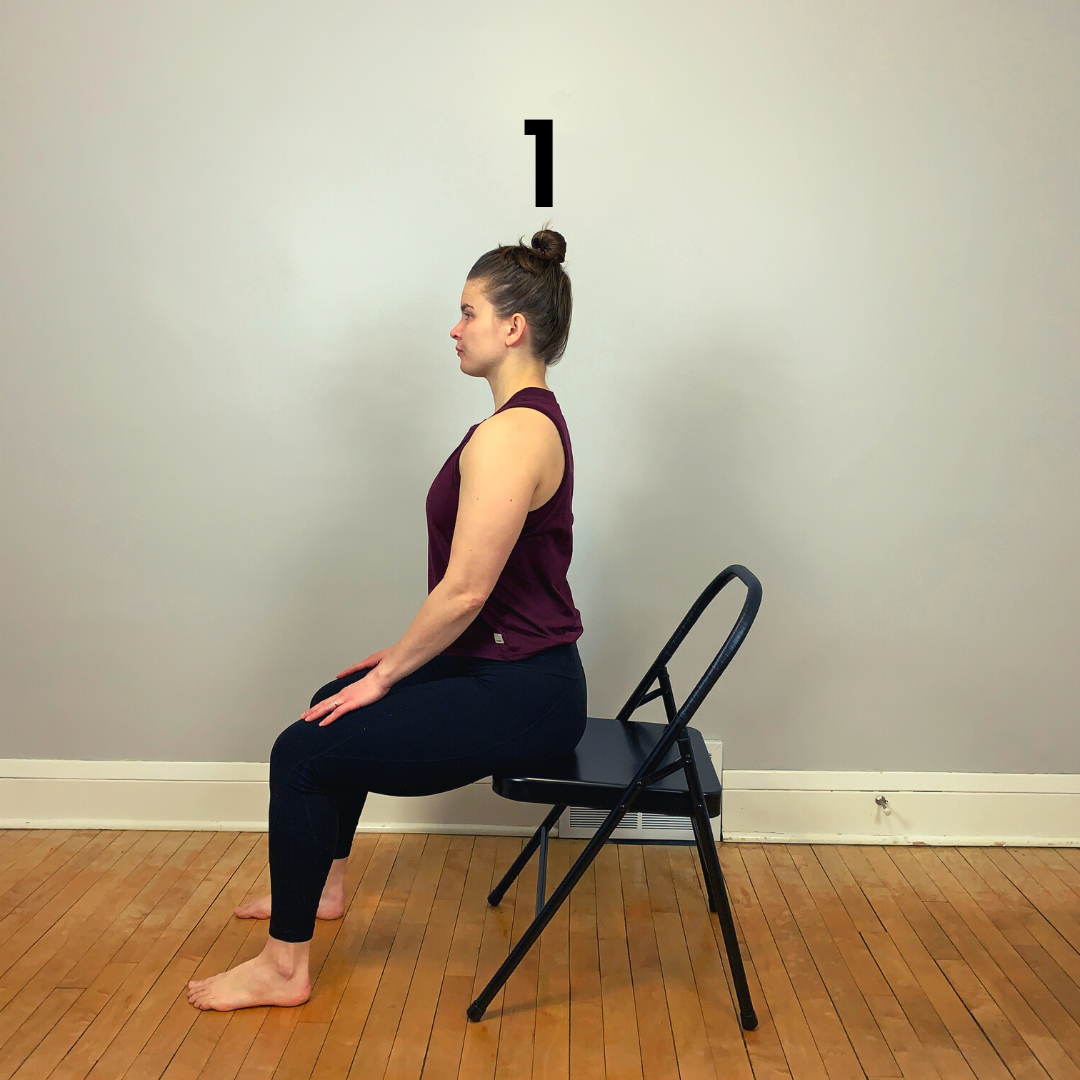
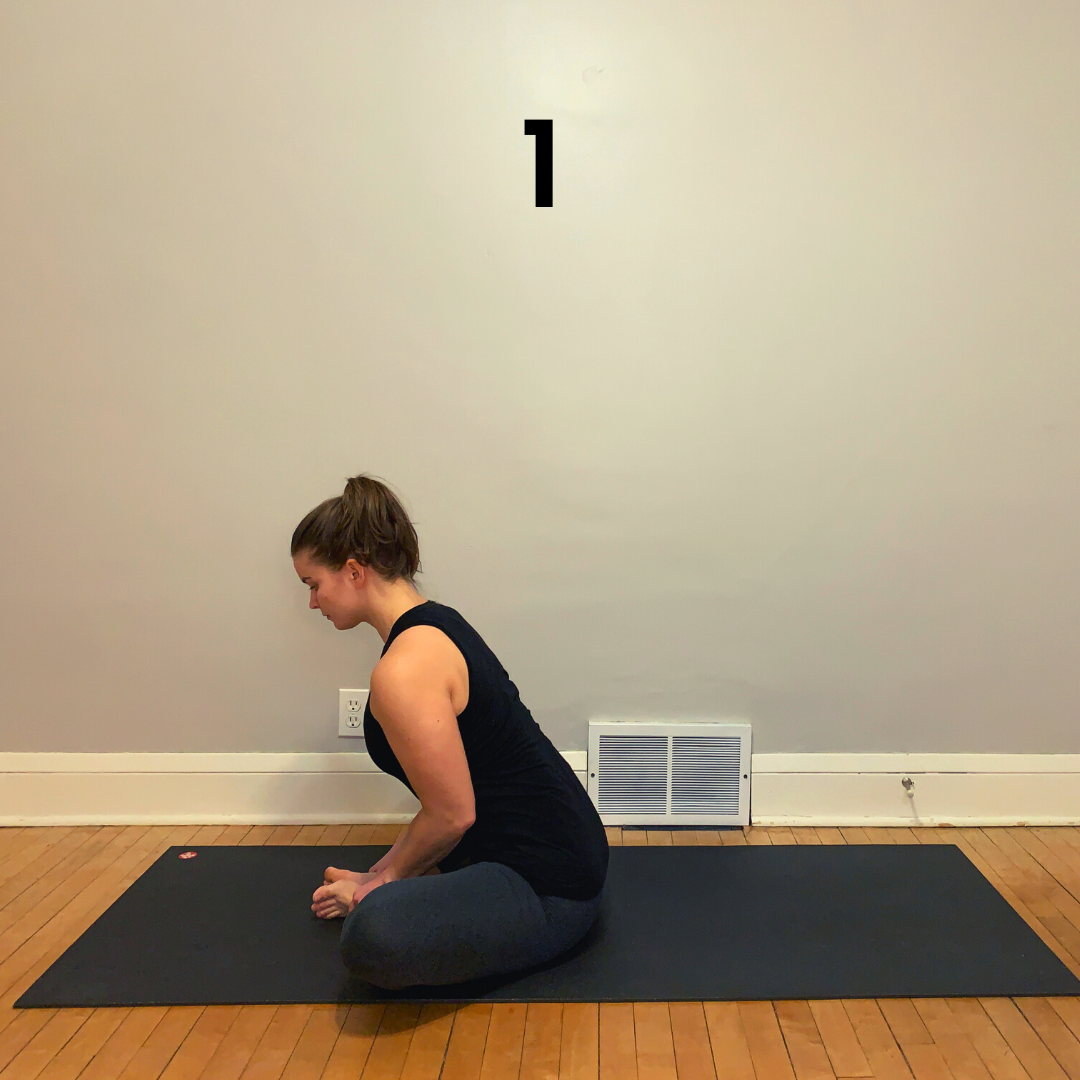
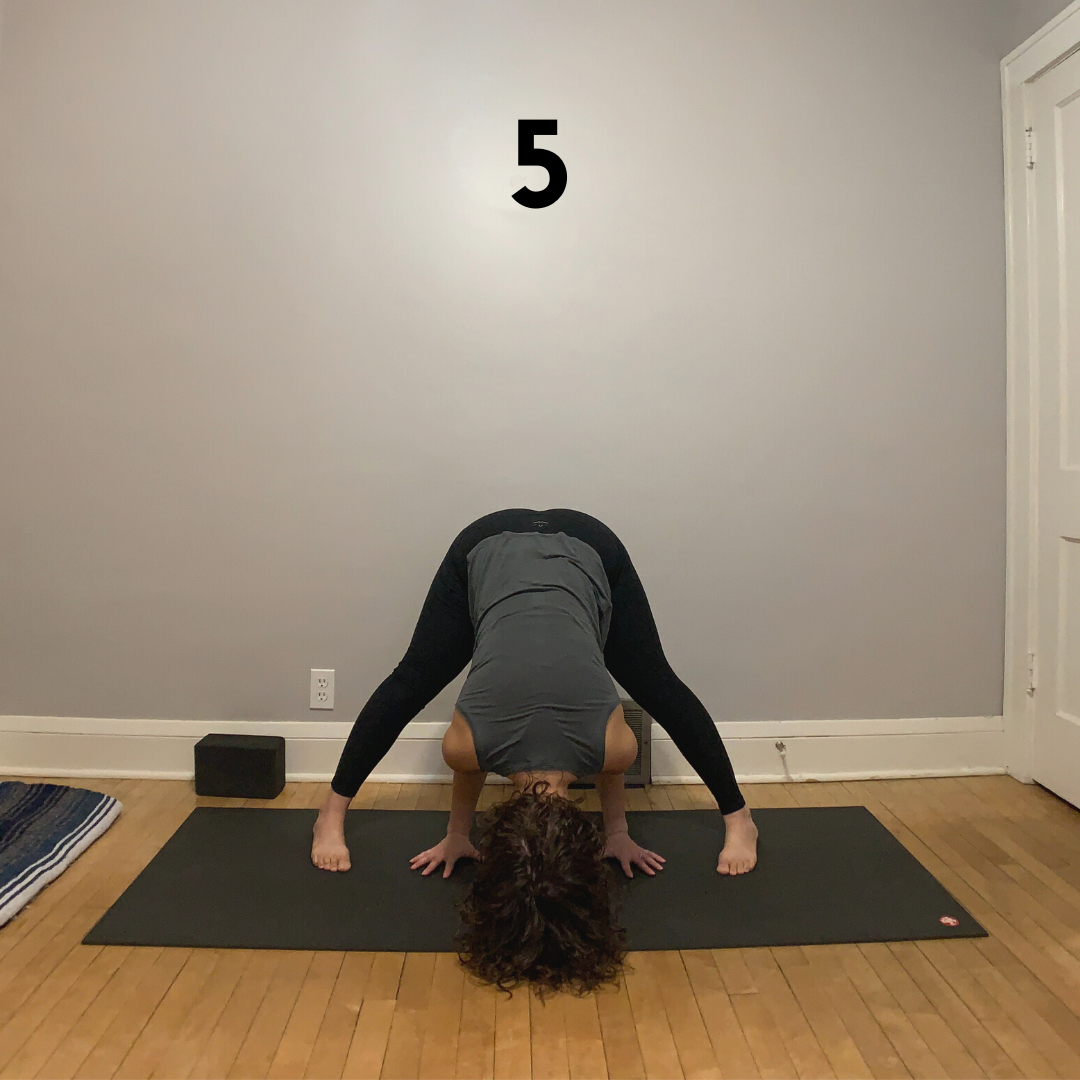
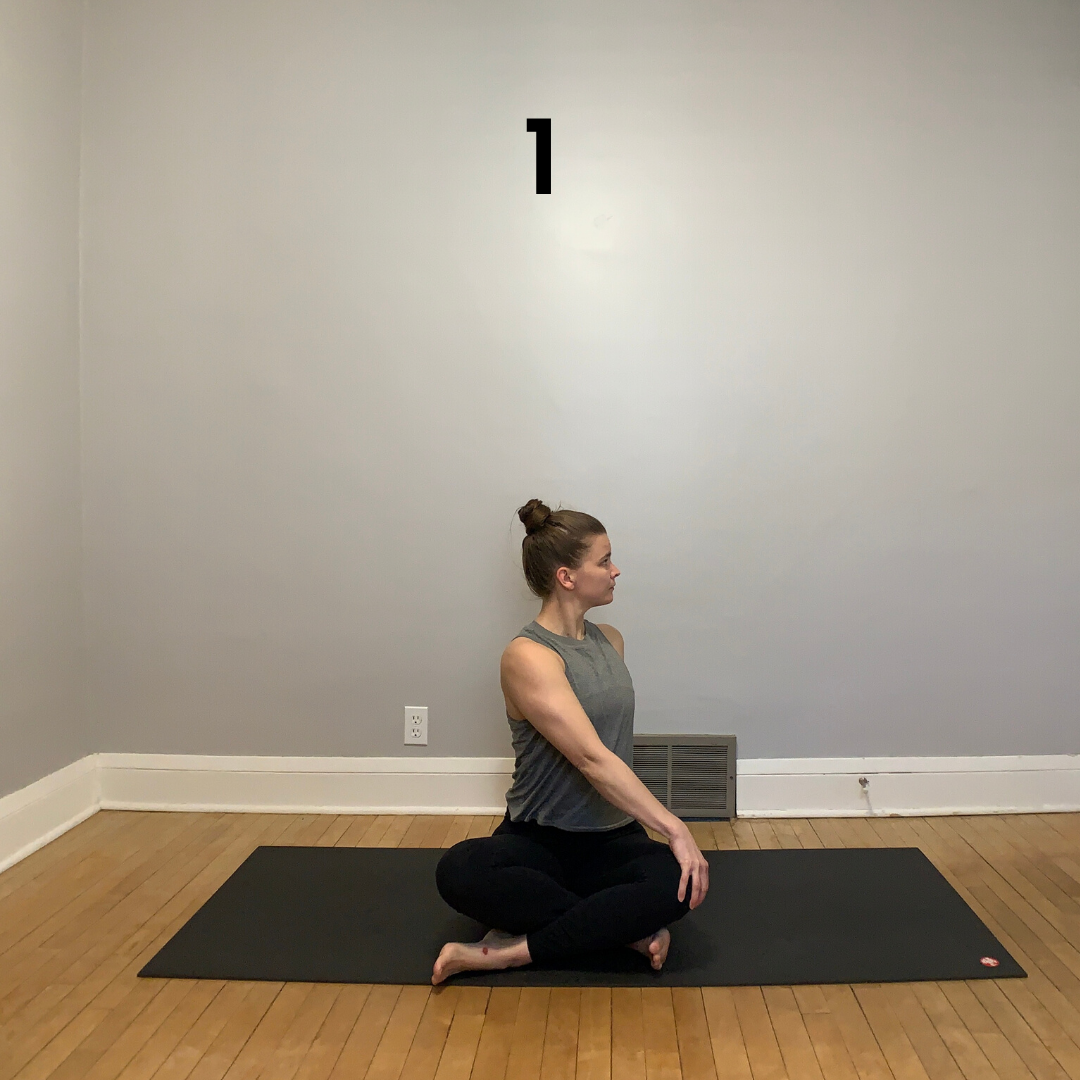
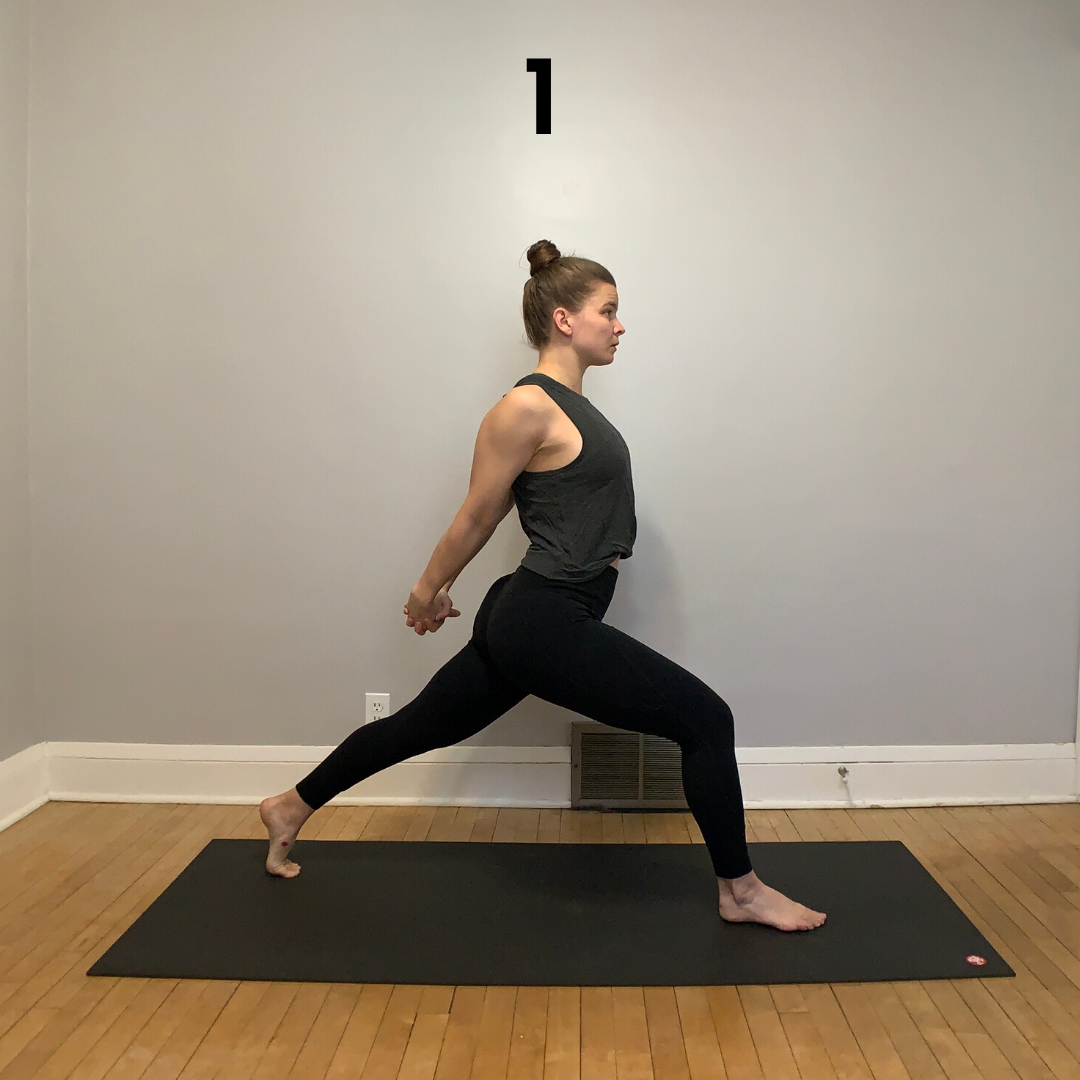
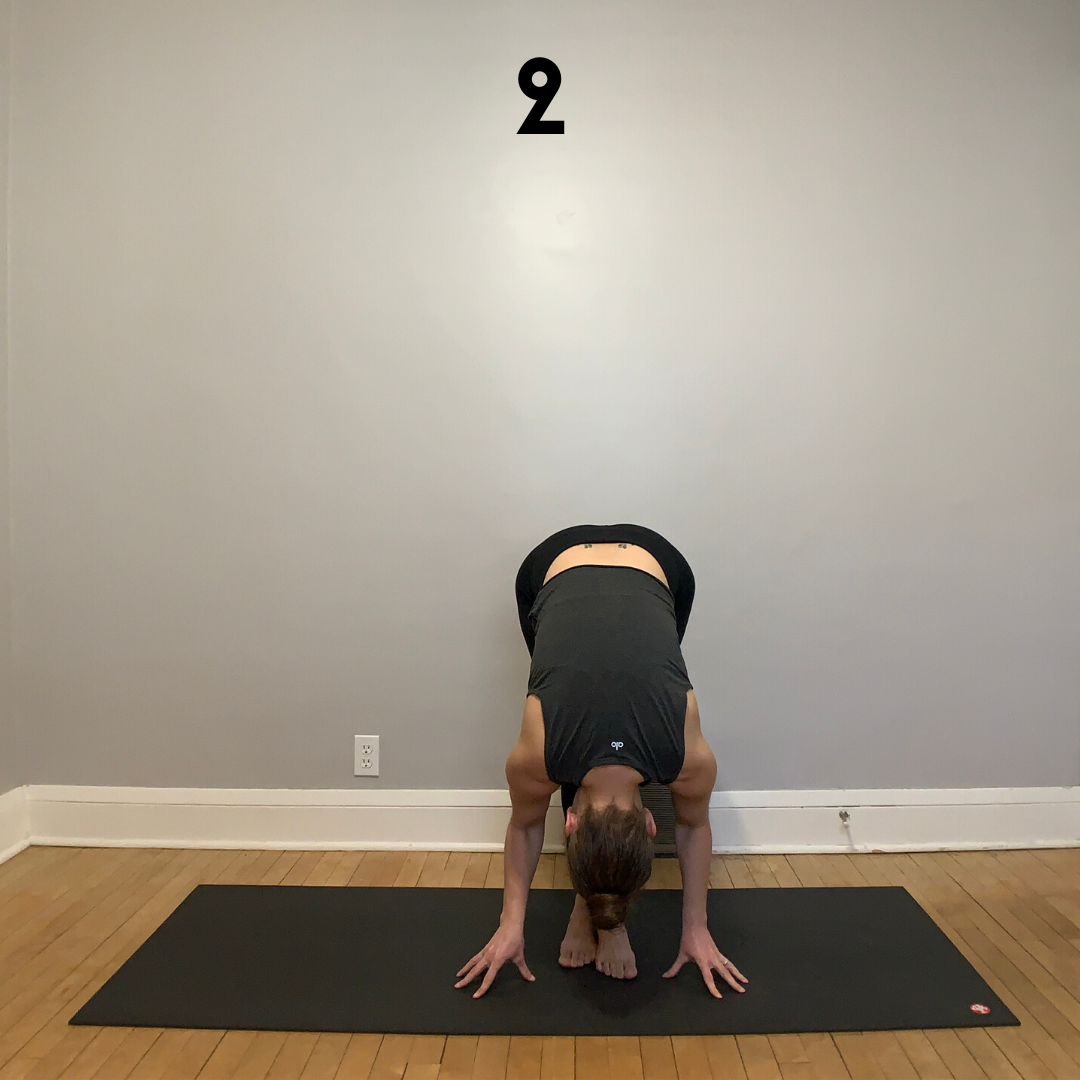
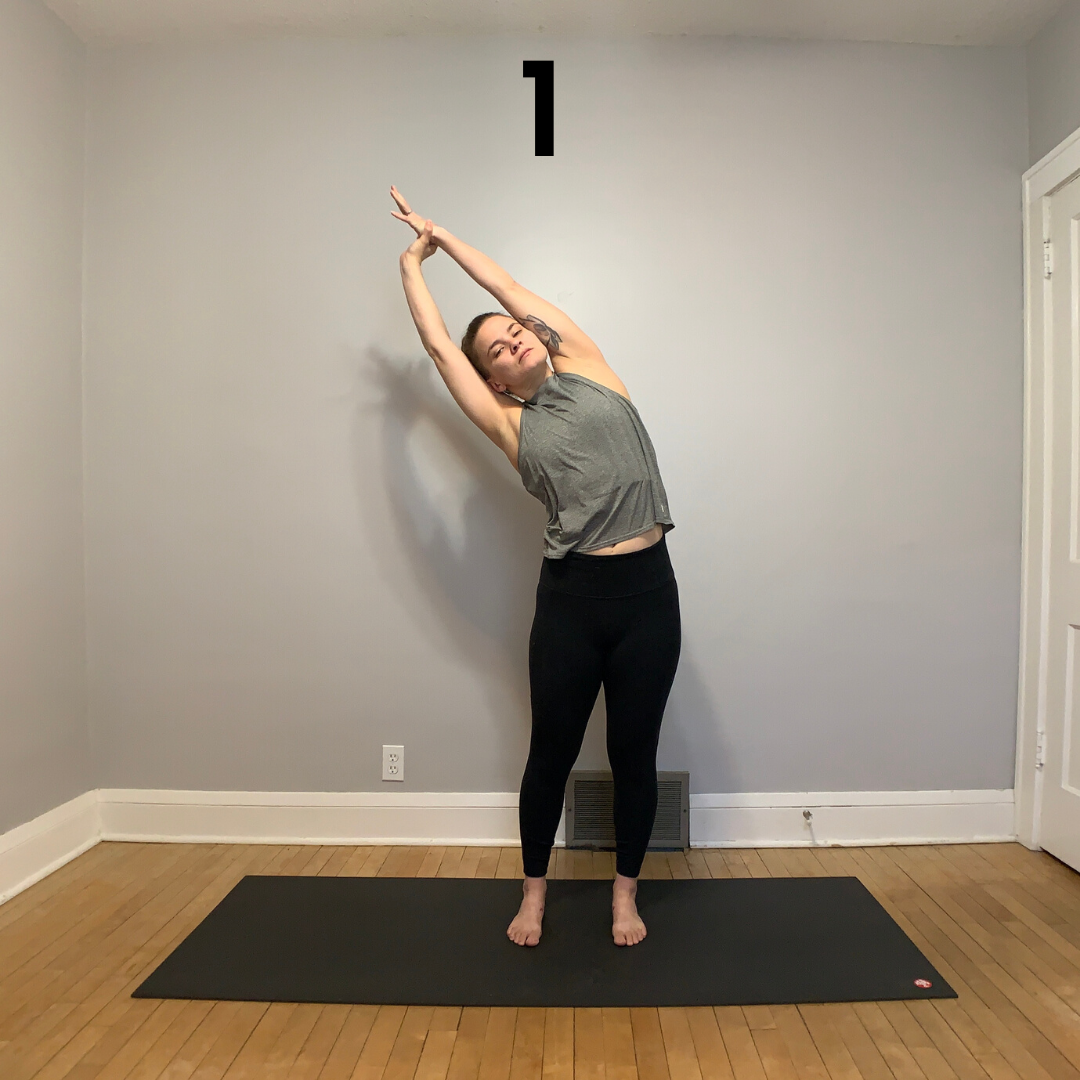
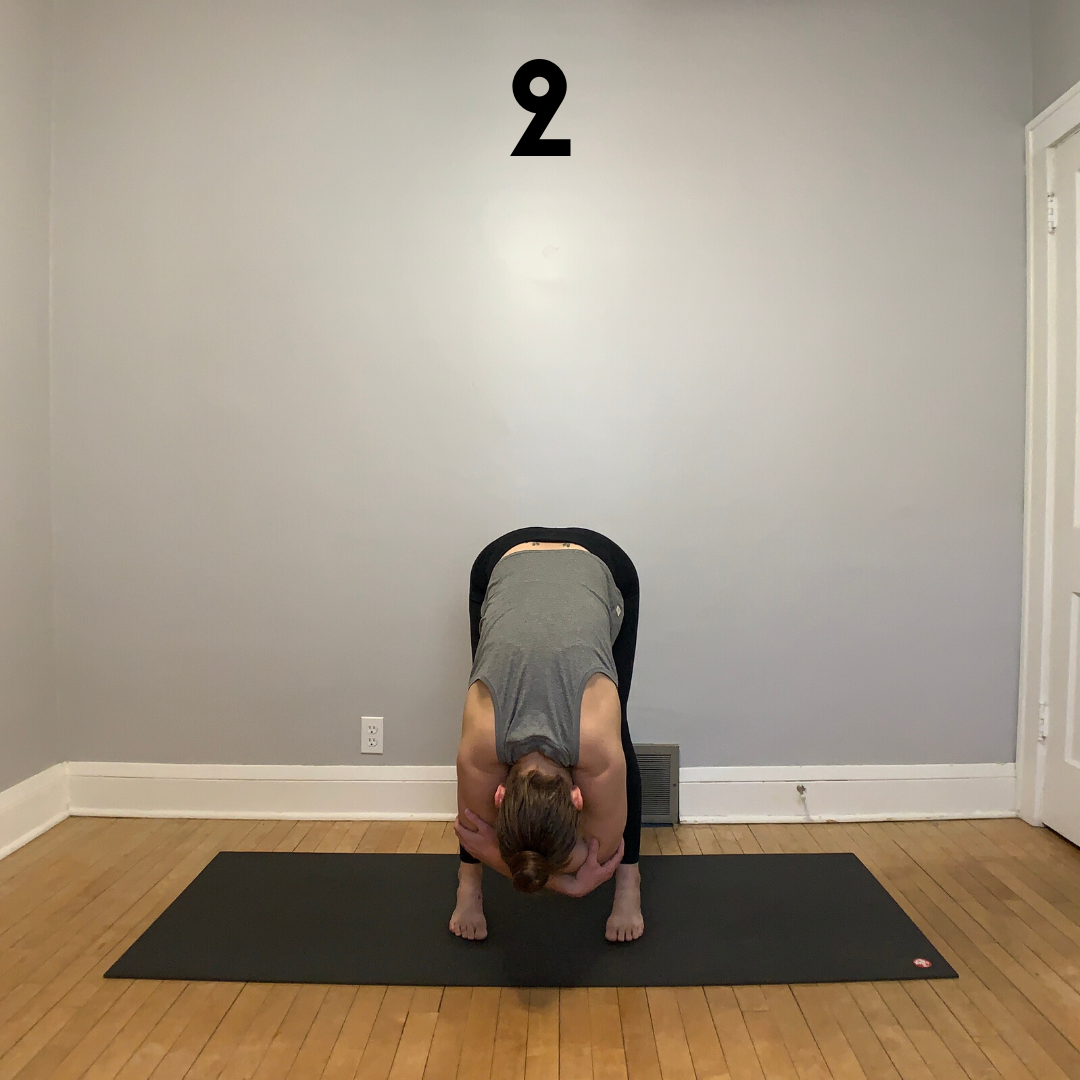
1 - Supported Standing Forward Fold
Sometimes referred to as Dangle Pose in Yin Yoga practices, this shape gives your spine an opportunity to lengthen and decompress without much effort.

Stand with your feet hip-width apart or wider. Hinge forward from your hips and let your knees bend as much as they want. To add support to the shape, place a block (or stacked blocks) under the crown of your head. Be sure your block is at a height that doesn’t create stress or stiffness in your neck.

Let your arms and hands simply dangle. If your hands don’t easily touch the floor, consider resting them on blocks to bring the floor higher.

Stay in the shape for 10 slow breaths.

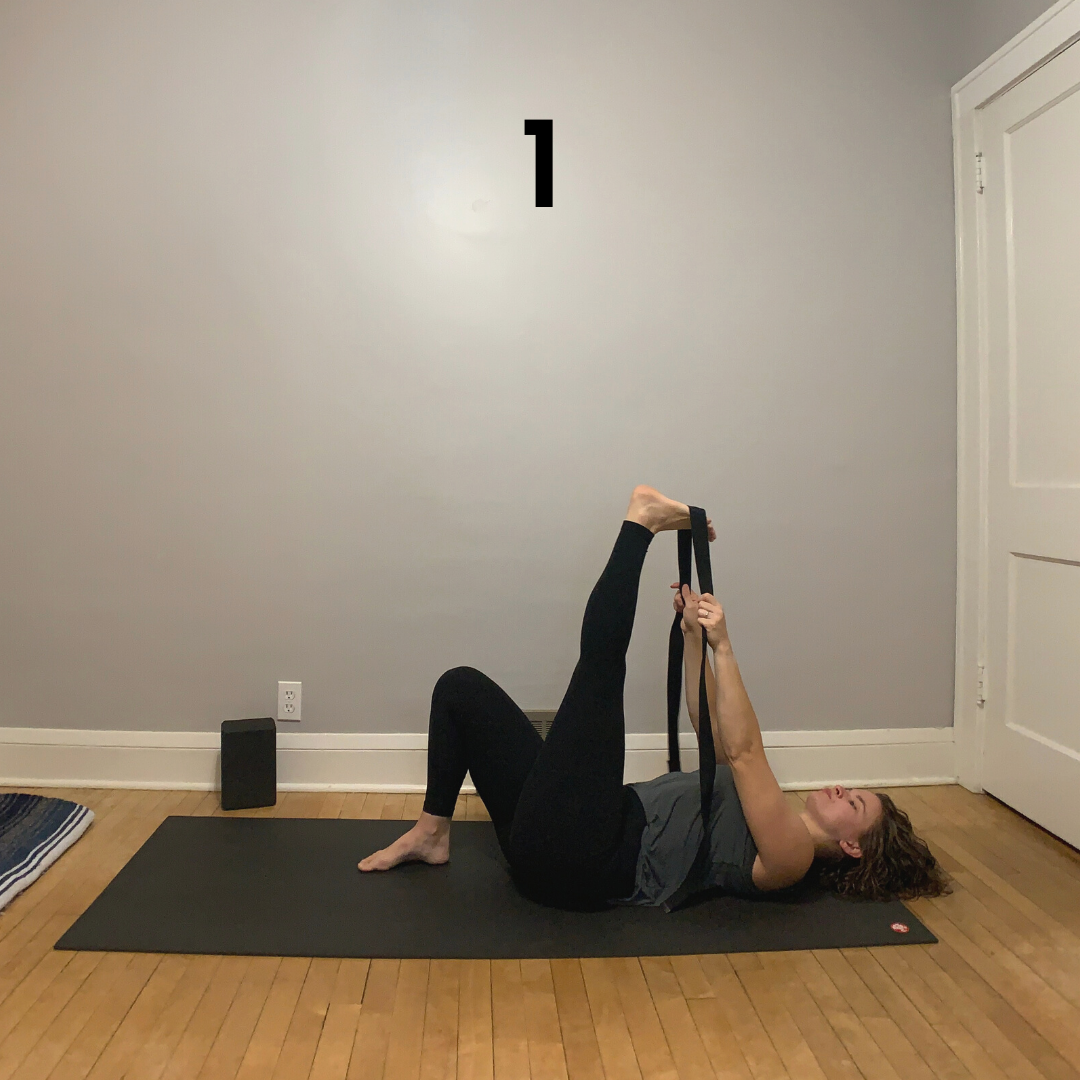
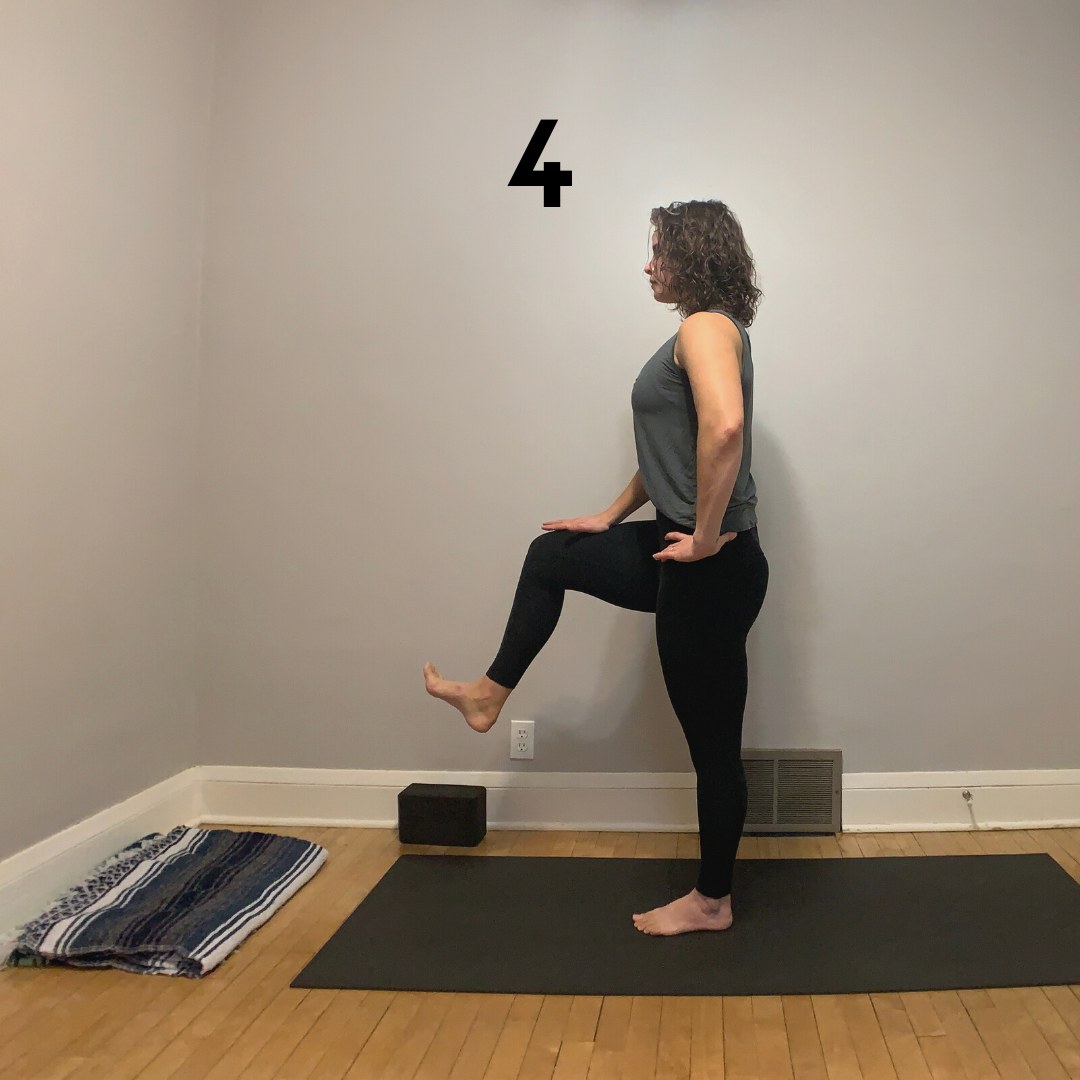
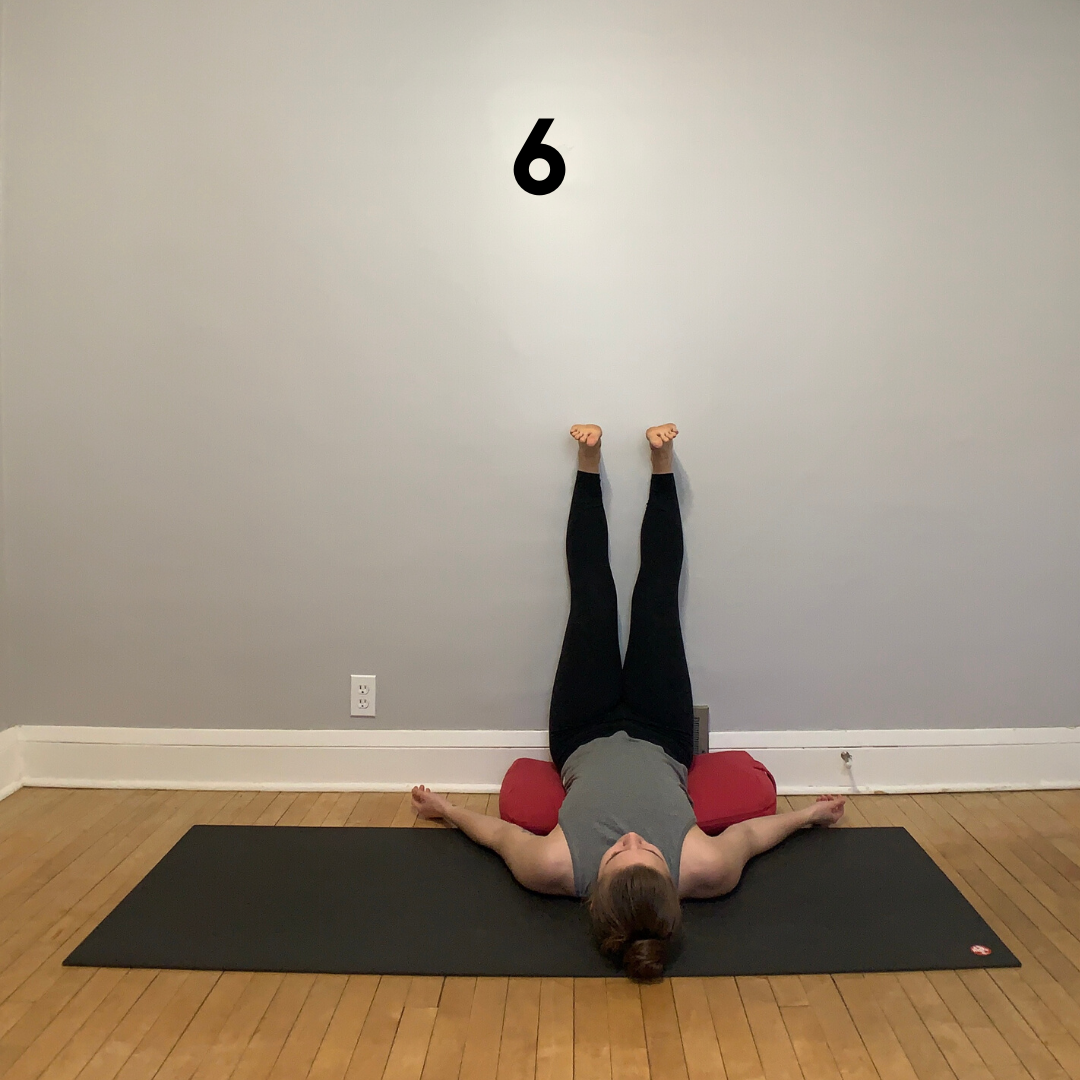
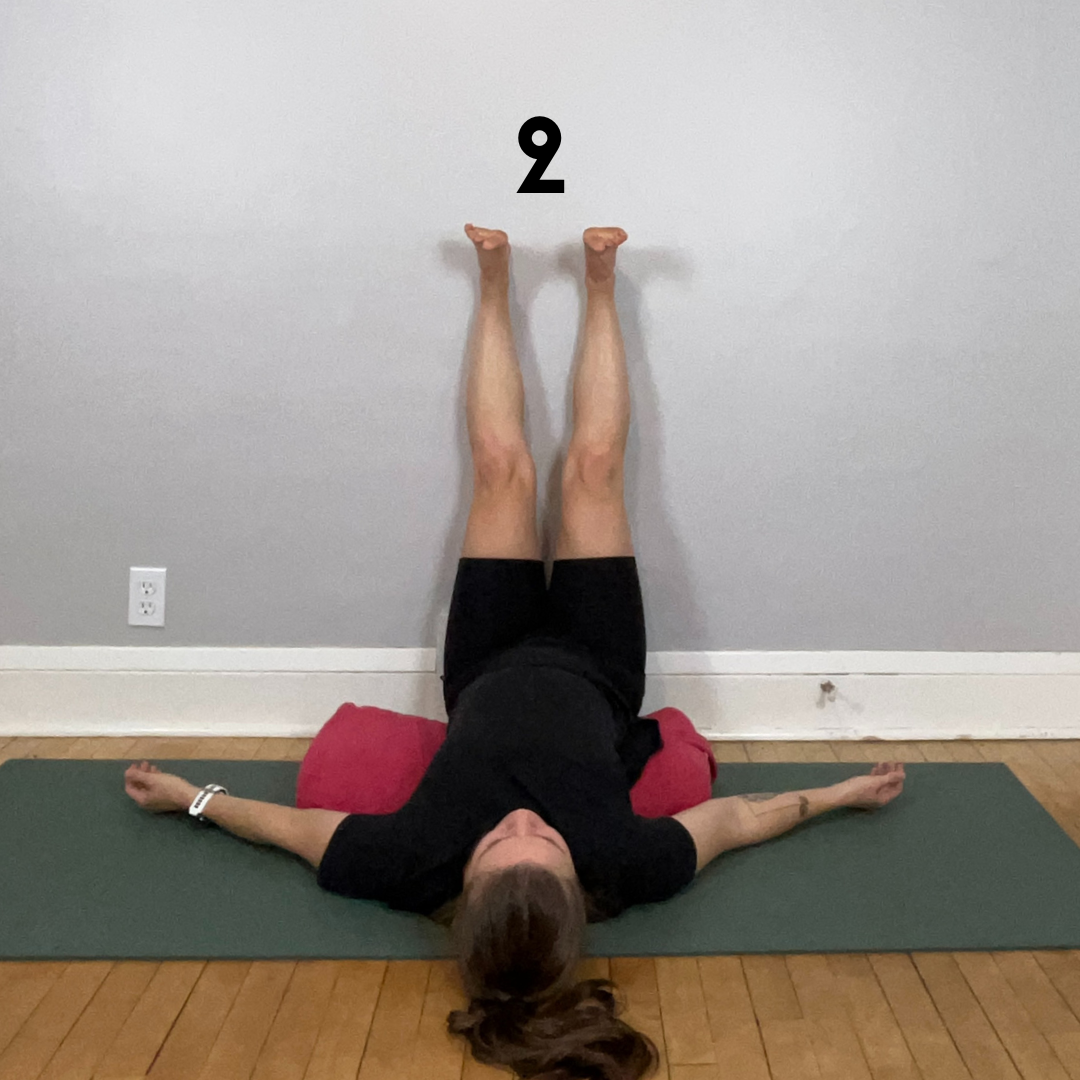
2 - Legs Up the Wall

You’ll need access to a wall or the back of a door for this one.

Scoot your tail close to the wall (your tail might actually touch if that feels right for you) and lift your legs straight up the wall. I prefer to place something under my sacrum like a bolster or folded blanket, and this can be done with your pelvis flat on the floor.

It can helpful to find that sweet spot where your legs are positioned directly over your hip sockets. Let your feet, ankles, and legs just relax and enjoy!

Hang out for as long as you’d like! You can also play with bending your knees outward and connecting the soles of your feet to position your legs in a butterfly-like position.
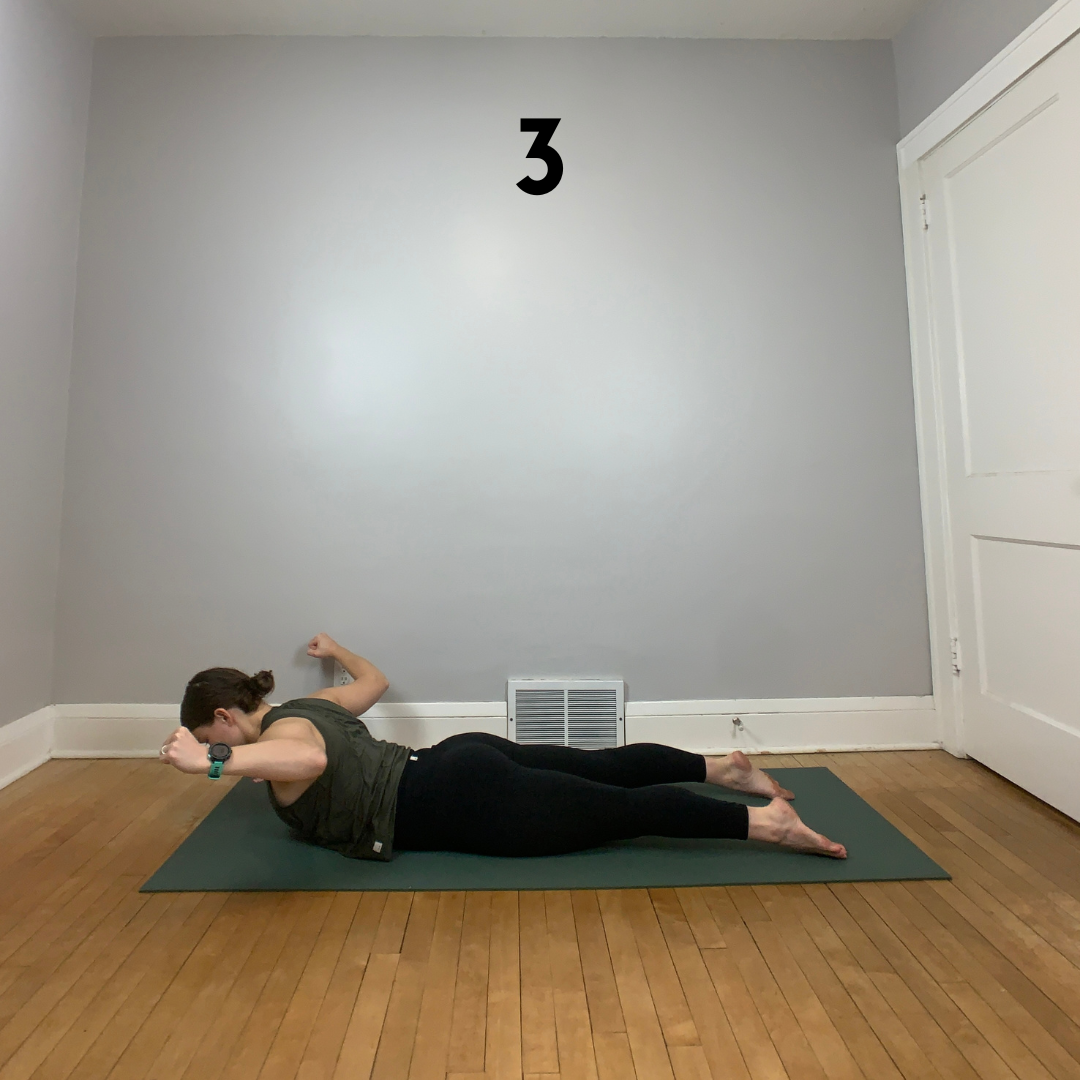
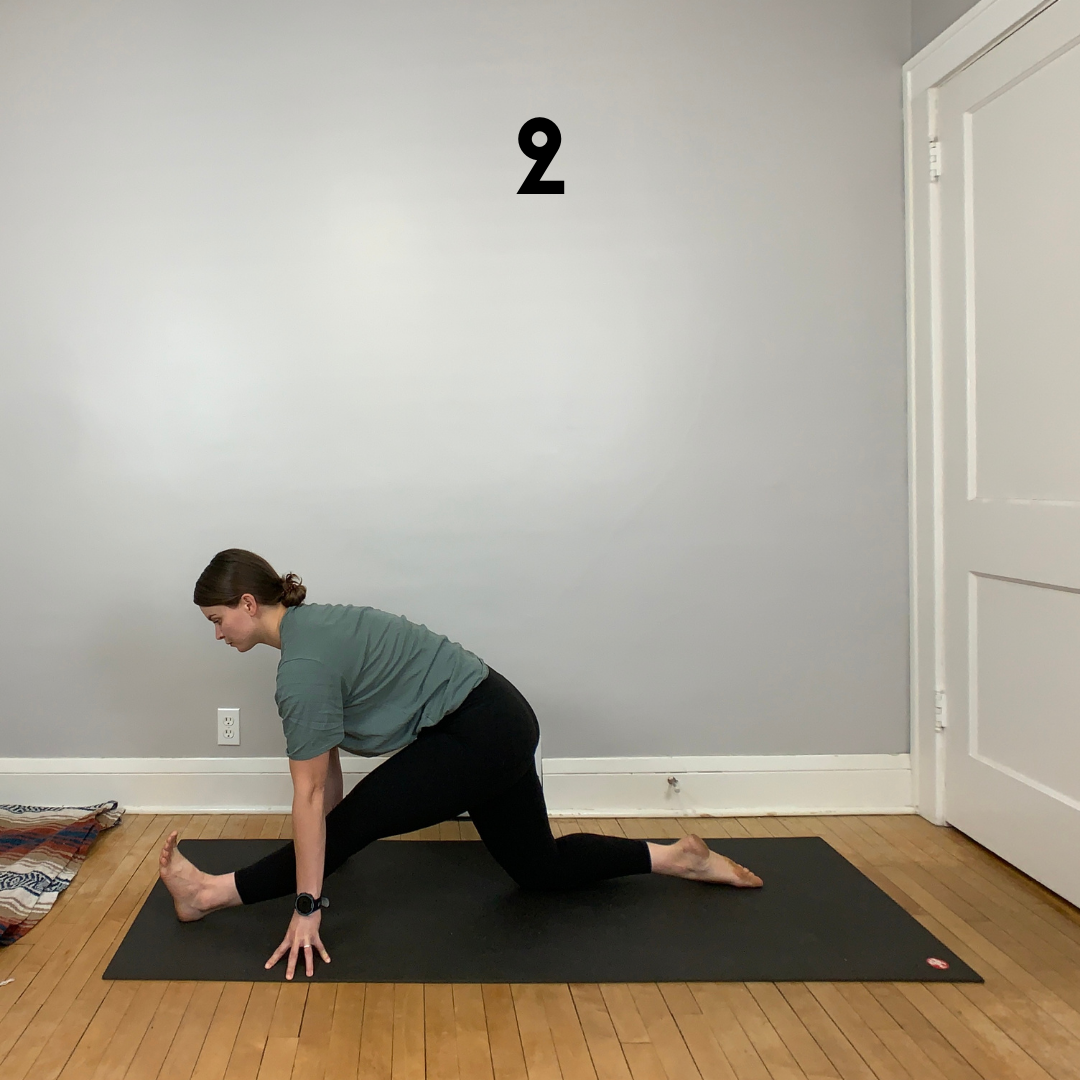
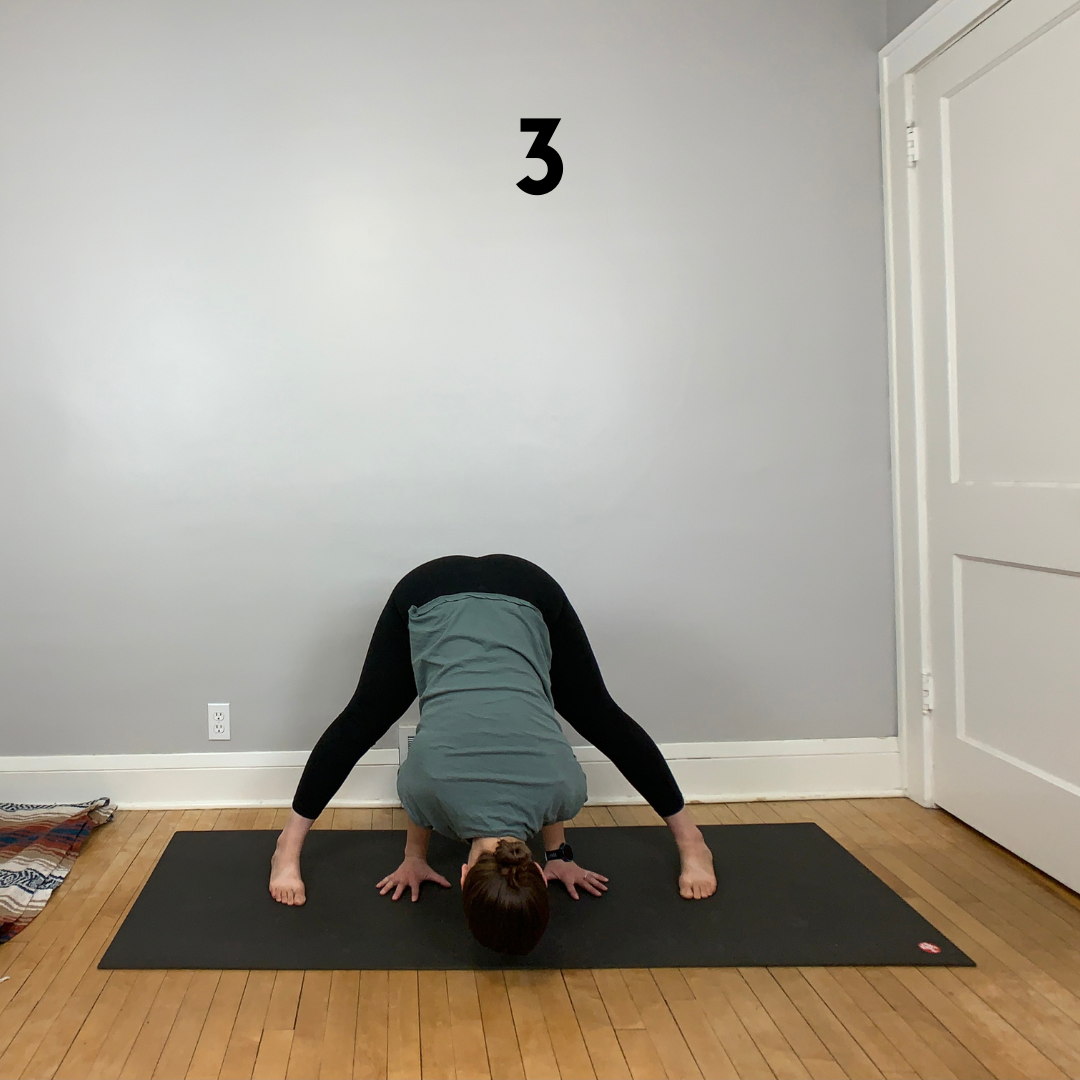
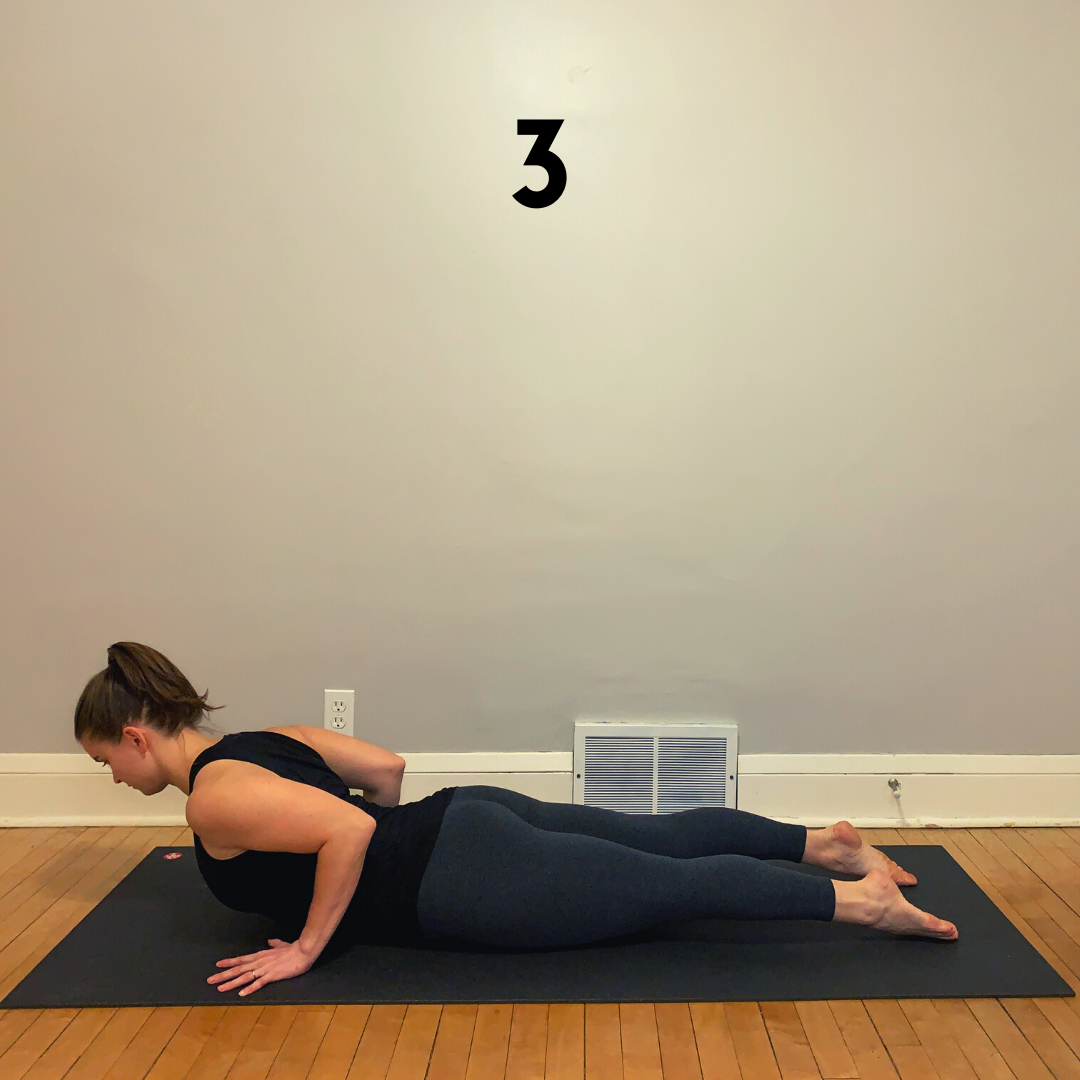
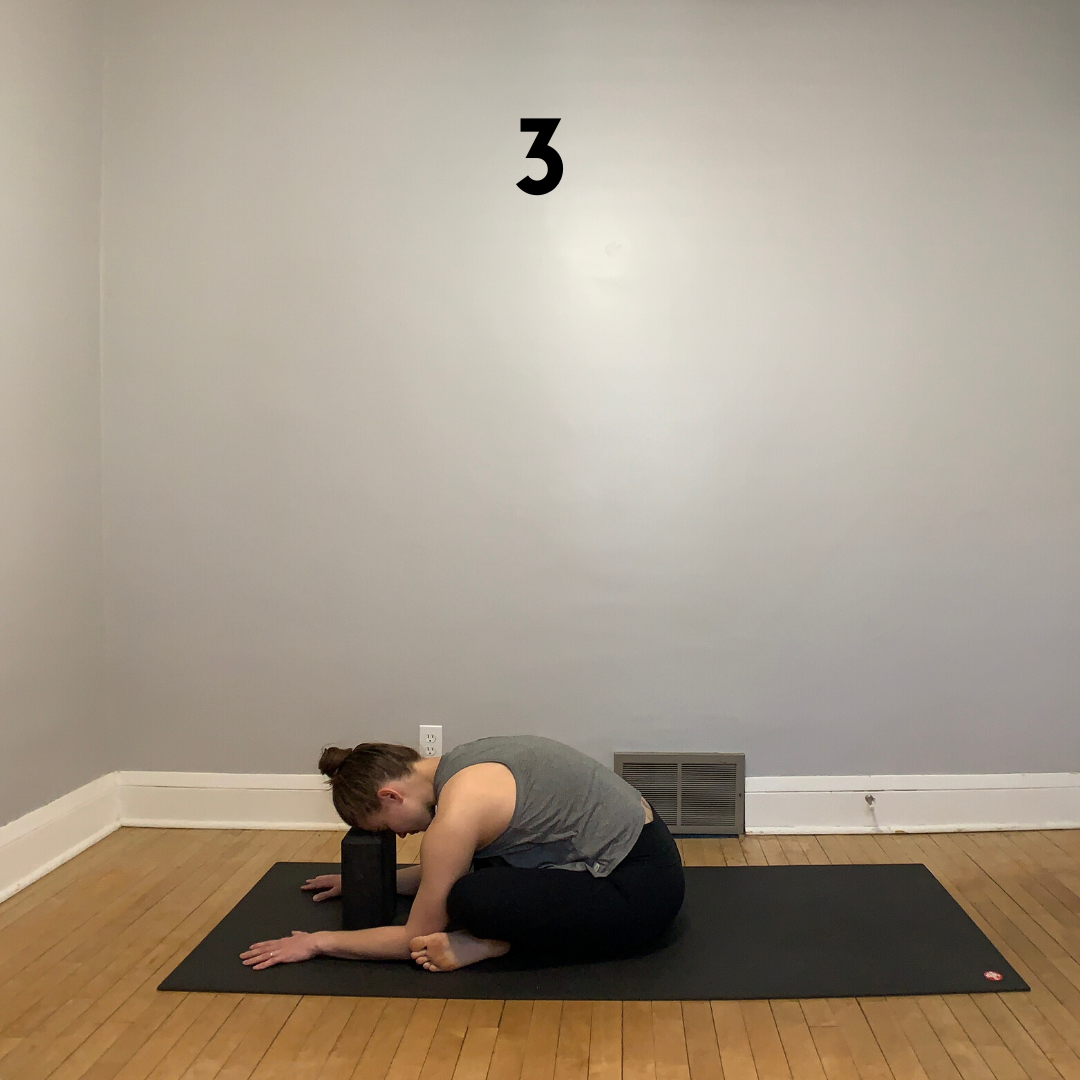
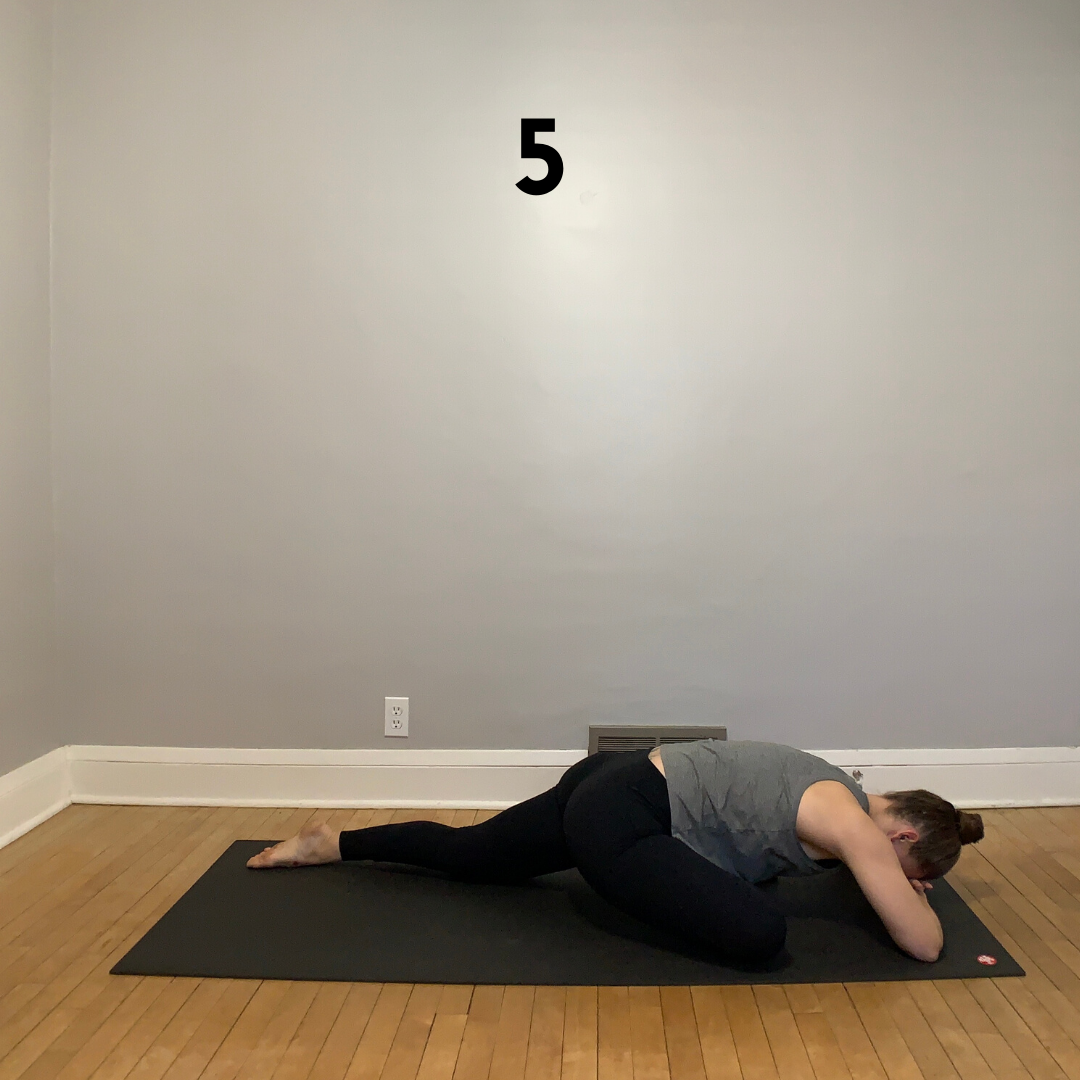
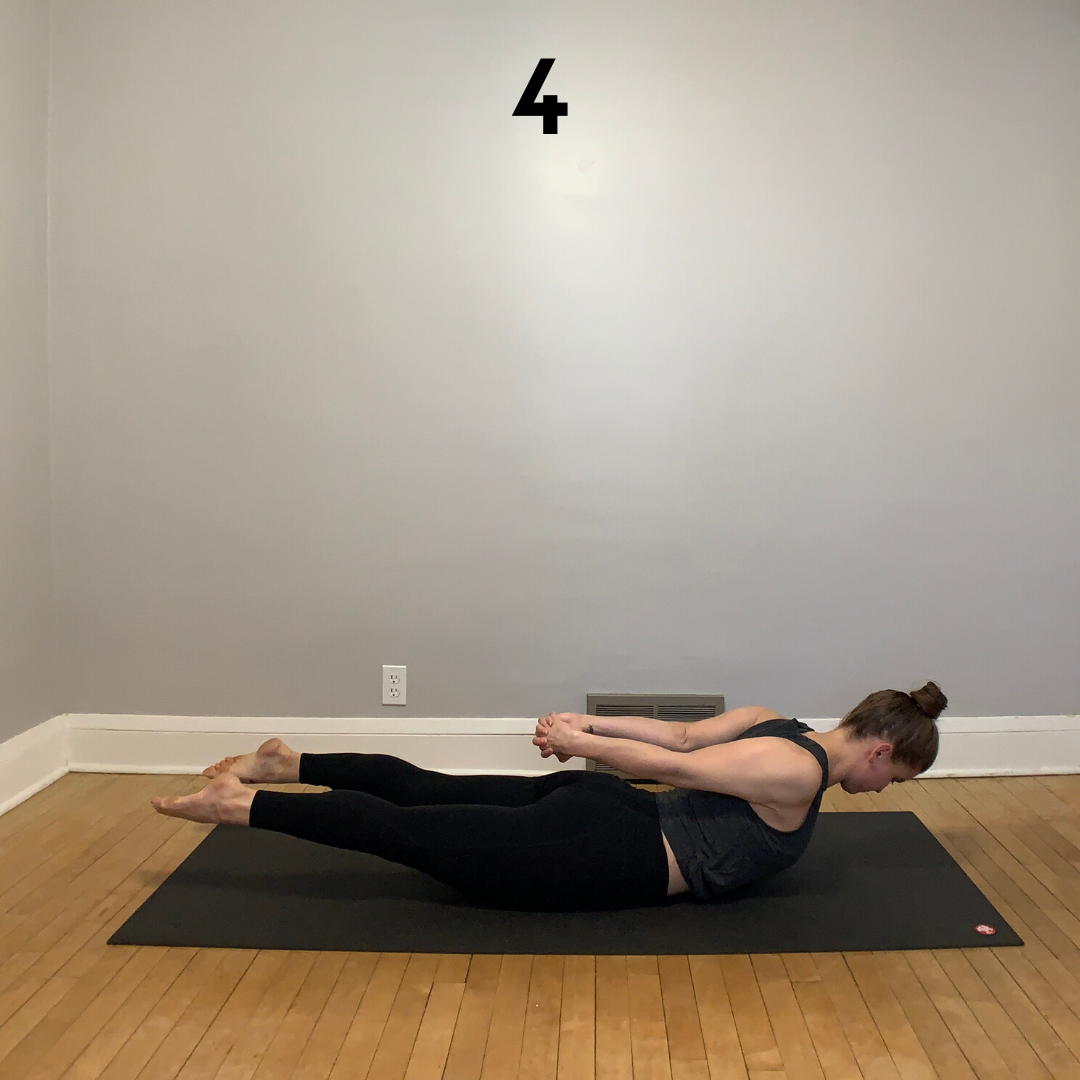
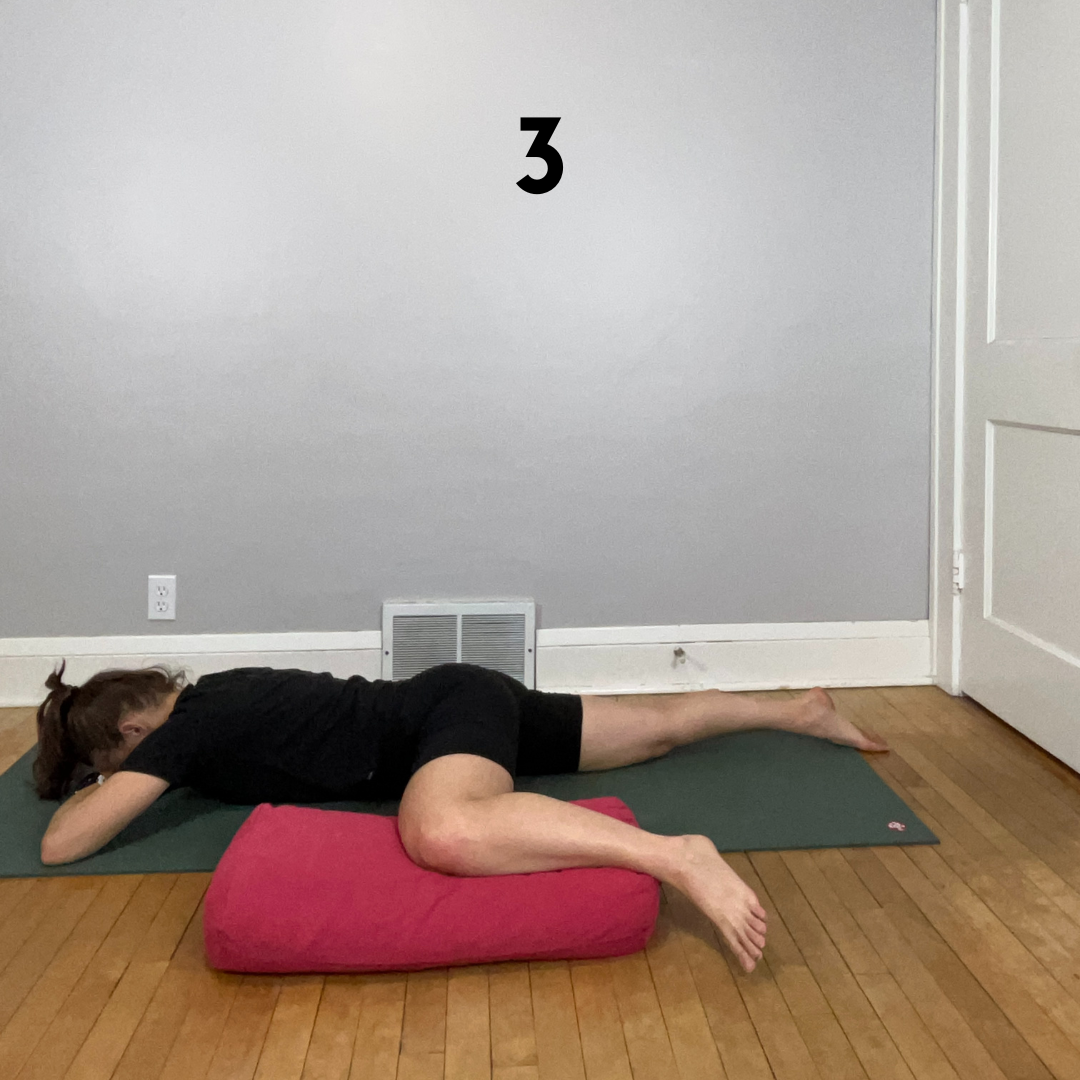
3 - Half Prone Frog

Lay on your belly and stack your forearms in front of you to support your forehead. Bend one knee to about 90 degrees and move your leg to the side. The angle of your knee and the height of your thigh is totally based on your comfort level.

Speaking of comfort - I prefer to put a bolster or blanket under the bent knee to create some cushion under the knee joint. Elevating the knee, however, can increase the stretch you might feel in your inner hip and thigh.

Settle into each side for a couple minutes.
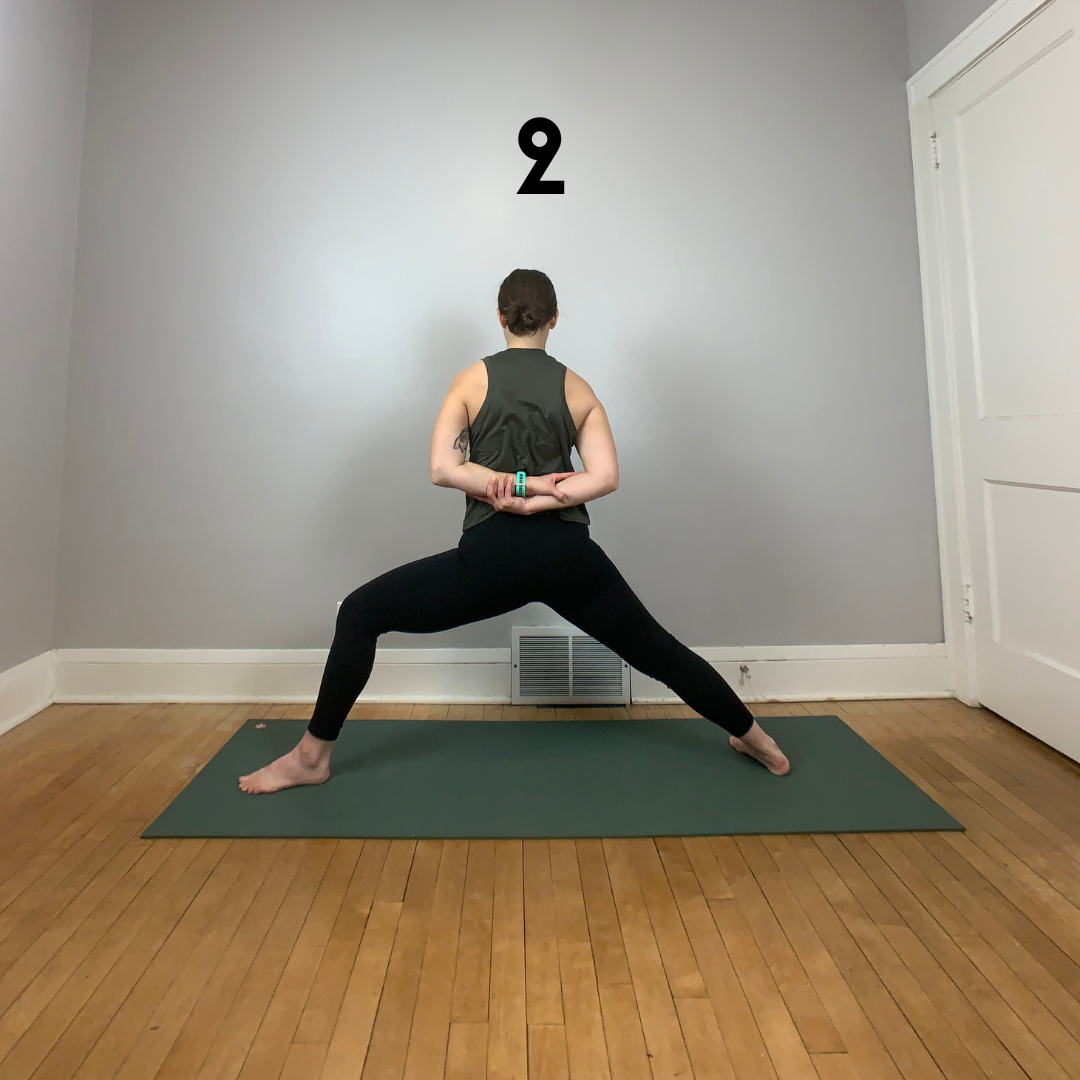
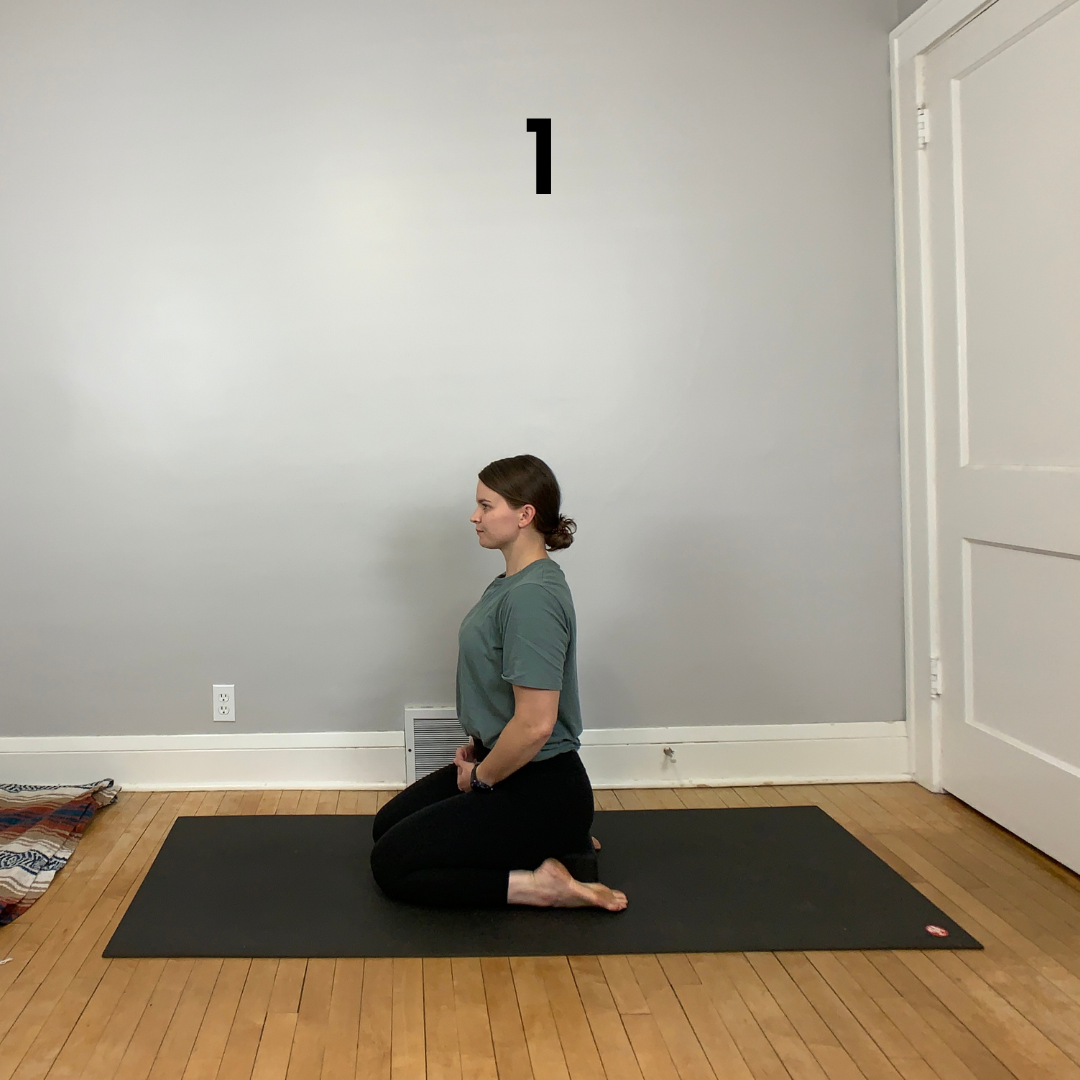
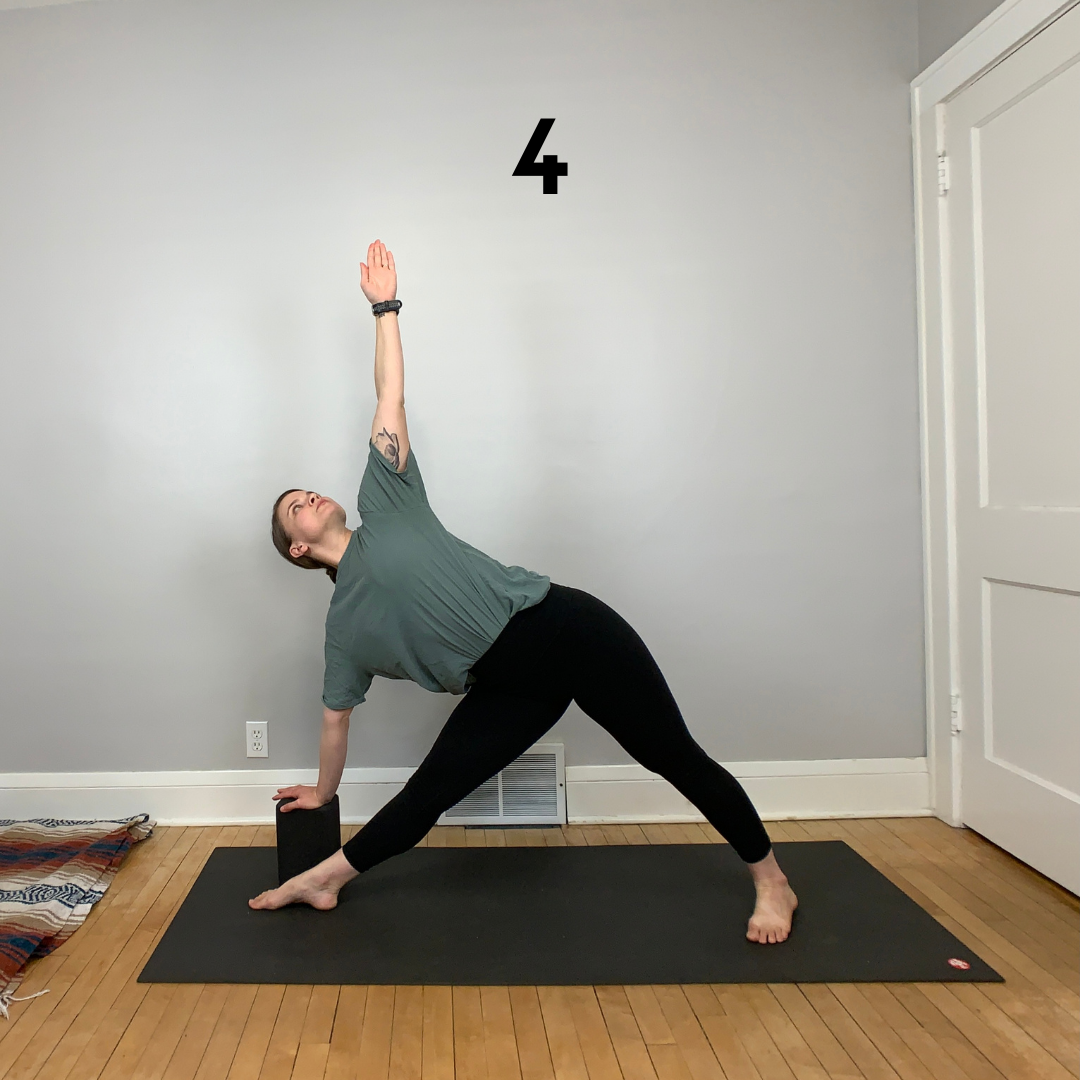
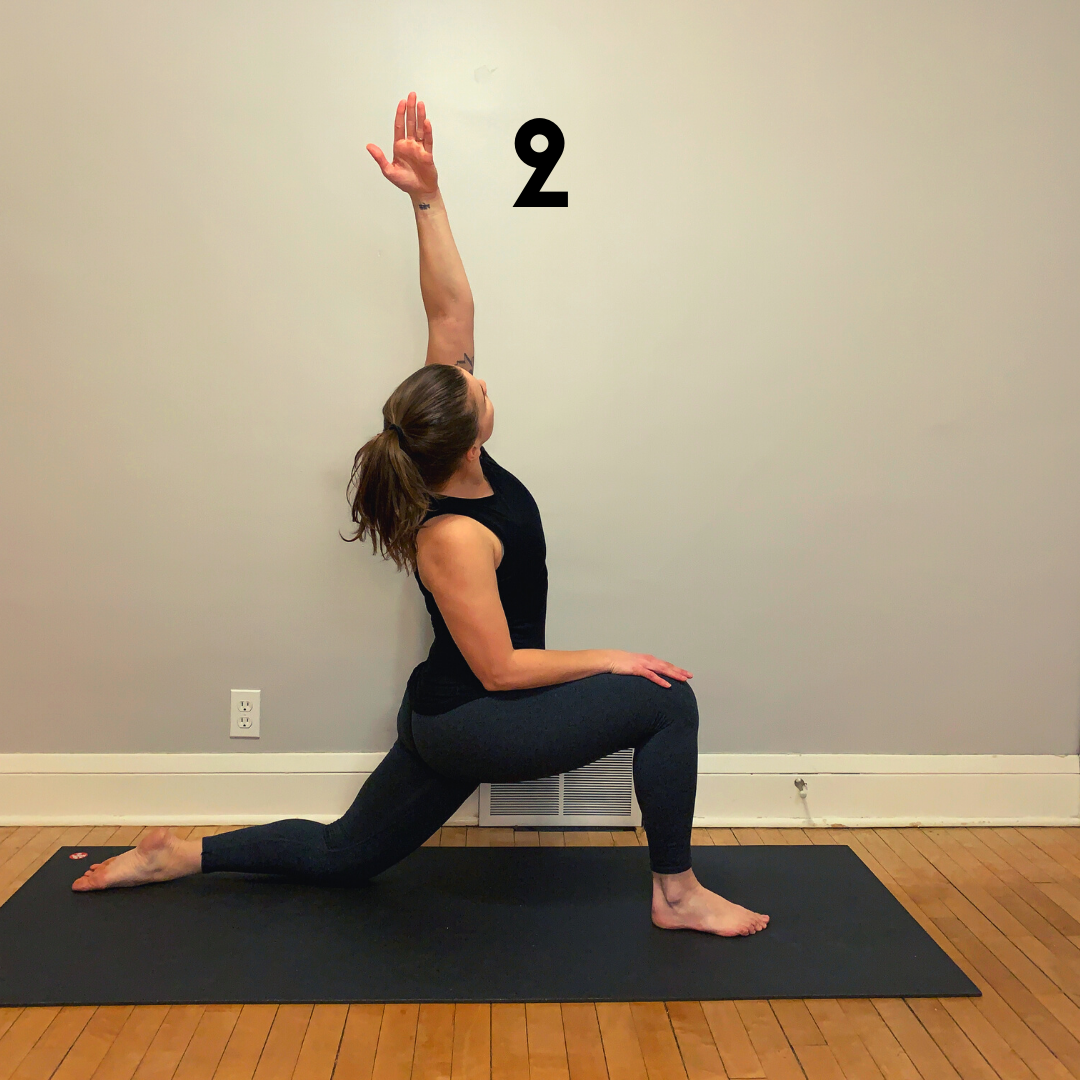
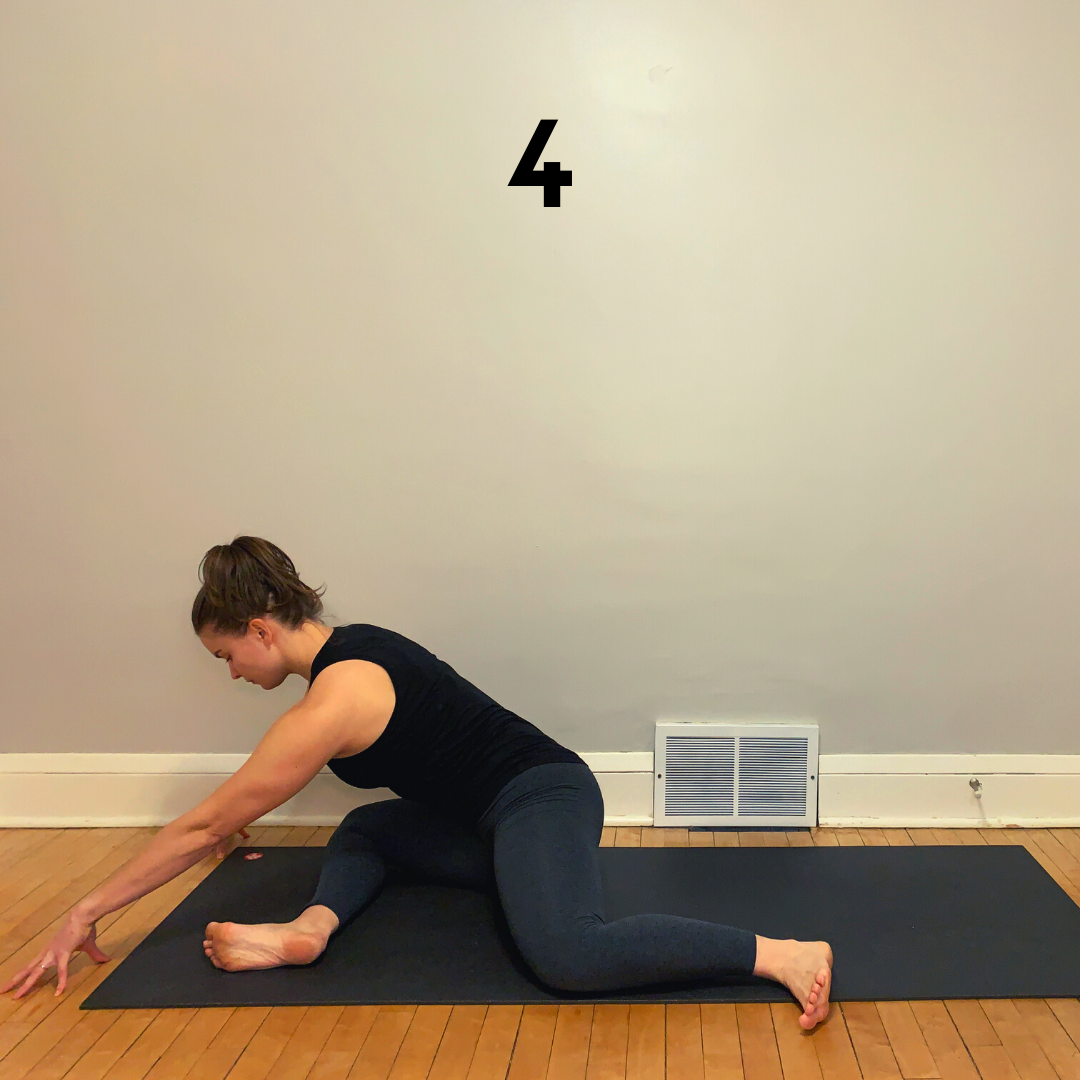
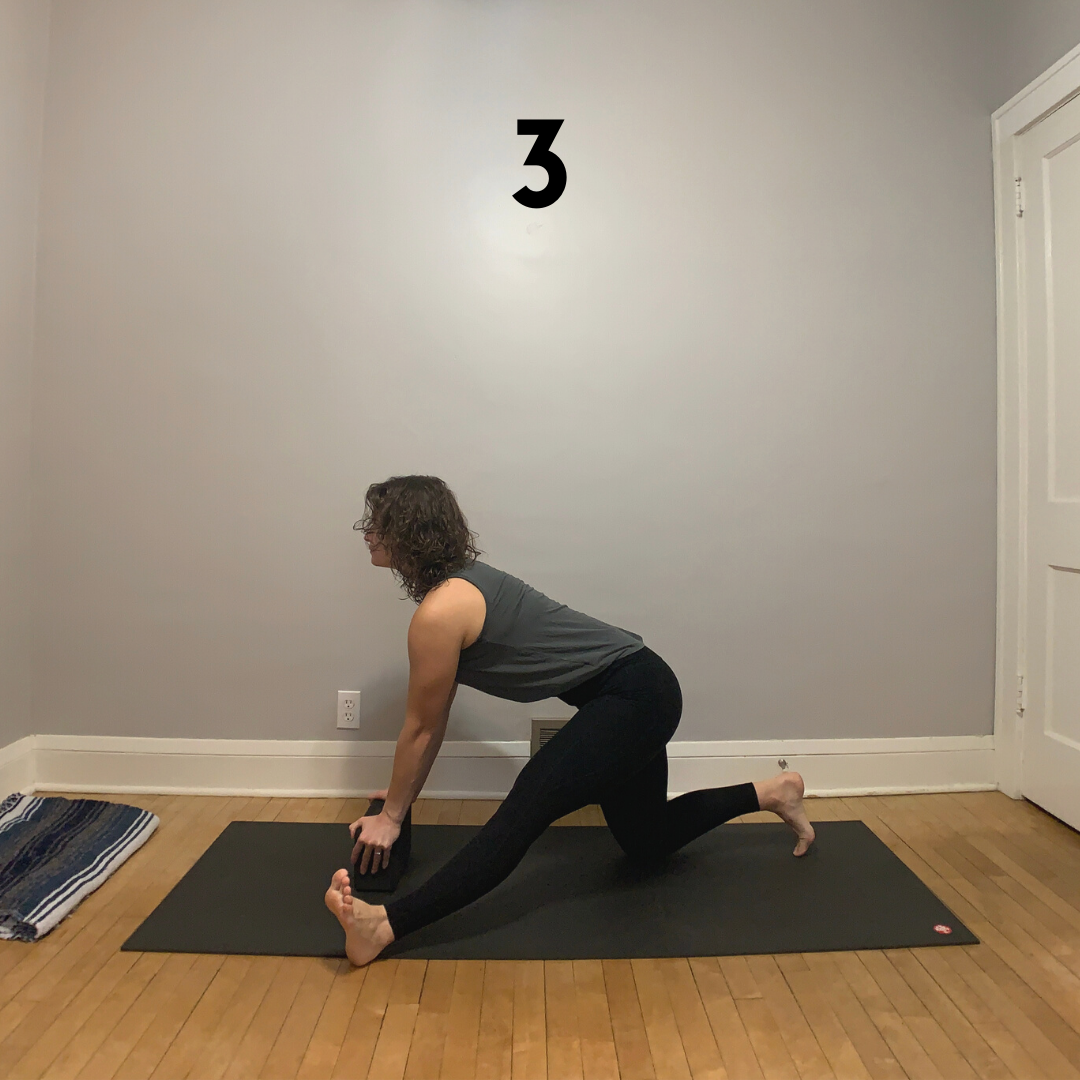
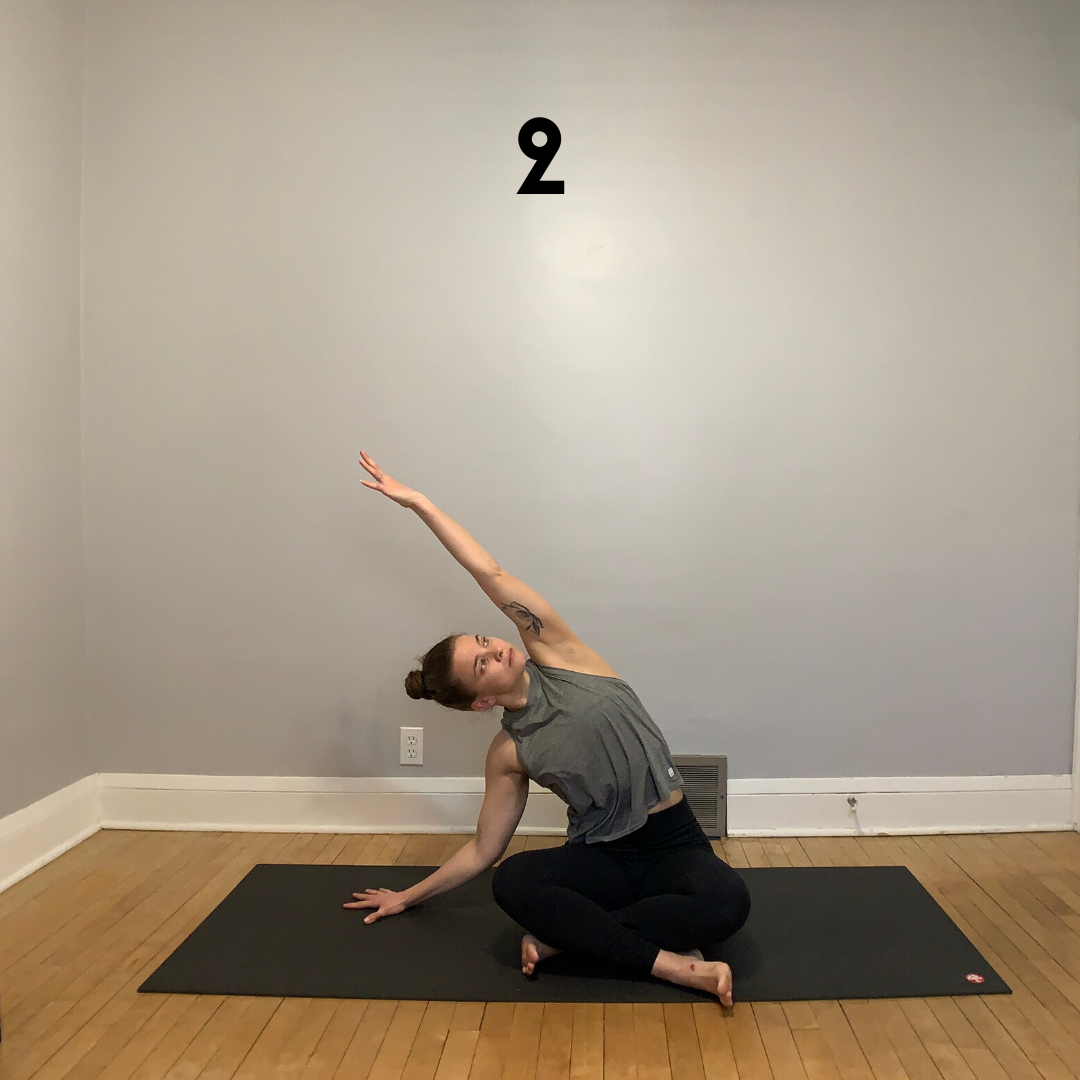
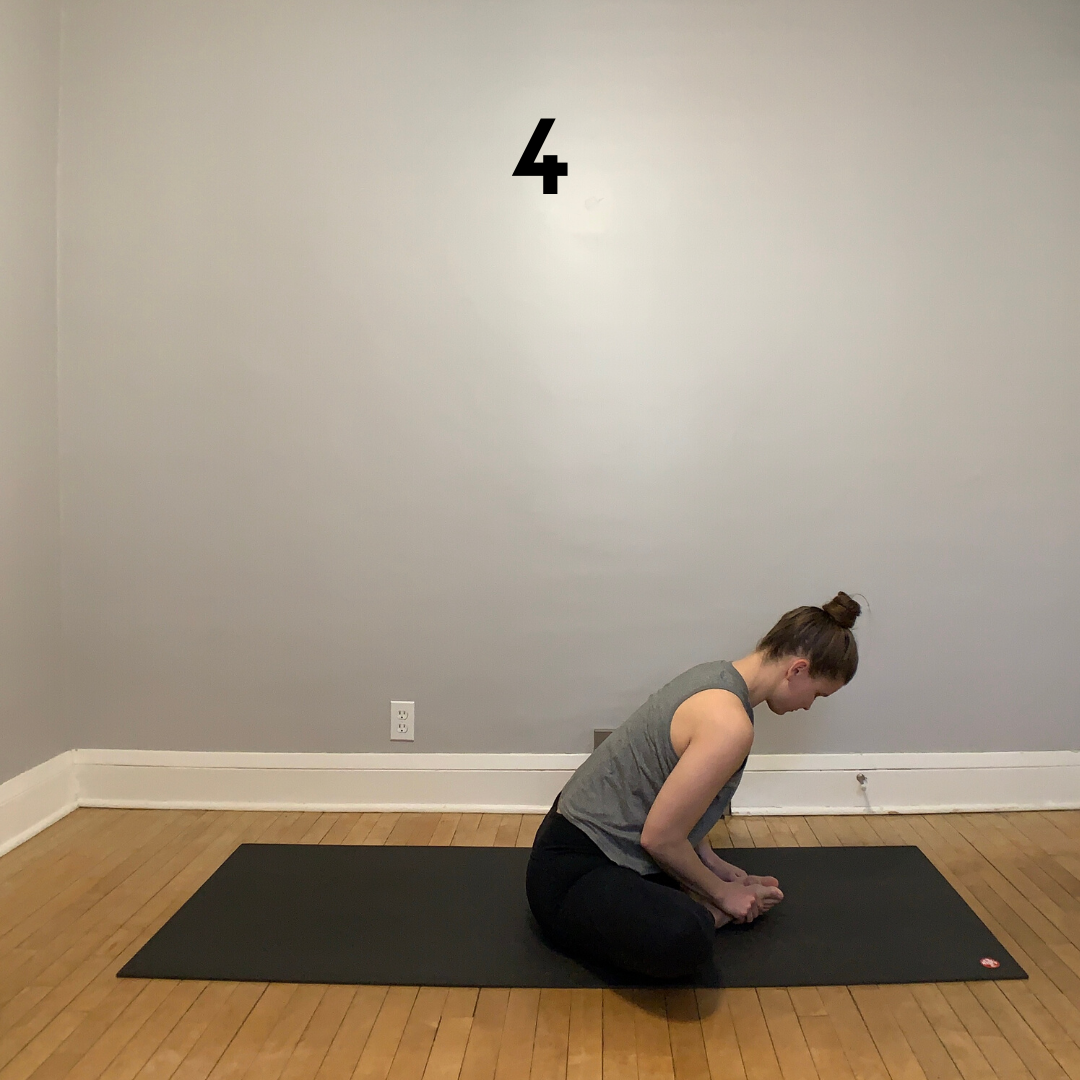
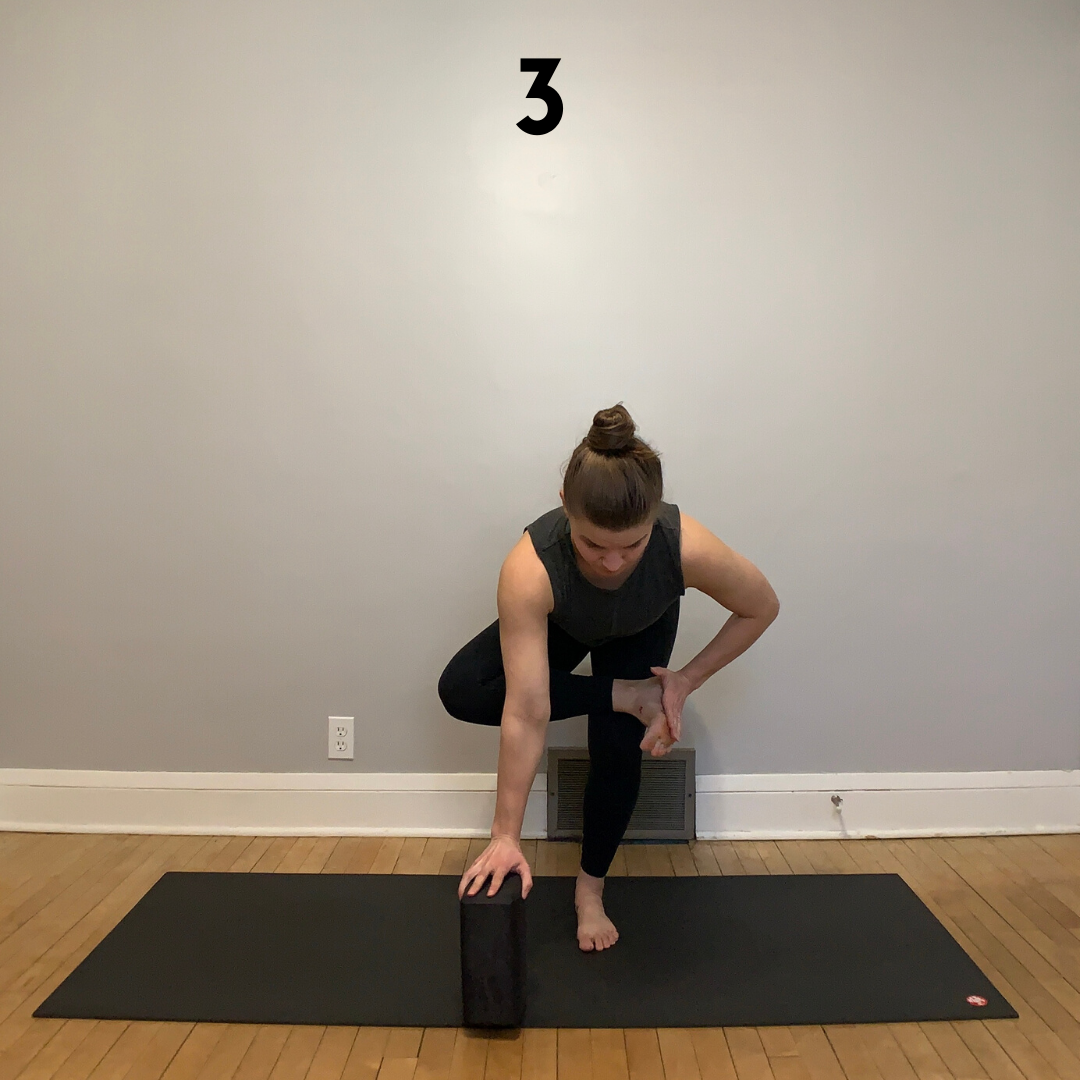
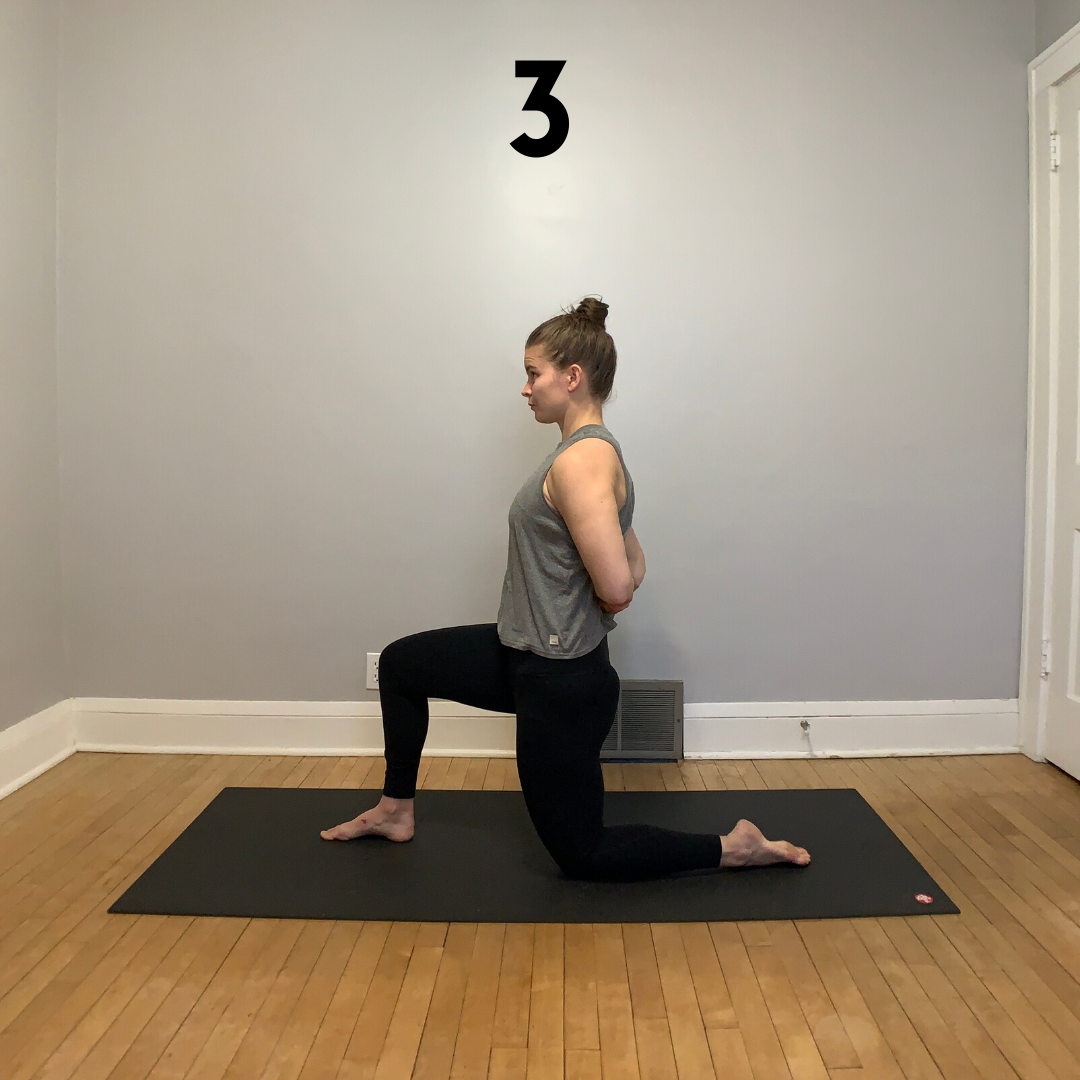
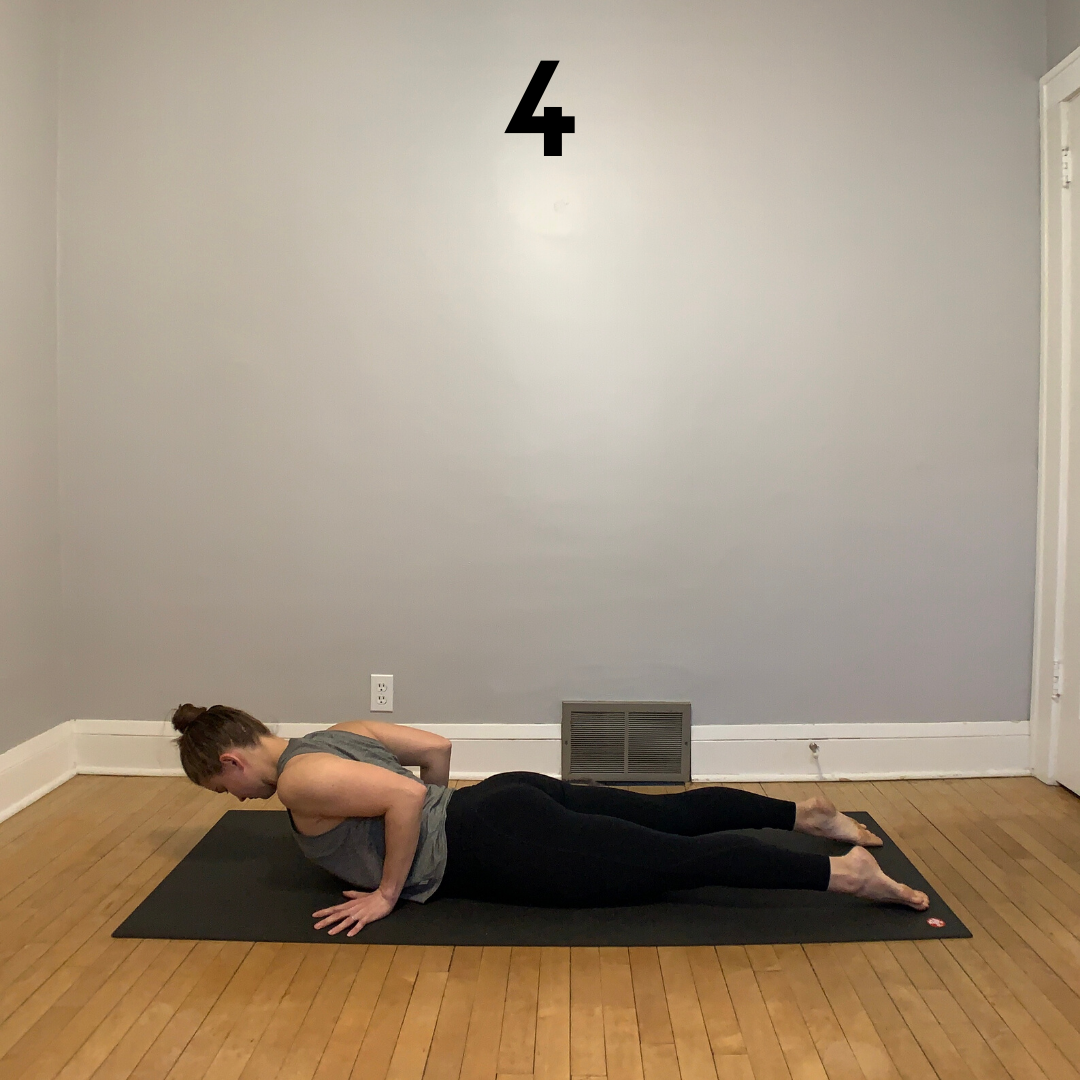
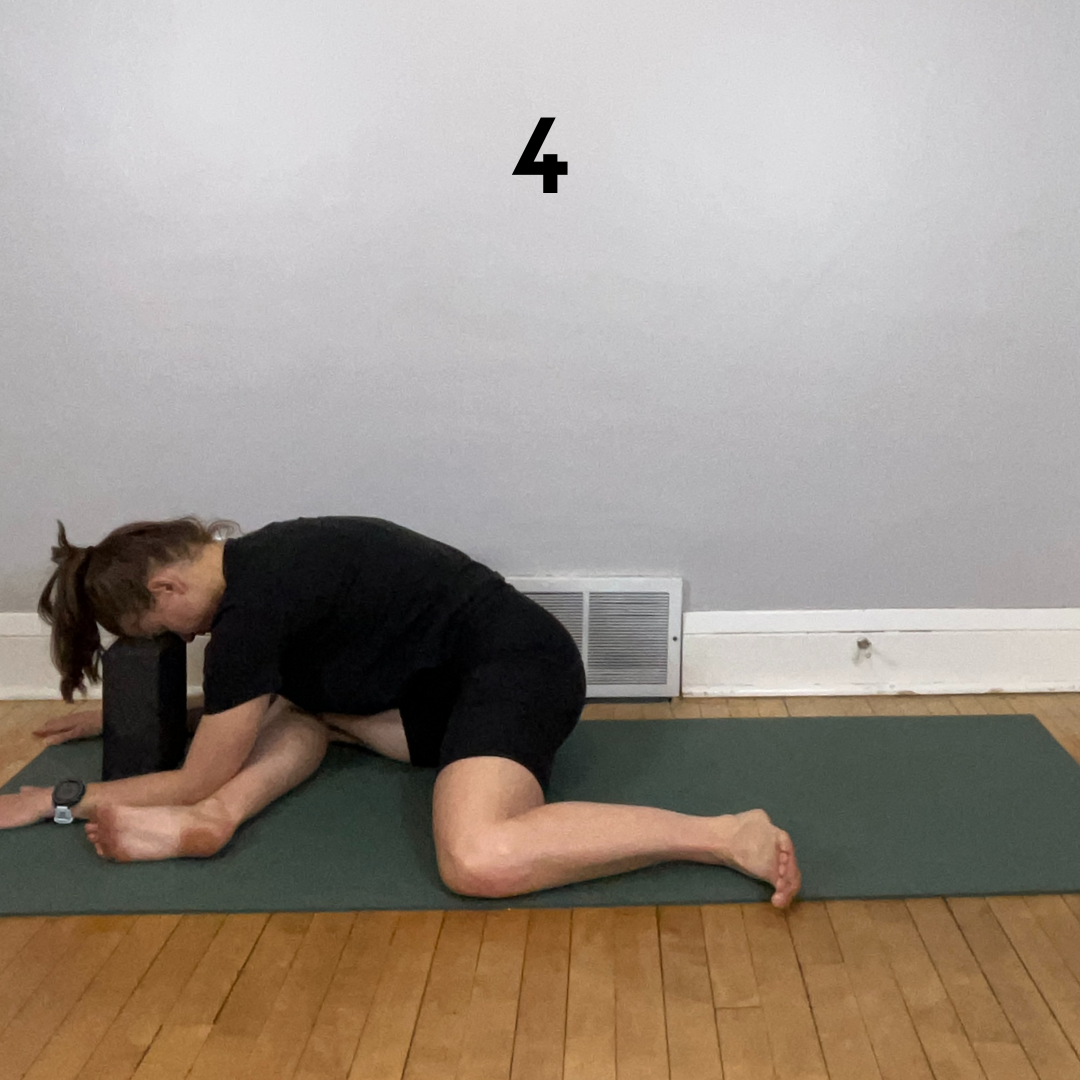
4 - 90/90 Stretch

Also known as my favorite Half Pigeon alternative.

Take a seat on your tail and position your right leg forward with your knee at approximately a 90 degree angle. Your shin might be parallel-ish to the short edge of your mat. Allow most of your weight to be over on your right hip and place your left leg behind you with your left shin parallel-ish to the long edge of your mat.

If folding forward feels right, consider placing a block or stacked blocks under your forehead.

You might stay in the shape for a couple minutes per side.

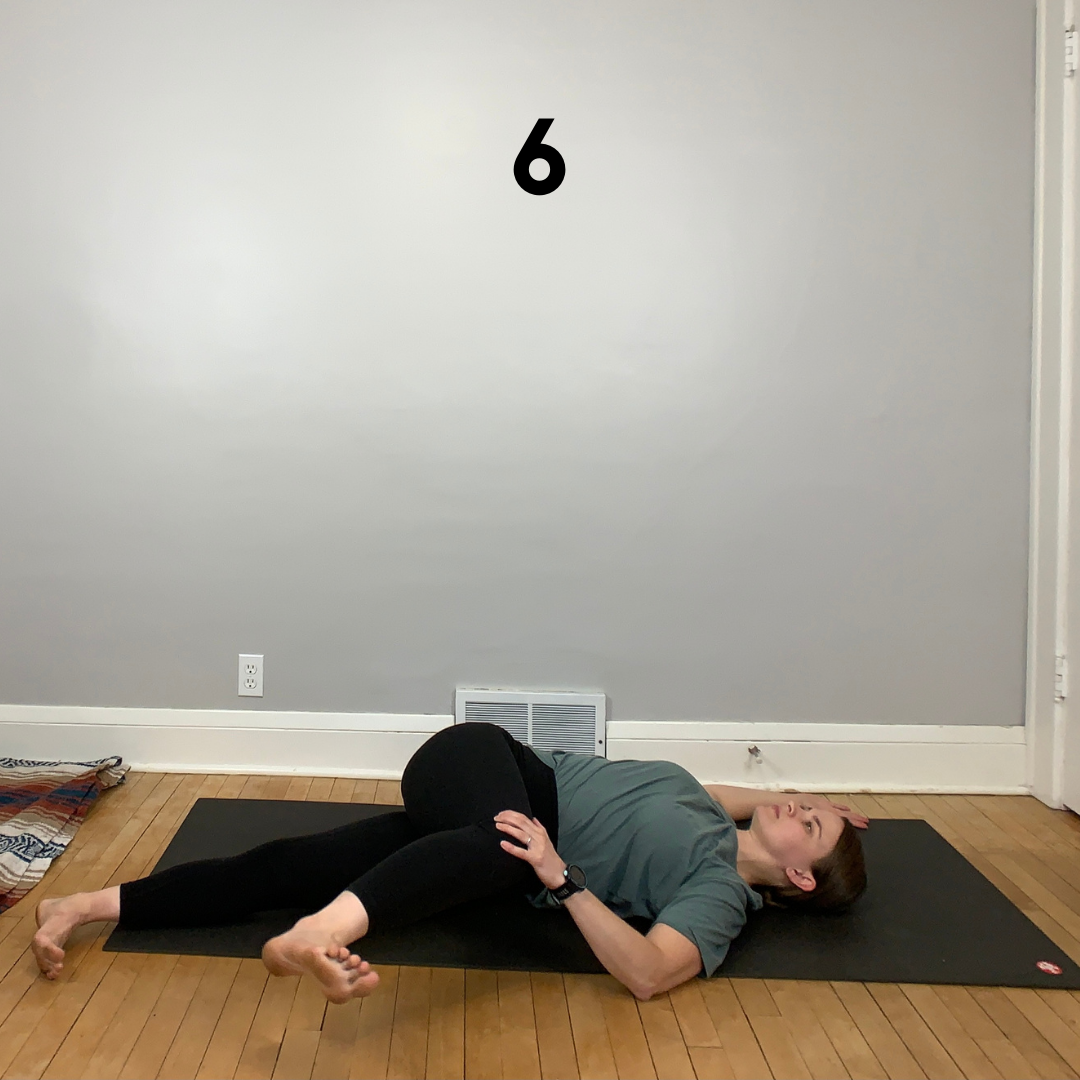
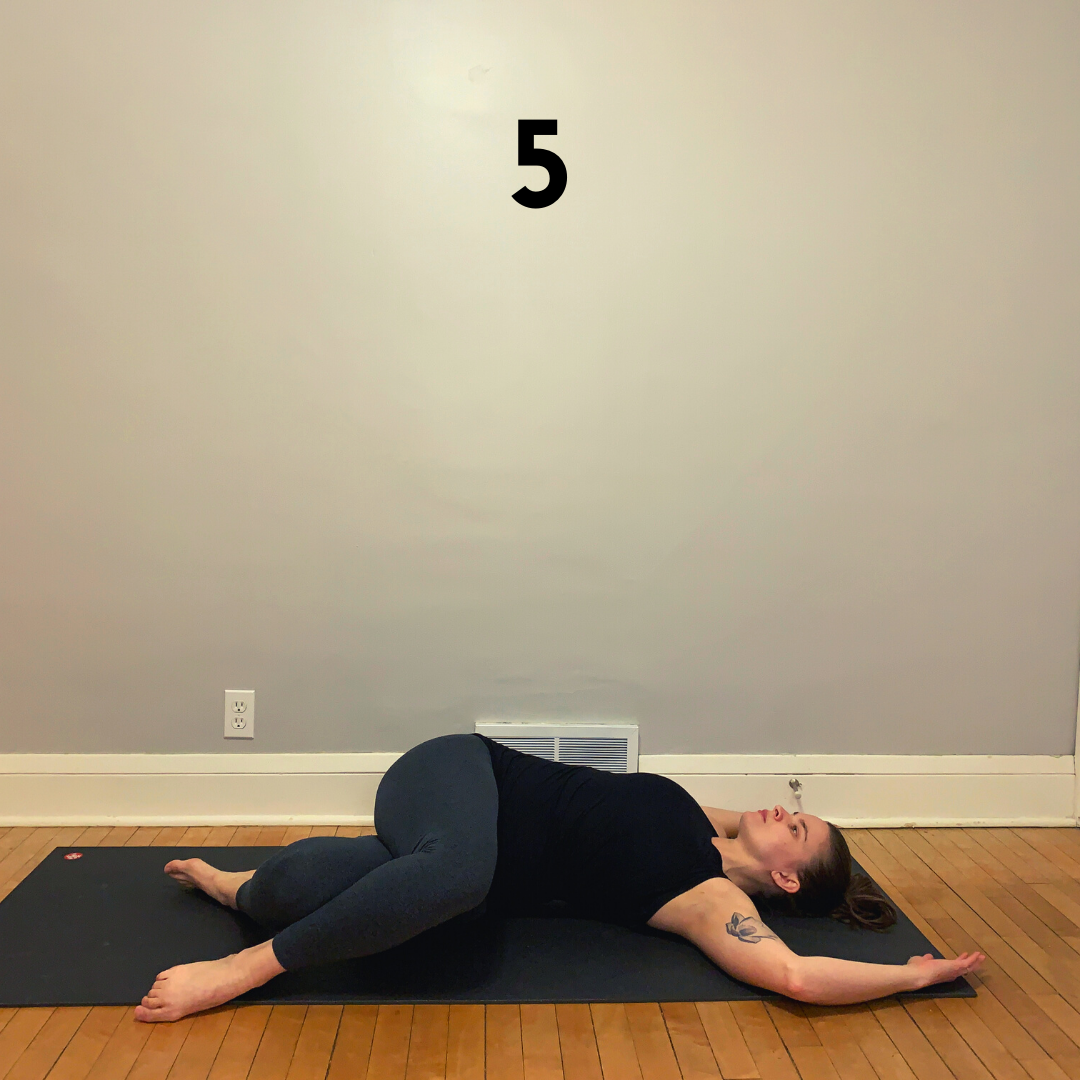
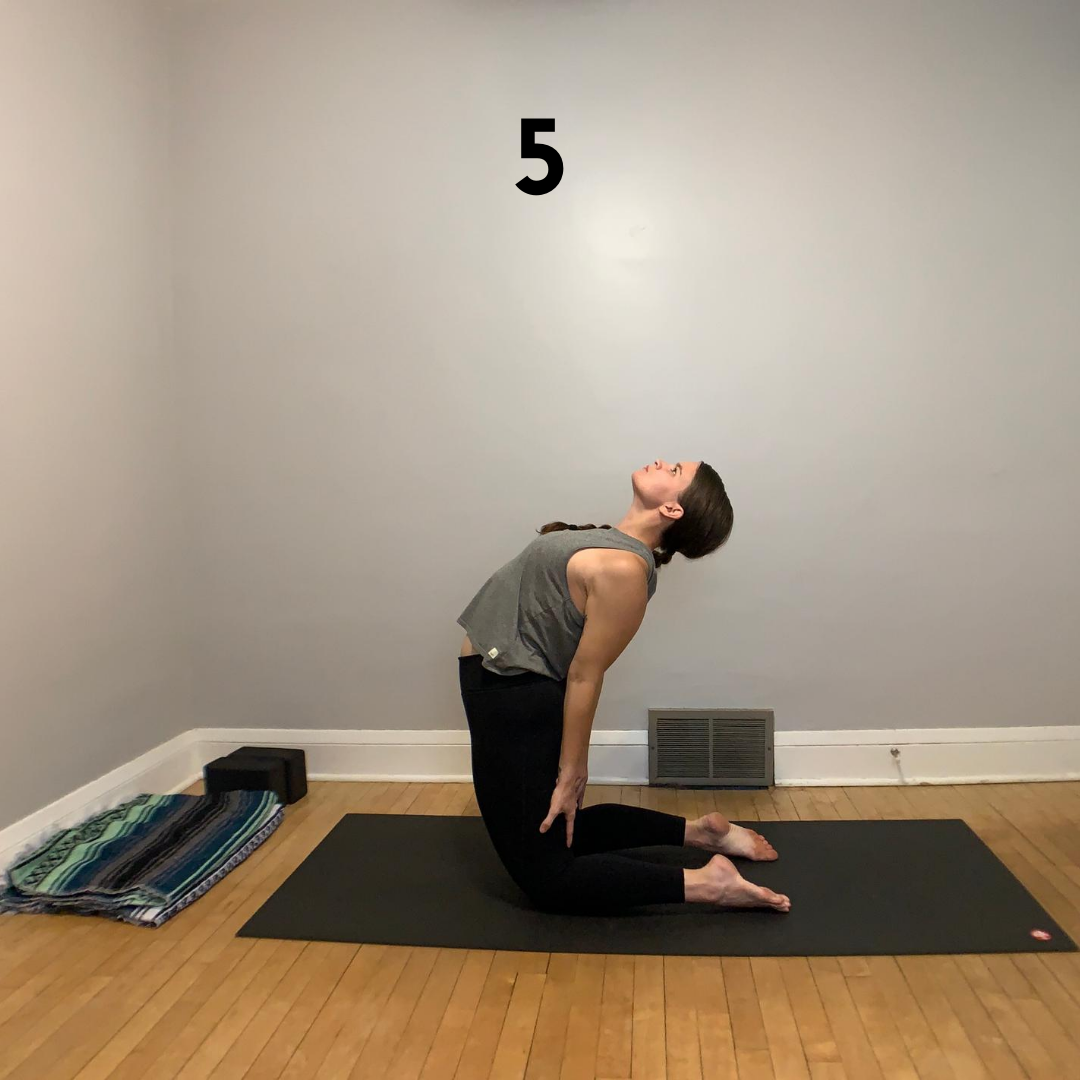
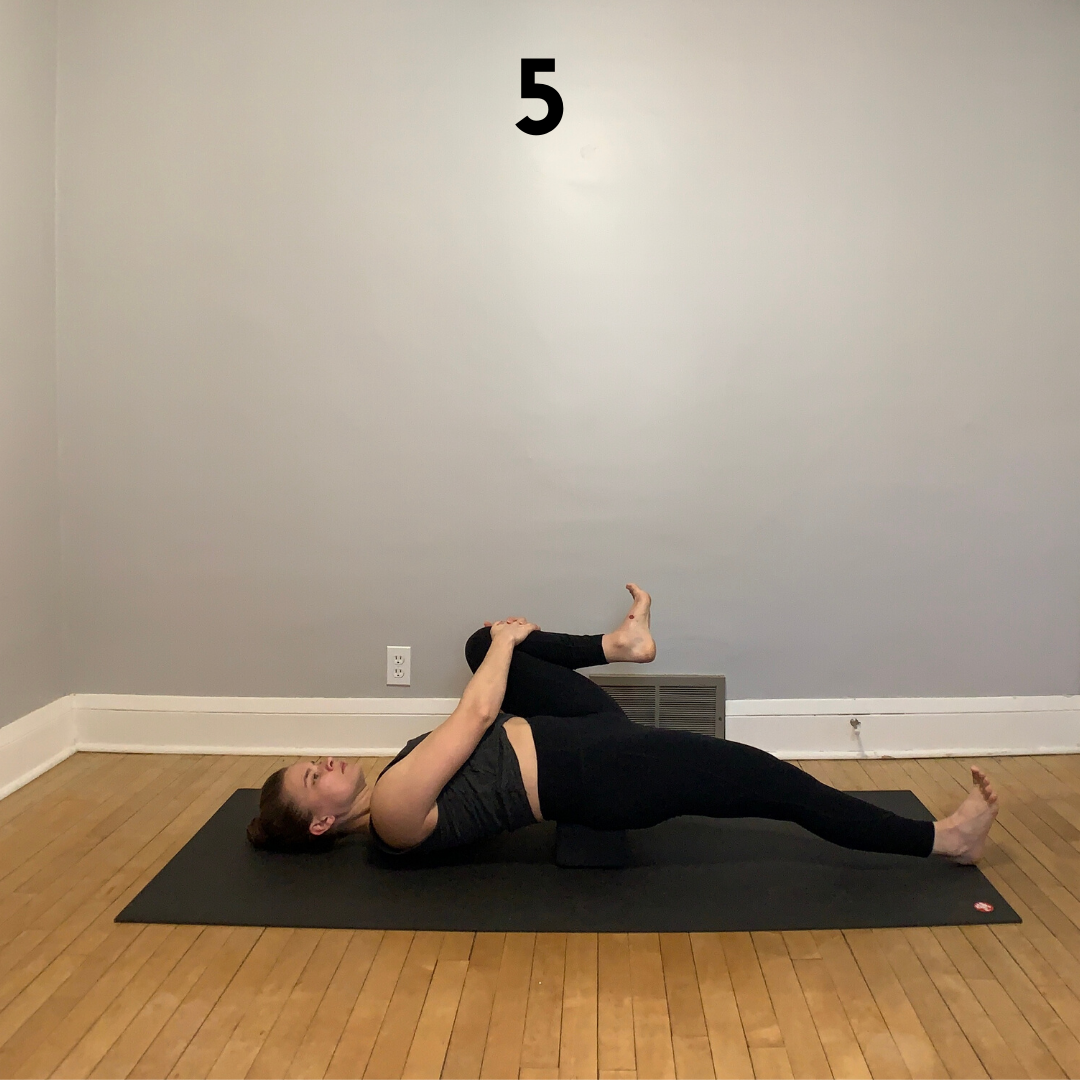
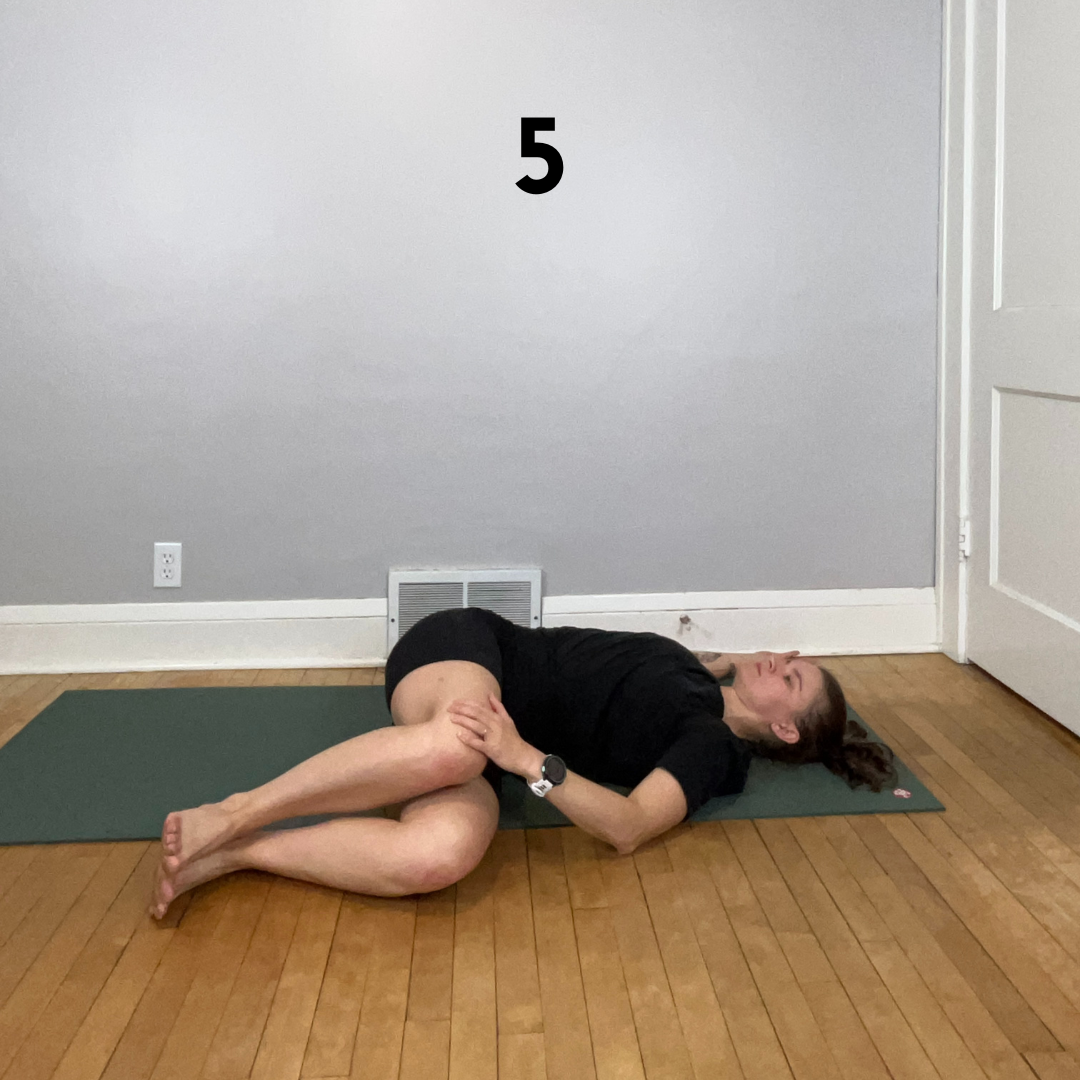
5 - Easy Supine Twist

Lay on your back with your knees bent and your feet on your mat. Shift your pelvis a little to the right and release both of your knees to the left. You might adjust your legs and stack your knees if that feels right.

You could place a blanket or foam block between your knees to create some separation between your knees. You can also stagger your legs if that feels best.

Since the intention is to prepare your body and mind for rest, let your arms go wherever it feels best. Turn your face in a direction that feels sustainable for your neck.

Take 5-10 breaths per side. You might release a few slow exhales through an open mouth.

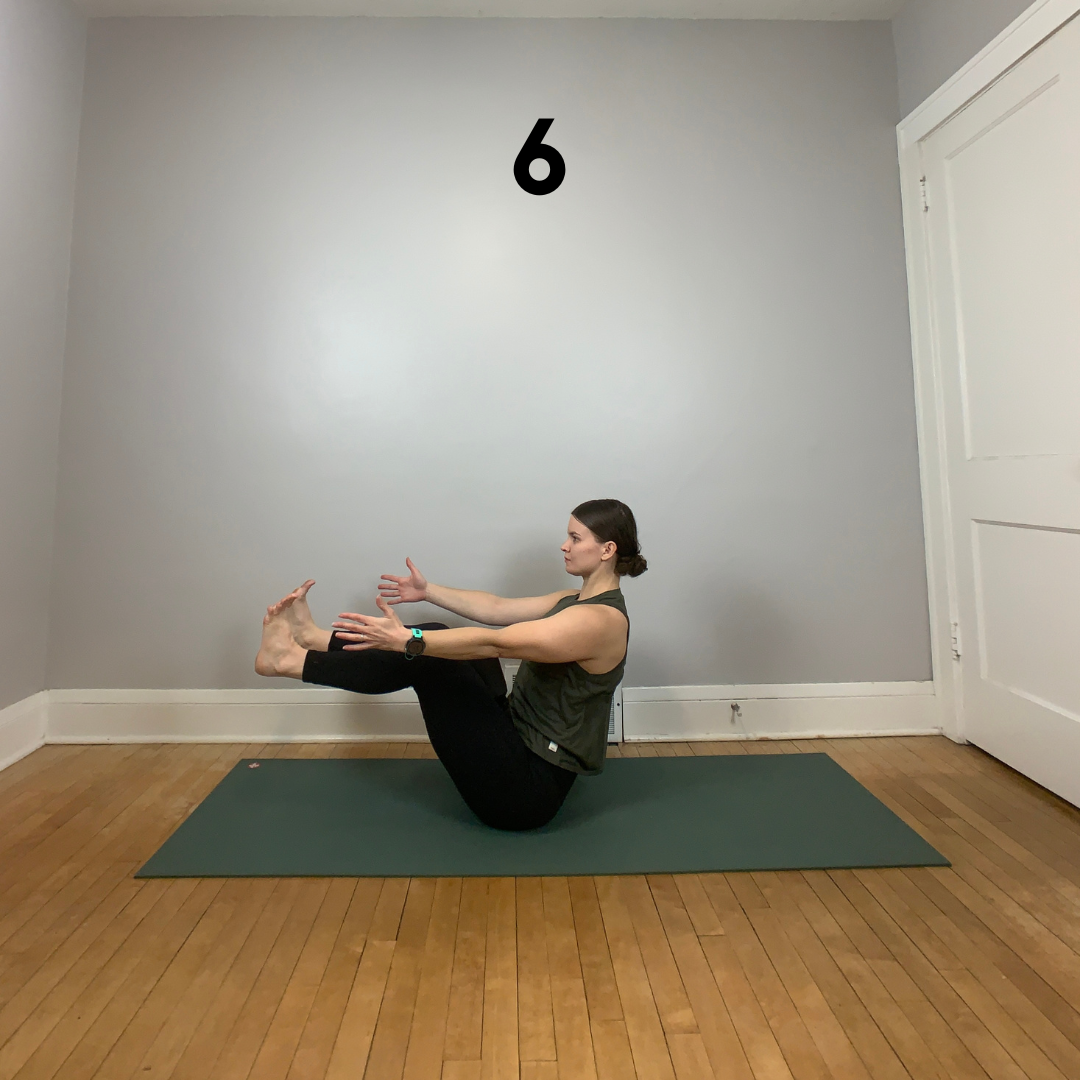
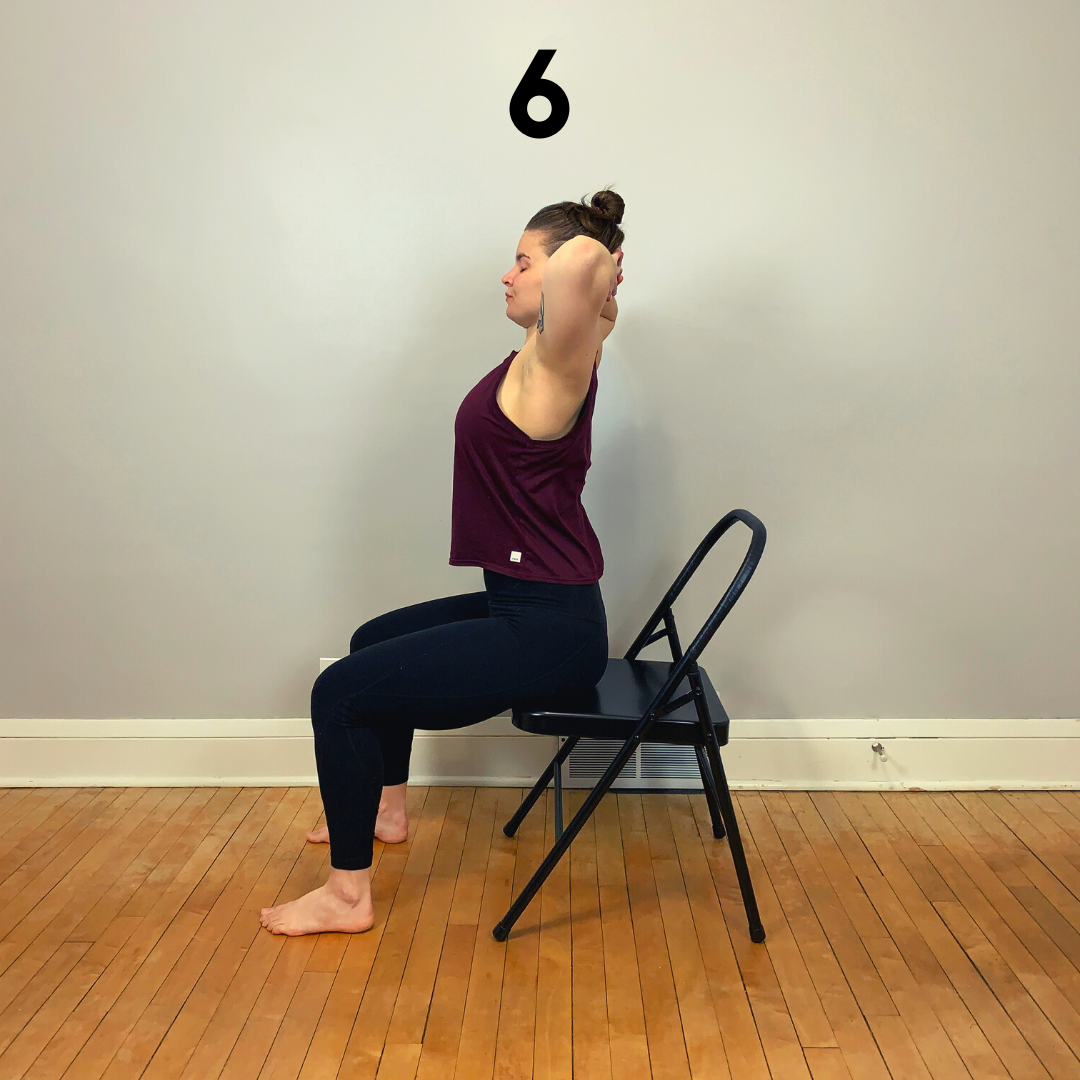
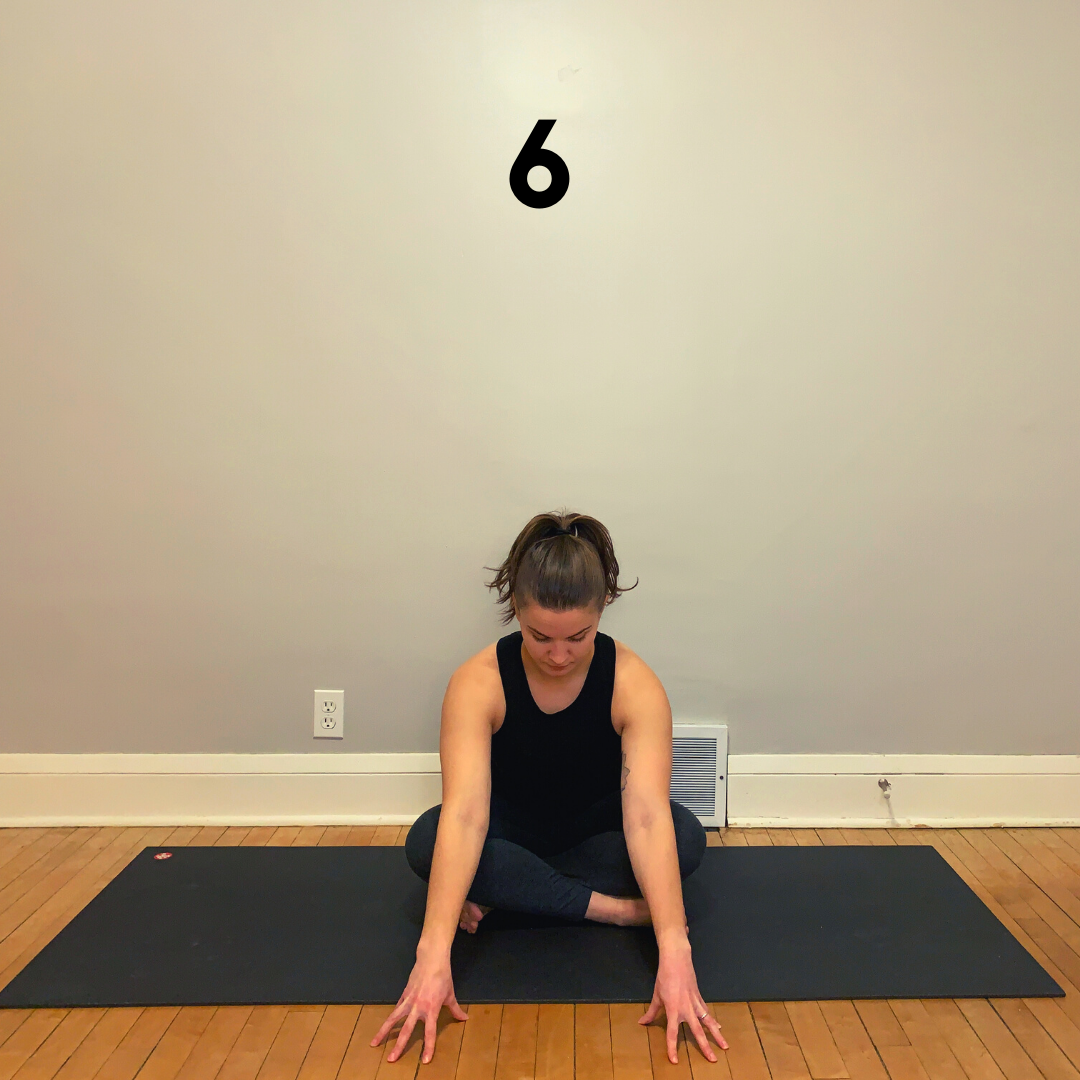
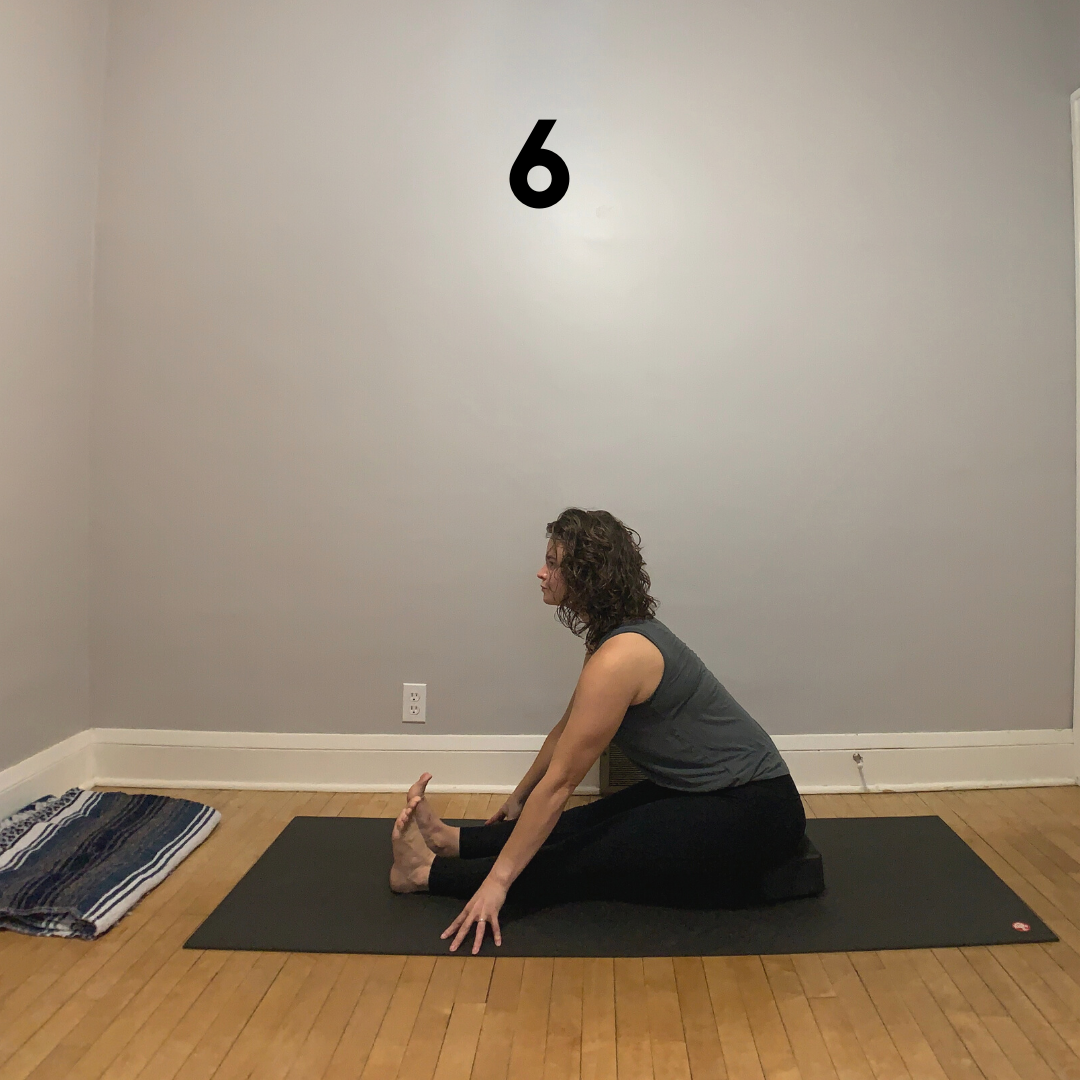
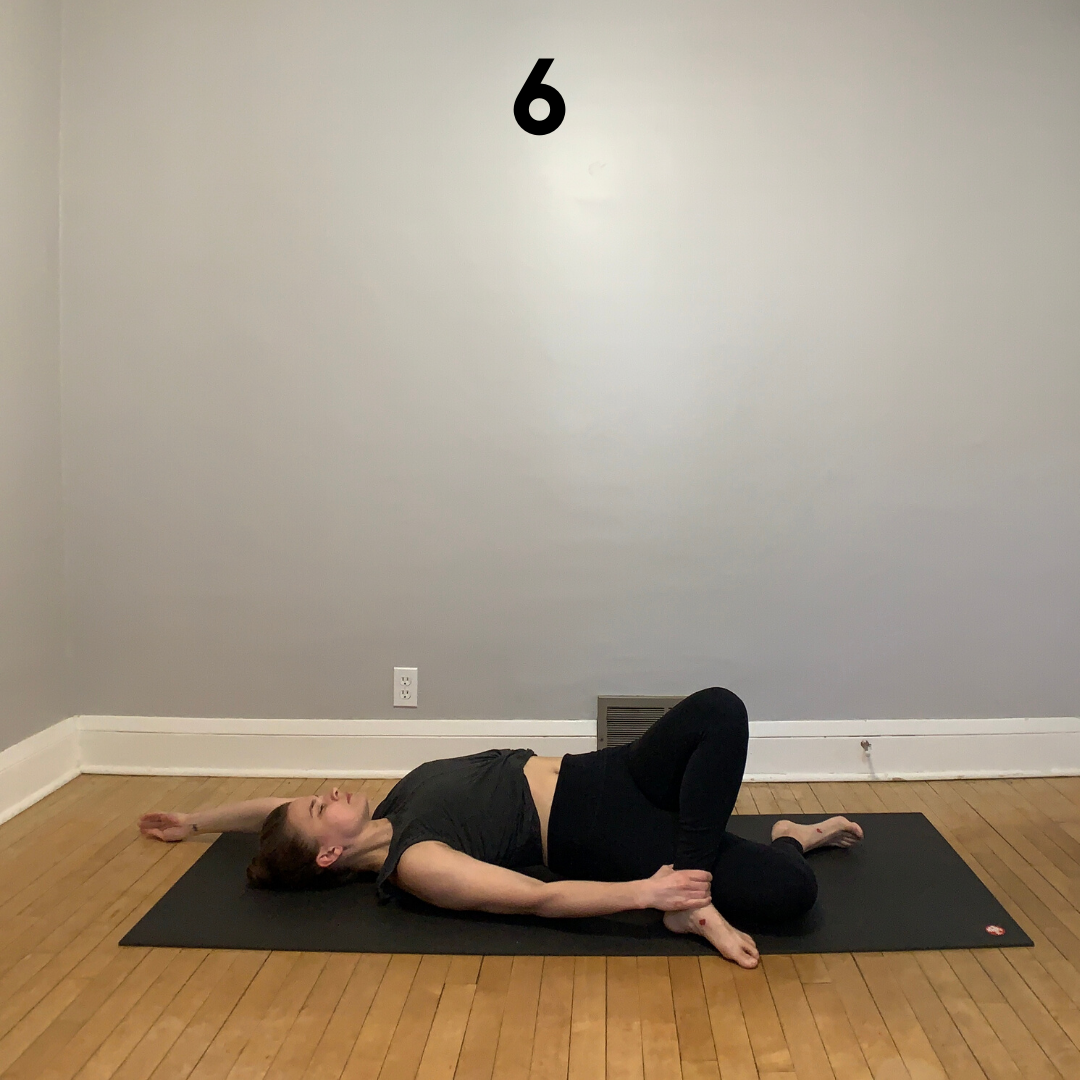
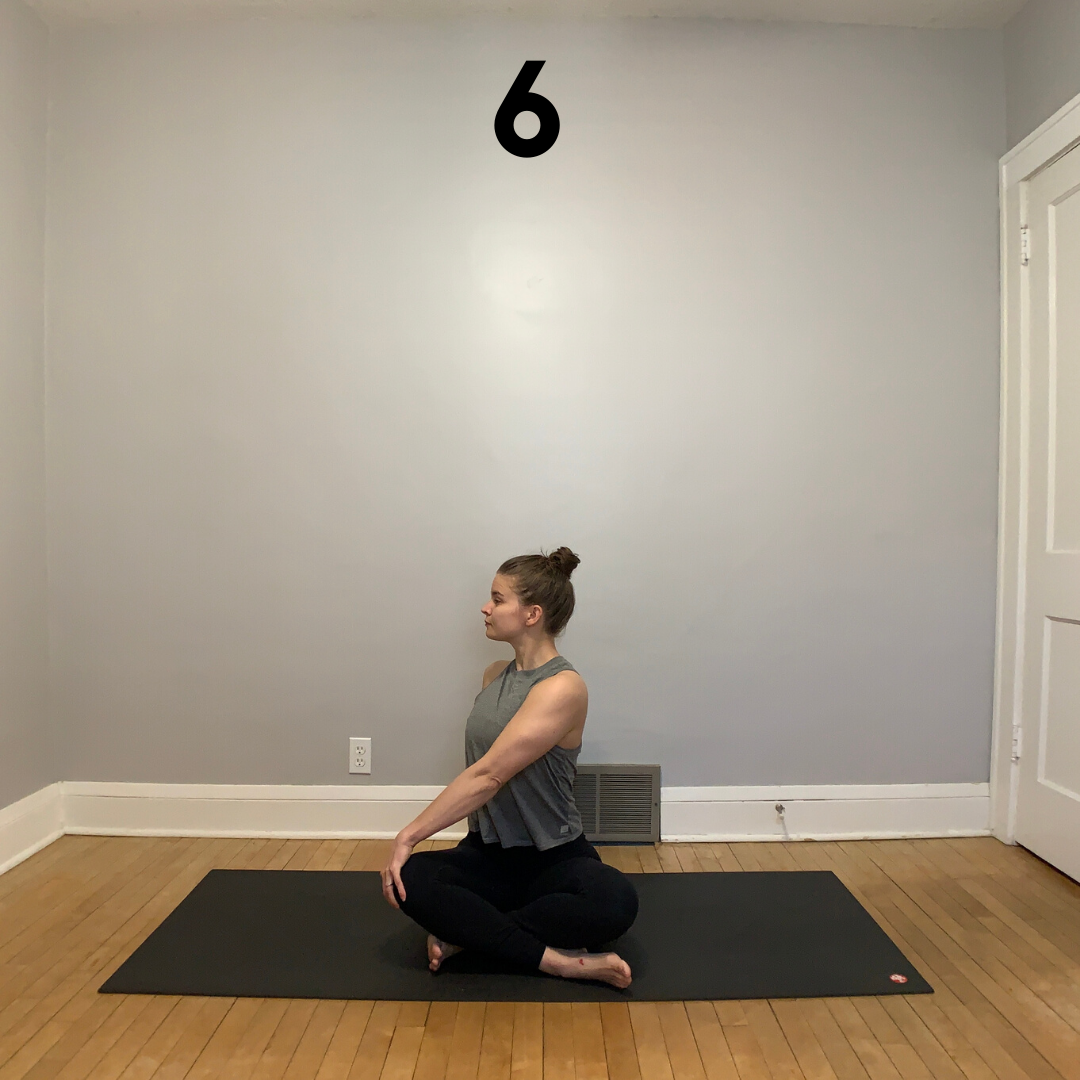
6 - Supported Reclined Bound Angle Pose

Lay on your back with your knees bent. Connect the soles of your feet and let your knees drop wide. Place a block, folded blanket, or bolster under each knee or thigh. Let your hands and arms rest wherever if feels best.

You can stay as long as you like! You might even drift away while settling into this one.

Sleep well!

Preparing for Twists

I have a soft spot for twists. I once dreaded them and now I absolutely LOVE them!

On more than one occasion I’ve had students approach me after a class and ask, “Erin, when will we be done with twists?” Typically my answer is something along the lines of, “Not any time soon.” (Insert wink emoji.)

I enjoy the many concepts that live within twisting shapes and the preparations that can support sustainable twists.

Are you working on your Revolved Triangle or Revolved Half Moon Pose? Try on these preparatory shapes before getting all twisted!

1 - Ardha Uttanasana - Halfway Lift

When exploring a twisting shape you might find that you’re able to move with more ease if you work with a long spine. Halfway Lift is an excellent shape to prep with to accentuate length in your ribs and spine.

I’m a fan of actively pressing your hands into your legs, blocks, or the floor to get more extension and length through the spine. At the same time, draw your shoulder blades back toward your pelvis to widen your chest.

2 - Virabhadrasana 2 with Front Shoulder Stretch

This front shoulder stretch could be added to a whole list of shapes, but I like it in Warrior 2 as it’s a great way to get the legs working and warm.

To get the most out of the shoulder stretch, hold onto your forearms behind your back and actively pull your upper arm bones apart. This way you’re stretching the shoulders while simultaneously engaging the muscles of the shoulders. It can be easy to press the ribcage forward when the arms are behind the back, so it’s best to firm your arms to your lower back and pull your front ribs back to your spine.

Take 5 to 10 breaths per side.

3 - Back Extension Variation

Similar to the previous shape, you might find that you’re more prepared for twisting shapes when your chest is open and your upper back is active.

For this back extension variation lay with your belly on the floor with your arms reaching overhead and seperate your feet about hip-width apart. Press the tops of your feet firmly into the floor and lift your hands, arms, and chest off the floor. Create fists with your hands and pull your elbows back in line with your shoulders. Reverse the movement by extending your arms forward and then release everything back down to the floor.

I like moving through this series 3 to 5 times.

4 - Adho Mukha Svanasana - Down Dog Variation

At this point you’ve established a long spine and an open chest. Next I like to address the outer hips and legs. It’s helpful to lengthen the outer hips especially when working toward a shape like Revolved Triangle.

In this Down Dog variation bend your left knee a lot, pivot your right heel in toward the center of your mat and angle your right toes out to about 45 degrees. Flatten your right foot to the floor. Actively press your hands down, look under your right arm, turn your abdomen to the right, and firmly press the pinky edge of your right foot into the floor. You might feel a stretch through your right outer hip and thigh.

Take 5 to 10 breaths and switch sides.

5 - Standing Ankle to Thigh

Another outer hip and thigh opener here.

From Chair Pose, cross your right ankle over your left thigh bone. Sit your tail down and back and lean your torso forward. Especially if you’re preparing for twisting shapes, I appreciate placing my hands on the floor or blocks to create a Halfway Lift feeling in the spine and ribs. Reach your chest forward and, in opposition, reach your sitting bones back.

Take 5 to 10 breaths and switch sides.

6 - Navasana - Boat Pose

Finally, it’s nice to add in a little core activation when preparing for twisting shapes. Boat Pose is a great go-to core strengthener when considering twists.

When setting up your Boat Pose, prioritize a long, lifted spine. Think about lifting your lower ribs away from your pelvis. You can even use your hands on the floor behind you to get an extra lift or place your hands behind your legs to pull your chest forward.

For an added bonus place a block between your legs to get your inner thighs to kick on.

Cool It Down

Confession from a heated yoga teacher: I don’t actually care for the heat.

Sure, I enjoy soaking up the sun on the beach while on vacation or hanging in a sauna for 30 minutes at a time. But do not expect me to be a pleasant human when it’s 90+ degrees and 1000% humidity for an extended period of time. I just can’t function under those conditions.

During the summer my practice mainly consists of shapes that help me cool down and get grounded. Here’s some of my go-to shapes during the steamy months.

1 - Virasana - Hero Pose

From hands and knees, sit back with your knees together and feet wider than your pelvis. If your seat does not comfortably come to the floor between your feet or if your knees are feeling a lot of tension, sit up on a block or folded blanket. You can also do this shape with your feet together and sit straight back on your heels.

Gently press the tops of your feet and shins down while sitting up tall. Take a few long, full breaths.

2 - Ardha Hanumanasana - Half Splits Variation

From a kneeling position with your right leg forward and left knee down, shift your tail back to lengthen right leg any amount - it’s okay if your leg does not fully straighten. For this variation, as your shift your tail back, stack your left hip over your left knee. Reach your chest forward in space and tug your right sitting bone back to create length in the back of your right leg.

Take about 5 to 10 full breaths and switch sides.

3 - Prasarita Padottanasana - Wide Legged Forward Fold

Step your feet out wider than your hips and point all of your toes toward the long edge of your mat. Hinge forward from your hips and, at the bottom of your fold, place your hands on your mat, legs, or up on a prop. Press your feet firmly into the floor and lift your sitting bones up in opposition.

4 - Trikonasana - Triangle Pose

Similar to your Wide Legged Forward Fold stance, step your feet wider than your hips. Point your right toes straight forward toward the short edge of your mat and angle your left toes slightly forward toward the same short edge. Reach your right arm forward and eventually reach down to place your right hand on the floor, lightly on your shin, or up on a block. Reach your left arm (the top one) toward the ceiling.

With this shape, consider creating length in your ribs, spine, and limbs. As your extend in all directions, feel your foundation - your feet - ground deeply into your mat.

Take 5 to 10 full breaths and switch sides.

5 - Vrksasana - Tree Pose

From a standing position, shift your weight into your right foot and elevate your left foot to place it on the inside of your right leg with your left knee bent and turned outward. Once you have your left foot settled, press your hands together in front of your chest. Ground your right foot into the floor and lift up through the top of your head. Consider working with a soft, calm gaze.

Take about 5 full breaths and switch sides.

6 - Jathara Parivartanasana - Supine Twist

Lay on your back, pull your right knee to your chest, reach your right arm out to the side, and guide your right knee across your body to move into the twist. Especially if you’re approaching this shape from a cooling perspective, consider keeping it really mellow. Once you feel your right shoulder lift away from the floor consider pausing at that point in your twist. Feel the support of the floor and exhale out your mouth if it feels right.

Take about 5 full breaths and switch sides.

You might wrap up these shapes with a 5 minute Savasana and/or seated meditation.

Go-To Chair Yoga Practice

Whether you spend all day in a chair or not, I think everyone can benefit from a Chair Yoga practice.

What is Chair Yoga, you ask? It’s a practice that utilizes a chair to support you in your yoga shapes.

I think Chair Yoga gets a bad wrap in some yoga communities. It’s often seen as a practice only for older populations or students with limitations. Sure, Chair Yoga can make shapes more accessible to a broader scope of students. But a chair can also be utilized to help students get into variations on Wheel, Handstand, and a whole slew of shapes that are often seen as “advanced”. Chair Yoga is truly for everyone!

Below are some of my favorite shapes that are supported by a chair.

1 - Take a Seat

When doing a practice in a chair, I find that it’s helpful to simply get situated first. No matter what chair you work with, it’s important to get your feet firmly grounded. You might have to scoot forward toward the front edge of the chair to do so. Once your feet are planted about hip-distance apart feel your sitting bones ground into the chair and allow your spine to lift up from there.

Especially on days when I’m working in a chair for an extended amount of time, I like to give myself a moment to organize my body in this manner. I might close my eyes and take a few deep, slow breaths. Feeling the grounding points of your body can take the edge off on a stressful day.

2 - Seated Twist

Now that you’ve established a grounded and tall seat, take your left hand to your right knee or thigh and right hand to somewhere on the chair - it might be the back of the chair, an arm of a chair, or the seat of the chair. Without using too much leverage, rotate your abdomen and chest to the right. Take 5-10 slow breaths and repeat on the second side.

3 - Seated Ankle to Thigh

Place your right ankle on your left thigh and keep your left foot grounded on the floor. Flex your right ankle and you might even place your left hand on the sole of your right foot. This shape can be done with the spine upright, or if you’re craving a deeper sensation in your outer hips you might hinge forward from your hips. Take 5-10 slow breaths and repeat on the second side.

4 - Seated Forward Fold

There’s a few different ways to approach a forward fold while in a chair. You might keep your feet planted about hip distance apart, hinge straight forward, and rest your abdomen in your thighs. Some bodies might benefit from taking the feet and legs wide to create a deeper hinge from the hips. If you’ve got a fairly deep fold, you might reach your hands through your legs to hold the legs of the chair.

If you choose to step the feet wide and go for a deep hinge, it might be worthwhile to play with the angle of the feet. Personally, I benefit from turning the toes slightly out to limit compression in the front of my hips.

5 - Supported Lunge

A lot of desk-dwellers complain of tight hip flexors and quadriceps. That chair you’ve been sitting on all day could actually be a useful prop to support you in lengthening those areas of the body!

Not all chairs are well-suited for this stretch. You’ll need a chair without arms in order to properly position the body.

From your starting seated position, move your tail toward the left edge of your chair. Keep your right sitting bone on the chair and slide your left buttock completely off the chair. Keep your right foot grounded and right knee bent. Step your left foot back and keep the left toes curled under. You could straighten the back leg like a conventional High Lunge shape, but I find that bending the left knee slightly and tilting the frontal hip bones upward helps to more effectively lengthen the front side of the left hip. Take 5-10 slow breaths and repeat on the second side.

6 - Upper Back Bend

From your starting seated position place your hands behind your head and widen your elbows. Continue to ground your feet on the floor and your sitting bones on the chair. Gently press your hands into your head and your head back into your hands to create resistance. With the elbows drawing back in space, press your upper ribs forward to create a slight backbend in your upper/middle spine. Rather than lifting your chin up like you would in most backbends, pull the chin slightly back like you’re creating a very lovely double chin.

Movement Prep for Meditation

As we inch near a new year I often receive questions about establishing a consistent seated meditation practice. Committing to a steady seated practice can feel daunting. And, just like any other type of practice, it can take time to establish a rhythm where you feel fully settled.

My number one advice for folks who are looking to settle into a seated practice: Find a seated shape that feels right for you. It can be frustrating to prepare for seated meditation and then two minutes in all you can think about is how uncomfortable you are.

My number two advice for folks who are looking to settle into a seated practice: Move your body before you sit.

Although the Eight-Limbed Path outlined in Patanjali’s Yoga Sutras doesn’t have to be interpreted as a step-by-step, chronological guide on how to live a more disciplined, meaningful life, I do believe there is some intention behind placing asana before the more meditative, contemplative aspects of the path. By moving the physical energy of the body we might be better prepared to sit in meditation.

You might try on this short movement practice to prepare your hips, knees, and spine before you settle into your seat.

1 - Baddha Konasana - Bound Angle Pose

Place the soles of your feet together and widen your knees. Depending on the mobility of your hips and spine you might keep your torso upright with your fingertips planted on the floor behind you. If it feels right, hinge forward from your hips and take your hands forward. You might elevate your hips with a yoga block to support a longer spine.

2 - Anjaneyasana with a Side Bend - Kneeling Lunge

Step your right foot forward into a lunge and place your left knee down. Place your right hand on your right thigh and reach your left arm overhead. Lean your torso to the right and continue to reach your left arm overhead. If you have more range of motion, you might place your right hand on a yoga block or on the floor. Repeat on second side.

3 - Bhujangasana - Cobra

With your belly down, separate your feet hip distance apart or narrower with your toes pointed back. Place your hands along side your upper to middle ribs. Hug your shoulder blades down and together. Pull your elbows in toward the midline. As you begin to lift your chest and upper ribs, press the tops of your feet down, frontal hip bones down, and create a pulling back action with your hands. Your Cobra can stay low (like pictured above) or play with lifting your middle ribs off the floor as you continue to hug your elbows and shoulder blades in.

4 - Seated 90/90

Think of this as a variation on Pigeon Pose.

Place your right shin parallel to the short edge of your mat and your left shin parallel to the long edge of your mat. Most of your body weight will be toward your right hip and both knees will be at a 90-ish degree angle. Either keep your torso upright or fold forward. If you do fold, fold straight forward over the front shin or toward the front foot for a deeper outer hip stretch. Repeat on second side.

5 - Reclined Twist with Eagle Legs

Lay on your back with your knees bent and your arms extended out wide. Shift your hips toward the right edge of your mat and wrap your right leg up and over your left leg. Let your knees fall toward the left side of your mat. You might inch your hips to the right to stack your right hip on top of the left hip. Repeat on second side.

6 - Sukhasana - Easy Pose

Cross your right shin in front of your left shin. You might keep your spine upright or fold forward. If you feel stress or strain in your lower back you might elevate your hips with a block, folded blanket, or cushion. If you do fold, consider adding some side to side movement with the torso to explore different sensations for the lower back and outer hips. Repeat on second side.

One last thing to consider: Keep in mind that your meditation practice does not have to be from a seated position. There are meditation practices that include movement like walking or moving through shapes… like your asana practice.

Hamstring Helper

So you wish your hamstrings were more mobile? Join the club of millions!

As someone with a long-time hamstring injury I tend to shy away from hamstring mobility work. However, it’s an area a lot of folks are excited about and I don’t want to disregard that interest.

If you’re looking to create more space in your hamstrings, consider the sequence below. Take note that the shapes aren’t just about begging the backside of your legs to get longer. The sequence also takes into consideration the frontside of the hips and their role in supporting hamstring length.

1 - Supta Padangusthasana - Reclined Hand to Foot Variation

My all time favorite hamstring opening posture!

Lay on your back and take a strap or towel with you. Bend your knees and place your feet on your mat. Lift one leg toward the ceiling and place the strap/towel around the ball of your foot. Your lifted leg might be bent and that’s fine! Actively press the sole of your lifted foot straight up and dorsiflex your ankle (pull the toes down toward the shin). With your hands pull straight down.

As you press your heel up, in opposition draw your thigh bone toward your hip socket and press the sitting bone of the lifted leg toward the front edge of your mat. (Heel up, thigh bone down, sitting bone forward.) Stick with the shape for a few breaths and repeat on the second side.

2 - Navasana - Boat

Sit on your behind with your knees bent and feet on your mat. Rock back slightly until you can take some weight out of your feet. You can always keep your toes down, or elevate your shins parallel to the mat. To get your hip flexors to do some work, be sure to lift your lower ribs away from your hips. The higher you lift your legs, or even straighten out your legs, the more your hip flexors will have to work.

The activation of this muscle group will support you in lengthening the backside of your legs - your hamstrings.

3 - Ardha Hanumanasana - Half Splits Variation

From a wide lunge, shift your hips back and lengthen your front leg any amount. You might keep your front leg wide of your pelvis (as pictured above) or center your extended leg with the legs about hip-distance apart. Rather than sitting on your back foot, elevate your pelvis above the back knee.

Flex the ankle of your extended leg. Reach your chest forward and actively draw the sitting bone of your extended leg back in space. As your chest moves forward, imagine you could suck your extended leg back into its corresponding hip socket. This action gets your hip flexors to fire. Even if your extended leg is bent you’re sure to feel this in your hamstrings!

Switch to second side after five to ten slow breaths.

4 - Eka Pada Tadasana - One-Legged Mountain Variation

This shape doesn’t necessarily lengthen your hamstrings, but it encourages your legs to stay strong and brings awareness to the hip flexor region.

Stand with your feet hip-distance apart. Shift your weight into one foot and elevate the opposite leg with the knee bent to about 90 degrees. You might stay right there. The simple action of elevating the leg causes the hip flexors to work. To add more effort place your hand on your lifted thigh. With balanced pressure, press your hand down into your thigh and push your thigh back into your hand. Switch sides once you start to feel the hip flexors fatigue.

5 - Prasarita Padottanasana - Wide-Legged Forward Fold

Step your feet about four feet apart. (This is a totally general stance. At the very least have your feet wider than your hips.) Point your toes straight forward or slightly turn them in toward the center. Hinge forward from your hips and place your hands on your mat, legs, or up on a prop. Consider placing your hands somewhere that allows you to maintain a long-ish spine.

Ground your heels and tip a little weight into your toes. Even if your knees are bent, actively lift your sitting bones up and allow the front rim of your pelvis to rock forward over your thigh bones. Just like Half Splits, imagine you could pull your thigh bones up into your hip sockets to get your hip flexors to activate.

Stay active in the shape for ten slow breaths.

6 - Paschimottanasana - Elevated Seated Forward Fold Variation

Take a seat on the front edge of a yoga block or folded blanket. Extend both of your legs forward any amount. Keep in mind that your legs do not have to be straight in order to benefit from the shape.

Before you hinge forward, lengthen your lower ribs away from your hips and sit tall. As you do hinge forward think of moving your sitting bones back and rock the front rim of your pelvis forward over your thigh bones. Rather than going to your deepest fold, stop a few inches higher. Stay at that point for a few breaths and imagine you could suck your thigh bones into your hip sockets and you actively press your heels forward.

I encourage folks to try this posture with their tail elevated. Why? When you’re seated on the floor most bodies feel like their sitting bones are stuck and don’t have the freedom to shift back. By slightly elevating the tail you create space for the sitting bones to shift back which allows the pelvis to rock forward over the thigh bones.

Energize

Need a little pick-me-up in your day?

Consider adding these six shapes into a practice. Perhaps you only have ten minutes. Take the ten minutes to move your body. Trust me. You’ll feel better after.

1 - Urdhva Hastasana Variation - Standing Backbend

Stand with your feet hip-distance apart. First take the time to get your feet grounded. Then reach your arms behind you, face your palms toward each other, and interlace your fingers. You can also hold a towel or strap if the front of the shoulders are feeling tight. As you stretch your knuckles down, lift the front of your chest up while gathering the shoulder blades in toward your spine.

2 - Anjaneyasana - Kneeling Crescent

Step one foot forward into a lunge and set your back knee down. Send your arms overhead either with your palms together or seperated. Press firmly into your front foot. The hips might drop forward, however, draw the front rim up your pelvis slightly upward toward your lower ribs. Repeat on second side.

3 - Virabhadrasana II - Warrior II

Step one foot forward with your toes pointed toward the front, short edge of your mat. Step your other foot back into a long stance with your toes turned slightly inward toward the front, short edge of your mat. Bend deeply into your front knee and straighten your back leg. Reach your arms apart and energetically reach through your fingers. Repeat on second side.

4 - Reverse Warrior Variation

Use the same stance as Warrior II. Reach your front arm up and your back arm down. Bend your top elbow and hold the backside of your head. Actively press your head into your hand and your hand back into your head for a deeper side stretch. Repeat on second side.

5 - Ustrasana - Camel

Kneel with your knees about hip-distance apart. Place your hands on your lower back or hamstrings. As your lift your chest up, draw your shoulder blades toward your spine and tilt the front rim of your pelvis up toward your lower ribs. Rather than dropping the head back, maintain some length on the backside of your neck.

6 - Urdhva Dhanurasana - Wheel

Lay on your back with your knees bend and feet placed about hip-distance apart. Place your hands outside your ears with your elbows draw in toward the midline of your body. With an exhale breath briefly press the the top of your head and then firmly press your hands into your mat. Continue to push your feet and hands down and lengthen your arms. Bridge Pose is an excellent option here, too.

After working through these shapes you might finish with an easy twist and an outer hip opening shape like Half Pigeon, Double Pigeon, or Reclined Ankle to Thigh Pose.

Soothe Your Senses

Feeling a little stressed out? Need some time to unwind?

Integrate these six postures into your day!

Hold each shape for 5 to 10 breaths… or really as long as you want. If your intention is to calm down and turn inward, I invite you to approach these postures in a soft, relaxed manner and intentionally lengthen your breaths.

1 - Seated Twist

Sit with your right shin crossed in front of your left shin. Ground your right hand on the floor behind you close to your pelvis. Place your left hand on your right knee or thigh. Lengthen your ribs and spine up away from your pelvis and rotate to your right. Repeat on second side.

2 - Seated Side Bend

Like the first shape, cross your right shin in front of your left shin. Take your right hand to your right about a foot or so. Lift your left arm overhead with your plan facing down. Lean into your right hand and side bend to the right. Resist from lifting the left half of your pelvis away from the floor. Repeat on second side.

3 - Sukhasana - Easy Pose

Cross your right shin in front of your left shin - just like the two previous shapes - and fold forward. If you feel stress or strain in your lower back you might elevate your hips with a block, folded blanket, or cushion. When you fold forward support your forehead with a prop to ease tension from your neck and shoulders. Repeat on second side.

4 - Baddha Konasana - Bound Angle Pose

Place the soles of your feet together and widen your knees. Depending on the mobility of your hips and spine you might keep your torso upright. If it feels right, hinge forward from your hips. Similar to Sukhasana, you might elevate your hips and/or support your forehead with a prop.

5 - Half Pigeon

Lay the outer edge of your right shin and knee down on your mat. Turn your hips forward toward the front of your space. There’s many ways to set up your legs in Pigeon, for this practice go for mild sensation. Place your right knee slightly outside your right hip. Lengthen your left leg behind you. Fold forward and place your forehead on something. Repeat on second side.

6 - Viparita Karani - Legs Up the Wall

Just as the name suggests, this shape allows for you to literally put your legs up a wall. Scoot your tail close to a wall and extend your legs straight up. If available, elevate your sacrum with a bolster, cushion, or a folded blanket. Place your thigh bones directly above your hip sockets to allow the legs to rest in the joints. Soften the back of your head, shoulders, and arms.

Runner Recovery

Even after completing a dozen or so running races and a handful of triathlons I still hesitate to call myself a runner. I gotta get over it.

It’s by no means easy, but the steadiness and focus required for running long distances has been good for me. Somedays going for a five, six, seven mile run is my meditation practice.

With time, however, the physical demands of running can take a toll on the body. Some types of yoga practices pair beautifully with running.

Below are a few of my go-to yoga shapes for recovery after a long run. These postures focus on outer and front of hip lengthening and front of chest opening - all areas that tend to be tight for runners. Hold each shape for 5 to 10 breaths. Keep in mind that “hold” doesn’t mean be a statue. Often intentional movement or rocking in a shape can help you release the tight stuff.

A block or similar prop to bring the floor higher to you could be helpful for some of the shapes.

1 - High Lunge with Front of Shoulder Stretch

Take a long step forward with your right foot and point all of your toes forward. Separate your feet hip distance apart or wider. Bend your front knee (right knee) to about a 90° angle. As you settle into your lunge, pull the front rim of your pelvis up toward your lower ribs to create length in the front of your back thigh (left thigh). Interlace your finger behind you with your palms facing each other. (You can also join your hands with a strap or belt.) Actively hug your shoulder blades down and together to widen the front of your chest. Repeat on second side.

2 - Cross Legged Forward Fold

Stand with your big toes together and fold forward. Cross your left ankle in front of your right ankle and line up your pinky toes side by side. Place your hands on the floor, your shins, or on a prop. Press firmly into your big toes. Lengthen your back leg (right leg) as much as you can and pull your right sitting bone up and back to increase the outer hip and thigh stretch. Repeat on second side.

3 - Standing Ankle to Thigh Variation

Shift your weight to your left foot, cross your right ankle over your left thigh, and bend your standing knee (left knee). Widen your lifted knee (right knee). Hinge forward from your hips. As you hinge forward send your tail back and your chest forward. Place your right hand on the floor or a prop. Press your lifted hand (left hand) into the sole of your lifted foot (right foot). Actively push your lifted foot (right foot) into your lifted hand (left hand) and your hand back into your foot.

4 - Locust Variation

Lay belly down with your feet hip distance apart or closer. Point your pinky toes back. Interlace your fingers behind your back (or use a strap or belt to join your hands). Ground your frontal hip bones. Lift your legs, chest, and arms. Actively stretch back through your toes and elevate your thighs by engaging your glutes and hamstrings. Draw your shoulder blades toward your spine and down toward your hips. Stretch your knuckles back.

5 - Half Wind Removing Pose Variation

Lay on your back with your knees bent and your feet flat. Lift your hips and place a block (or folded blanket) under your sacrum. Lengthen your left leg long onto your mat. Bend your right knee and hold onto the front of your shin or under your knee. Draw your lifted knee (right knee) up toward your right armpit. Stretch the heel of your extended leg (left leg) as far forward as you can while pressing your ankle bone toward the floor to stretch the front of your extended hip (left hip). Repeat on second side.

6 - Reclined Ankle to Thigh Twist

Lay on your back with your knees bent and your feet flat. Cross your right ankle over your left thigh. With your left hand hold your lifted ankle (right ankle). Keep your legs in the shape you’ve created and drop your legs to your left. Ground your right foot - you may need to move your hips slightly right to plant your right foot. With your left hand pull down on your ankle to ground your foot. In opposition energetically lift your right knee up and press your knee forward while still grounding your right foot. Reach your free hand (right hand) overhead and stretch as far back as you can through your fingers. Repeat on second side.

Start Your Day

Looking for a few yoga shapes to get your day started? Try these out!

Especially if your day involves sitting in a chair and working on devices, this is a great practice to get your spine moving in all directions while emphasizing front of chest opening. Take slow, intentional breaths in and out of your nose. Hold each shape for 5 to 10 breaths.

1 - Standing Side Bend

Start with your feet hip distance apart. Reach both of your arms overhead. With your right hand hold your left wrist. First lengthen straight up and then lean to your right. Gently pull up and over with your right hand to deepen the stretch on the left side of your body. Repeat on second side.

2 - Ragdoll Standing Forward Bend

With your feet hip distance apart or wider, hinge from your hips into a standing forward bend. Especially with a morning practice, take a generous bend in your knees and allow your spine to be heavy. Interlace your forearms in front of you and hold opposite elbows. Let your neck be long and your head heavy.

3 - Kneeling Lunge with Front of Shoulder Stretch

Step your right foot forward into a lunge and place your left knee down. Stack your right knee over your right ankle and your left hip over your left knee. Firmly press the top of your back foot and front heel into the floor. Draw the fronts of your hips up toward your lower ribs to emphasize the stretch on the front of your left hip. Engage your left glutes. Reach your arms behind your back and grasp your forearms. Draw your shoulder blades down and together to widen the front of your chest. Repeat on second side.

4 - Cobra

With your belly down, separate your feet hip distance apart or narrower with your toes pointed back. Place your hands along side your upper to middle ribs. Hug your shoulder blades down and together. Pull your elbows in toward the midline. As you begin to lift your chest and upper ribs, press the tops of your feet down, frontal hip bones down, and create a pulling back action with your hands. Your Cobra can stay low (like pictured above) or play with lifting your middle ribs off the floor as you continue to hug your elbows and shoulder blades in.

5 - Bridge

Lay flat on your back with your feet hip distance apart or wider and your knees bent. Press through your feet to lift your pelvis. With your arms alongside you, gather your shoulder blades in closer toward your spine. Press the back of your head, upper arm bones, and feet firmly into the floor. As you continue to lift your hips, firm your glutes and hamstrings.

6 - Seated Twist

With your right shin crossed in front of your left shin, place your left hand on your right knee and your right hand behind you. Ground your back hand and sitting bones. Lengthen straight up through the crown of your head as you twist turn your belly button, ribs, chest, and chin to the right. Repeat on second side.