Utthita Parsvakonasana - Side Angle Pose
This posture breakdown is going to start like most of my posture breakdowns begin… There’s a lot of yoga postures I once hated. Now, after taking the time to understand them, I thoroughly enjoy them. In a way, yoga postures are kind of like people!
For this post I’m dissecting Utthita Parsvakonasana - Side Angle Pose.
The word utthita means extended. Right away it gives me an image of something long and drawn out. That’s exactly what’s happening in Side Angle Pose. The body is in a long, drawn out shape. However, sometimes I see students take on this shape in class and their bodies look very condensed.
Ready to extend your Side Angle Pose?

Foundation
Side Angle is often set up from Warrior II. It’s a great base to then move into Side Angle Pose. To fine tune your foundation firmly ground your front foot into your mat. Press evenly through the center of your front heel and the base of your big and little toes. This pressure downward will force your front leg to engage and give you more lift and support.
Press the back edge of your back foot into your mat. As you push through the back foot stretch your back leg as much as you can.
As an added bonus, hug your heels toward each other. You’ll instantly feel your inner thighs kick on providing more lift and engagement in the shape.
Front Knee
Sure, working your front knee to a 90 degree angle is taught in just about every yoga class everywhere. However, your knee will not explode if it’s at more or less of a 90 degree angle! You’ll be fine if you over or undershoot that angle.
When you do set up your front knee rather than just bending your knee forward also draw your front knee slightly wide in the direction of your bottom arm and little toe. For you anatomy and physiology nerds, you’re abducting the front thigh. This movement causes your outer hips and thighs to engage and create space for you pelvis to move. We’ll get to that movement shortly…
Twist A Little
Once you have your feet and legs solidified, you can then address the upper body. Side Angle involves a slight twist in the upper body. Without moving the legs or pelvis, turn your top ribs away from the floor. The twist allows you to widen the chest and lengthen away from the strong foundation you’ve established.
What Happening with the Hips?
This is where I get all sorts of questions about Side Angle Pose. What the heck is going on with the hips? Once i figured out the pelvic orientation of this posture everything changed!
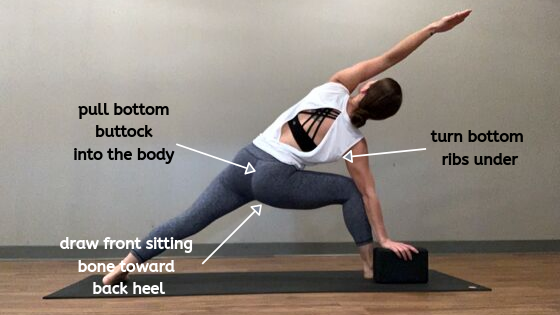
Draw your front sitting bone toward your back heel (if your right foot is forward this will be your right sitting bone). When you do this there’s a good chance your top frontal hip bone is going to turn slightly downward. Good! Let it happen! With this action you might feel that you have more space to lengthen and extend your upper body. It is called Extended Side Angle, right?
Along with drawing the bottom sitting bone back, it’s important to keep the glutes of the front leg engaged. It’s easy to let the tail sway way out behind you. As you engage the glutes of your front leg, pull your buttock into your body.
More Rib Action
Your top ribs aren’t the only ones doing the work. You can invite your bottom ribs to the party too. Turn your bottom ribs under as you continue to lengthen them away from your pelvis.
And there you have it! Extended Side Angle Pose. Try it on! Are you now feeling long and extended?