Ardha Uttanasana - Halfway Lift

I think my new favorite pastime, beyond doing all things dog related, involves examining common yoga shapes and dissecting a variety of approaches to the shapes.

In this edition of Erin Examines we get Ardha Uttanasana, also known as Halfway Lift.

First, let’s look at the name:

Ardha is often translated as Half. And Uttanasana is often translated as Forward Bend or Forward Fold.

Ardha Uttanasana = Half of a Forward Bend/Fold

Now that we’ve gotten that out of the way, let’s look at the shape and its many forms.
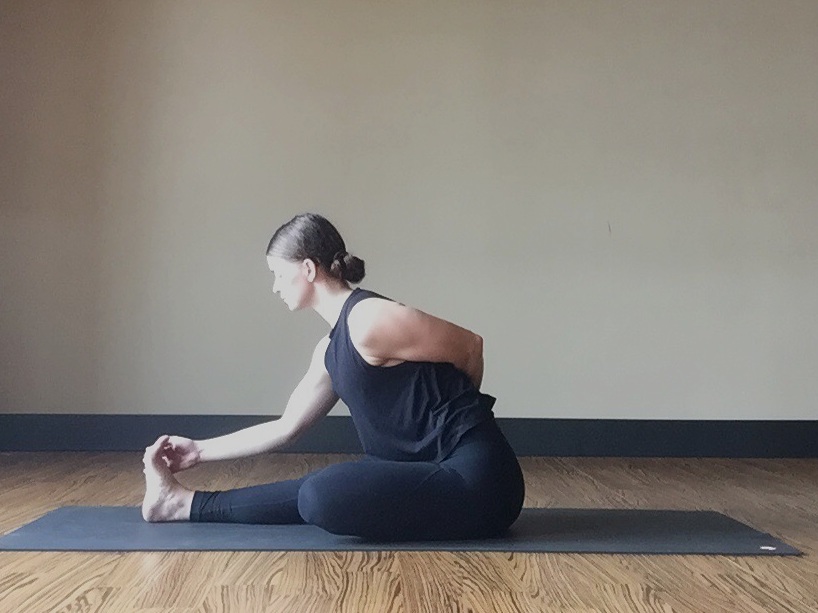
frontal hip points rocked forward & down over thigh bones (3).png

Hands on Shins

I’m not shy about my preferences. This is my go-to variation in my own practice and I tend to cue the shape in this manner.

Why?

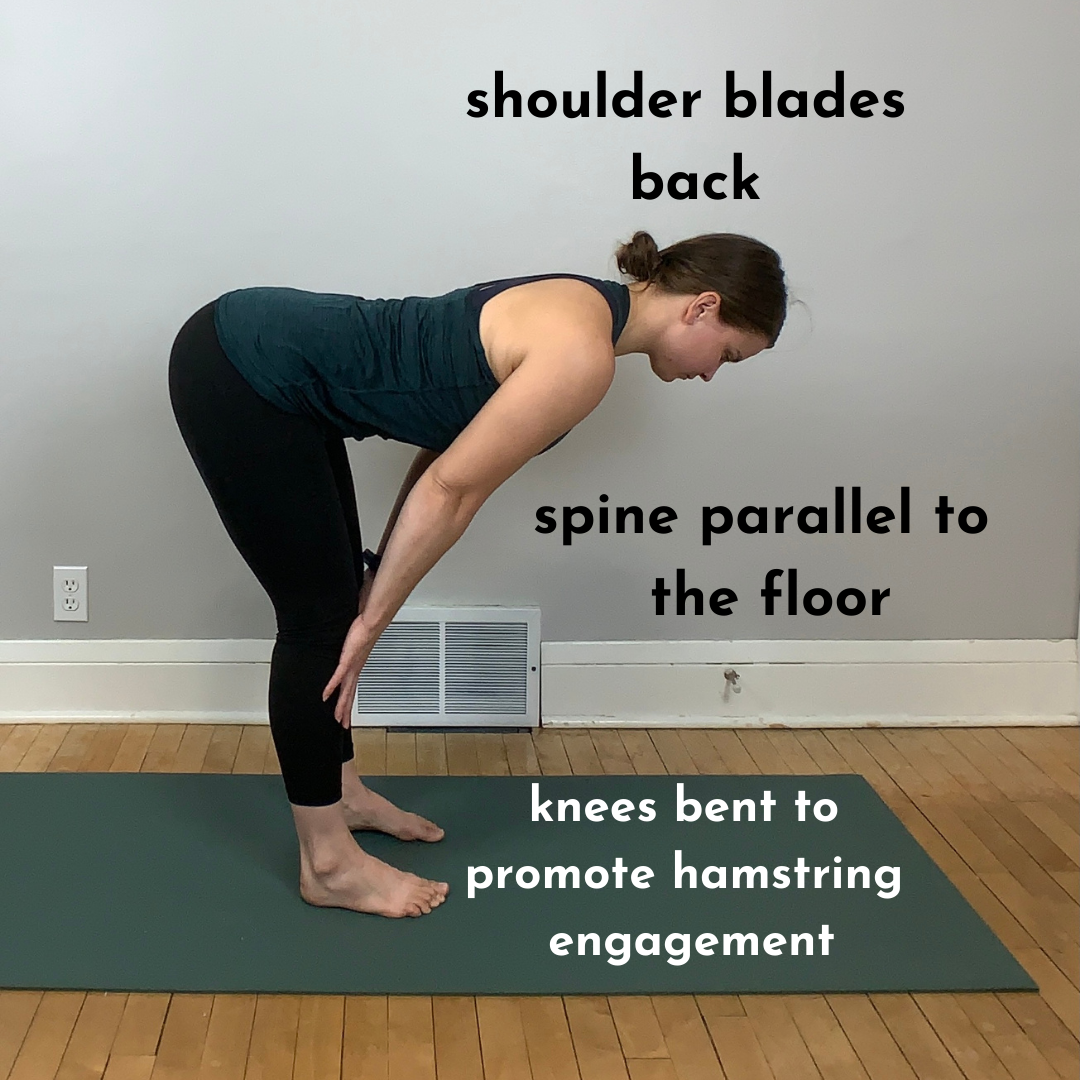
By pressing your hands into your shins you might find that you’re able to create - what feels like - more length in your spine. Plus, the firm press of hands into shins gives you something to resist against and might allow you to draw your shoulder blades back toward your hips and active the upper back. As strength in the upper back can sometimes get neglected in a yoga practice, I’m a fan of emphasizing upper back strength whenever possible.

This variation also allows you to get your spine parallel-ish to the floor. Going back to the name of the shape; you’re placing your body in half of a forward bend.

One last note on this variation: Depending on your body, you might bend your knees a bit. I, personally, encourage slightly bent knees with the bodyweight tipped toward the toes to promote hamstring engagement.
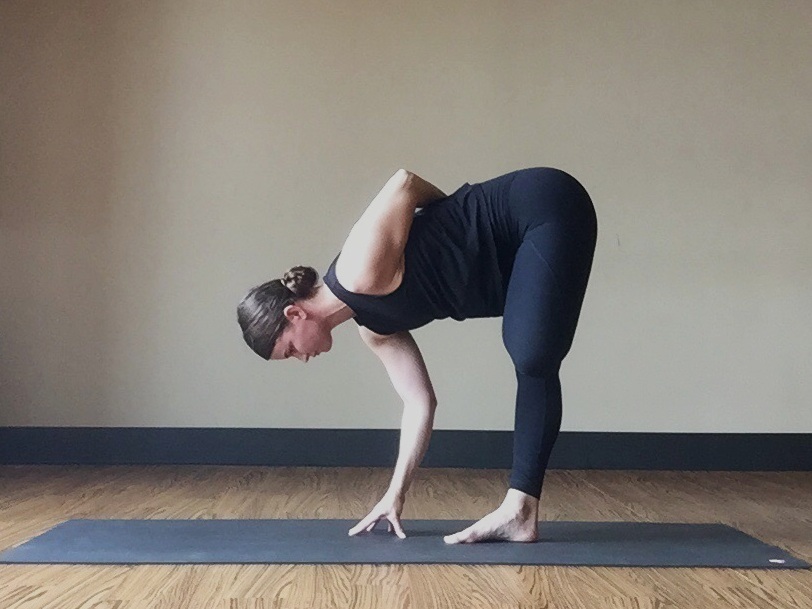

frontal hip points rocked forward & down over thigh bones (4).png

Hands to Floor

Another common approach to Halfway Lift is to place your hands or finger tips to the floor.

Why would someone choose this variation?

Hands to the floor creates deeper flexion in the front of the hips and places the body in a shape that looks more like a forward bend. This variation is commonly seen in an Ashtanga practice. This is totally me speculating as I don’t practice Ashtanga - The Ashtanga Primary Series focuses heavily on forward folding shapes. By doing a Halfway Lift that features deep hip flexion, one might find more depth in the deep forward folds of the Primary Series.

Depending on your body, you might bend your knees or kept the legs straight. Your choice might take into consideration the length of your arms and/or the mobility in your hamstrings.


Other Options

I thoroughly appreciate when students try on something I don’t offer in a class. And I thoroughly appreciate experimenting and trying variations that are “less traditional”.
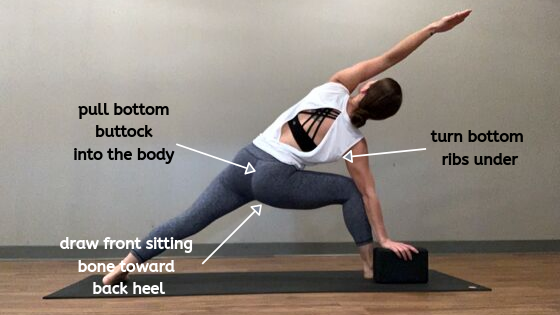
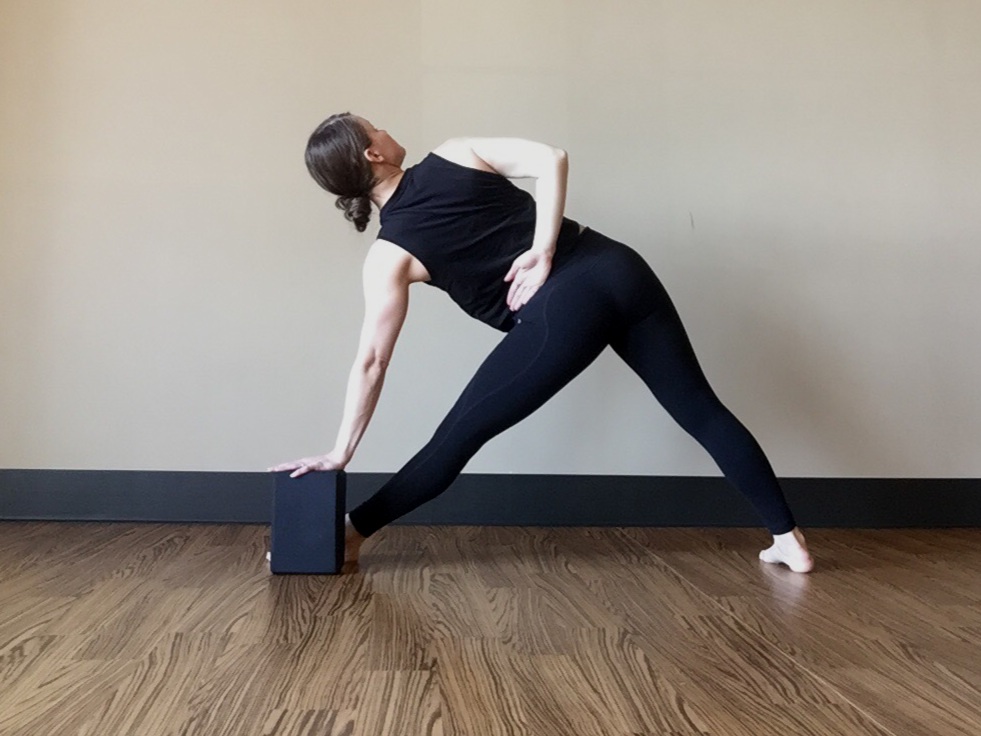
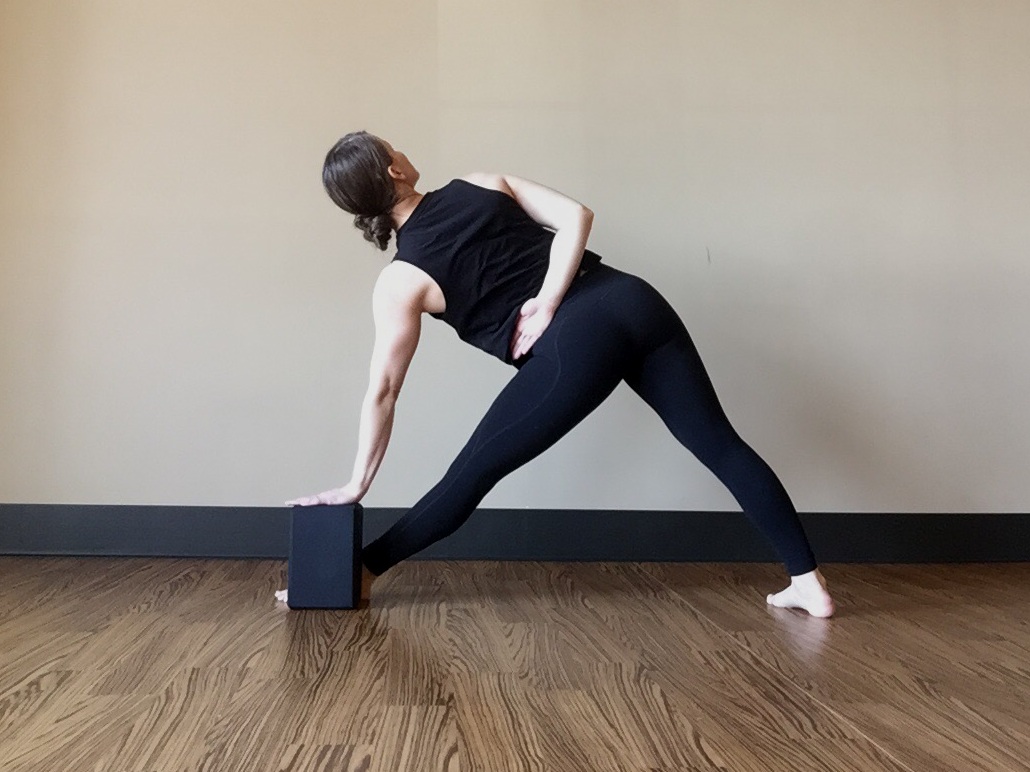
Hands to Blocks

frontal hip points rocked forward & down over thigh bones (5).png

Kind of like a combo of Hands to Shins and Hands to the Floor, Hands to Blocks is one of my favorite options. You get the leverage of moving the chest and spine forward and you get the benefit of pushing your hands down into something. Especially for folks with shorter arms and/or less mobile hamstrings, placing your hands on blocks is a very accessible option.

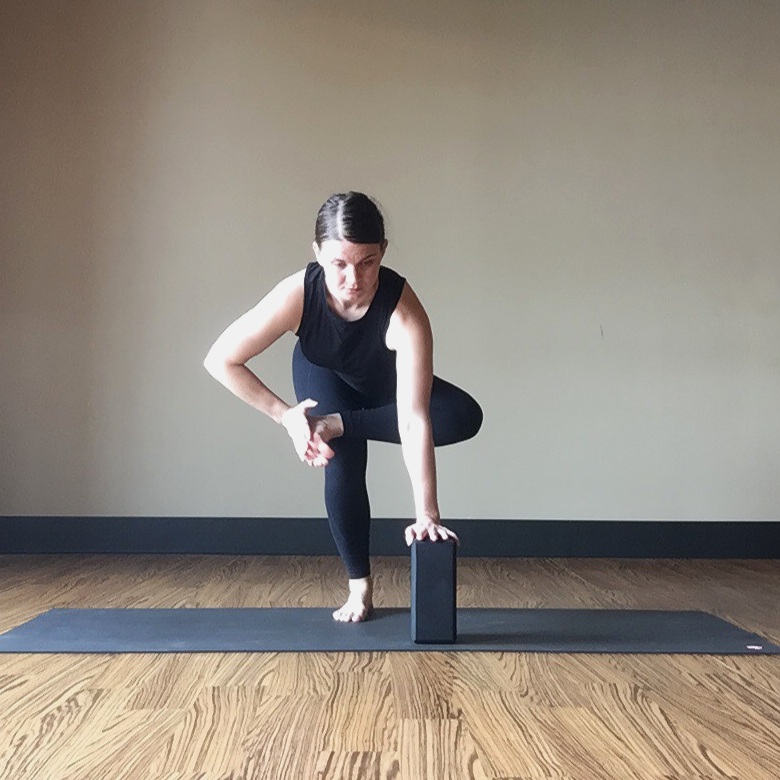
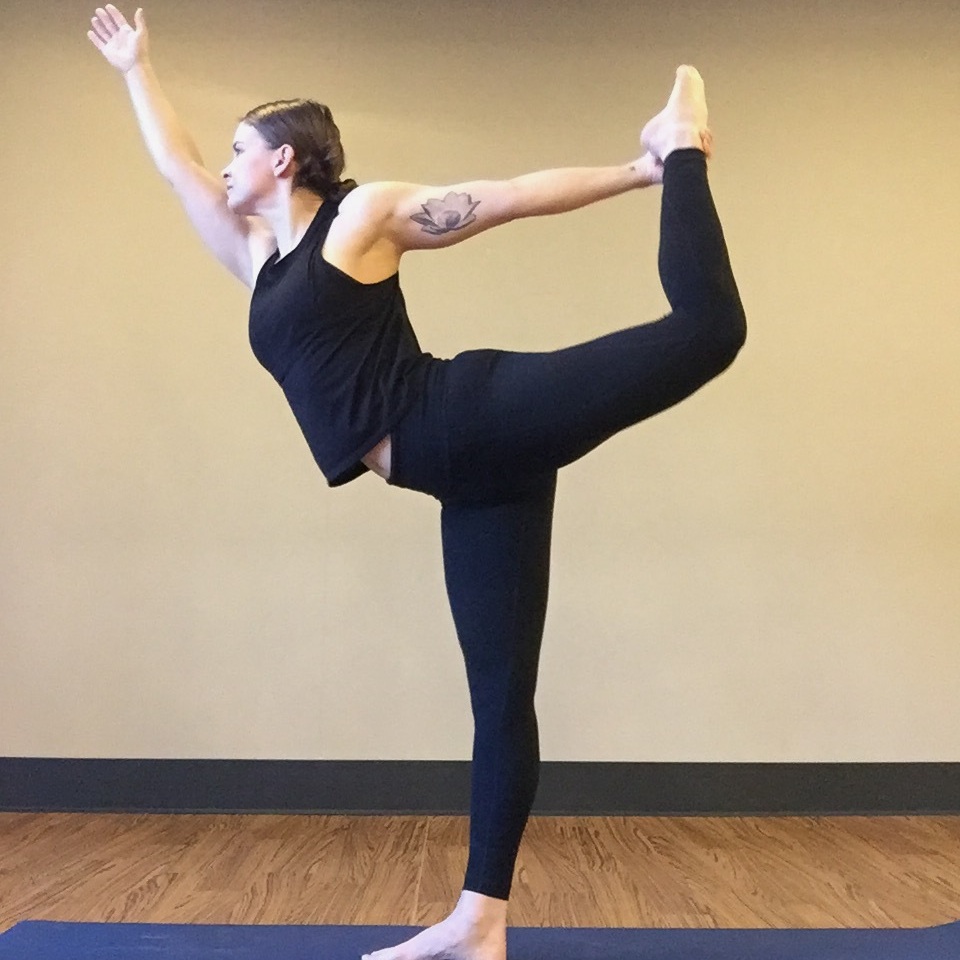
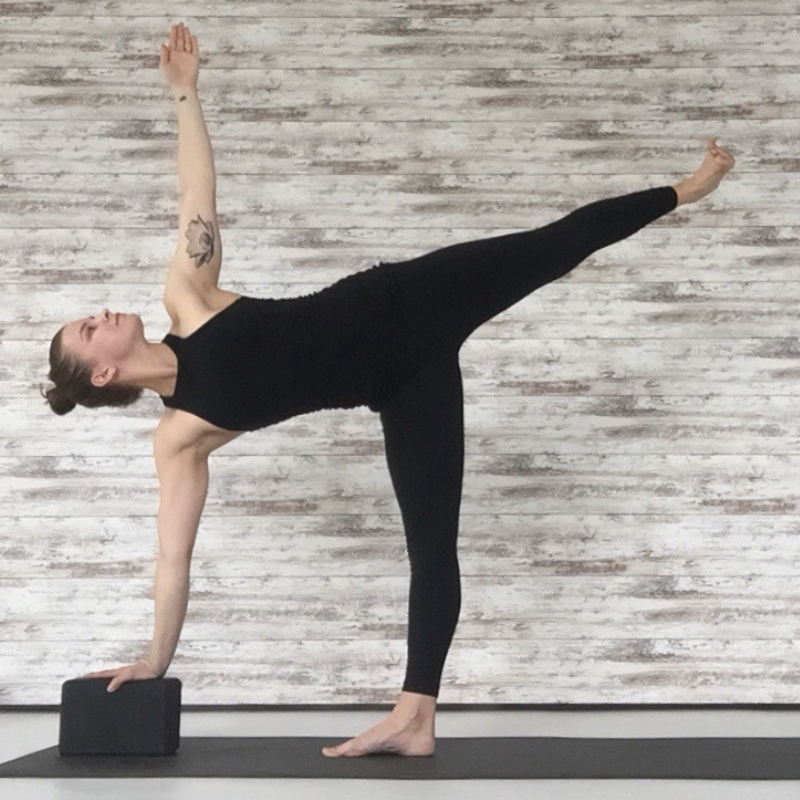
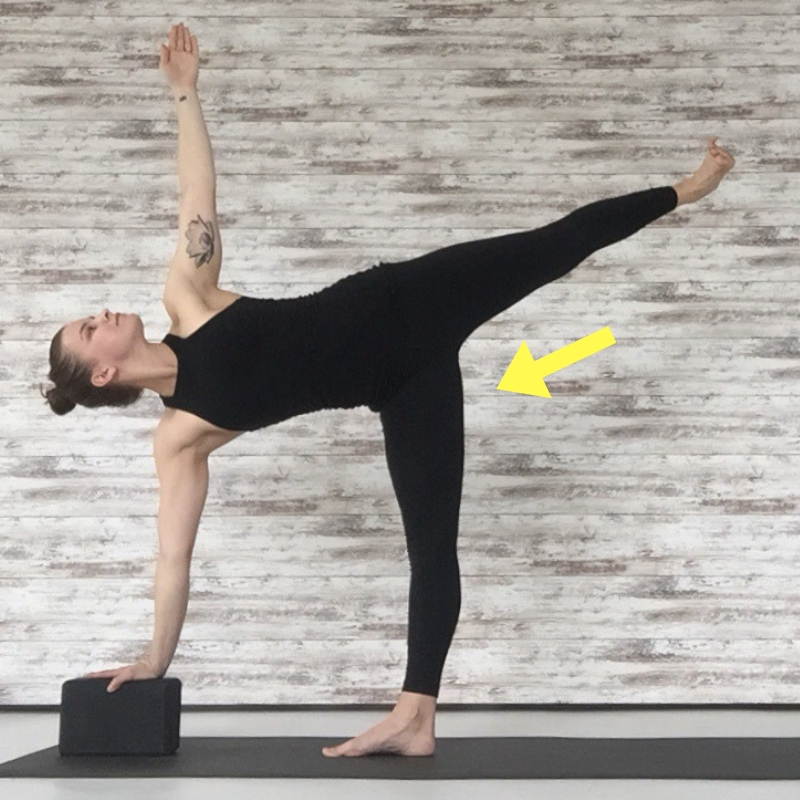
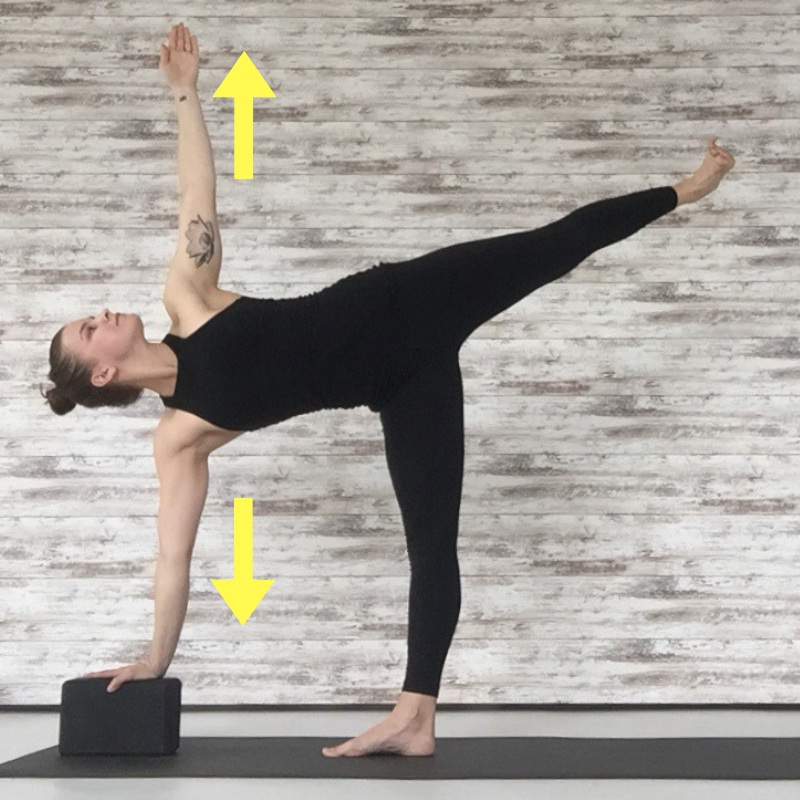
I also love that this variation gives students the opportunity to feel the sensation of pressing their hands into blocks which might create muscle memory for shapes like Warrior III with hands on blocks and Half Moon with the bottom hand on a block.
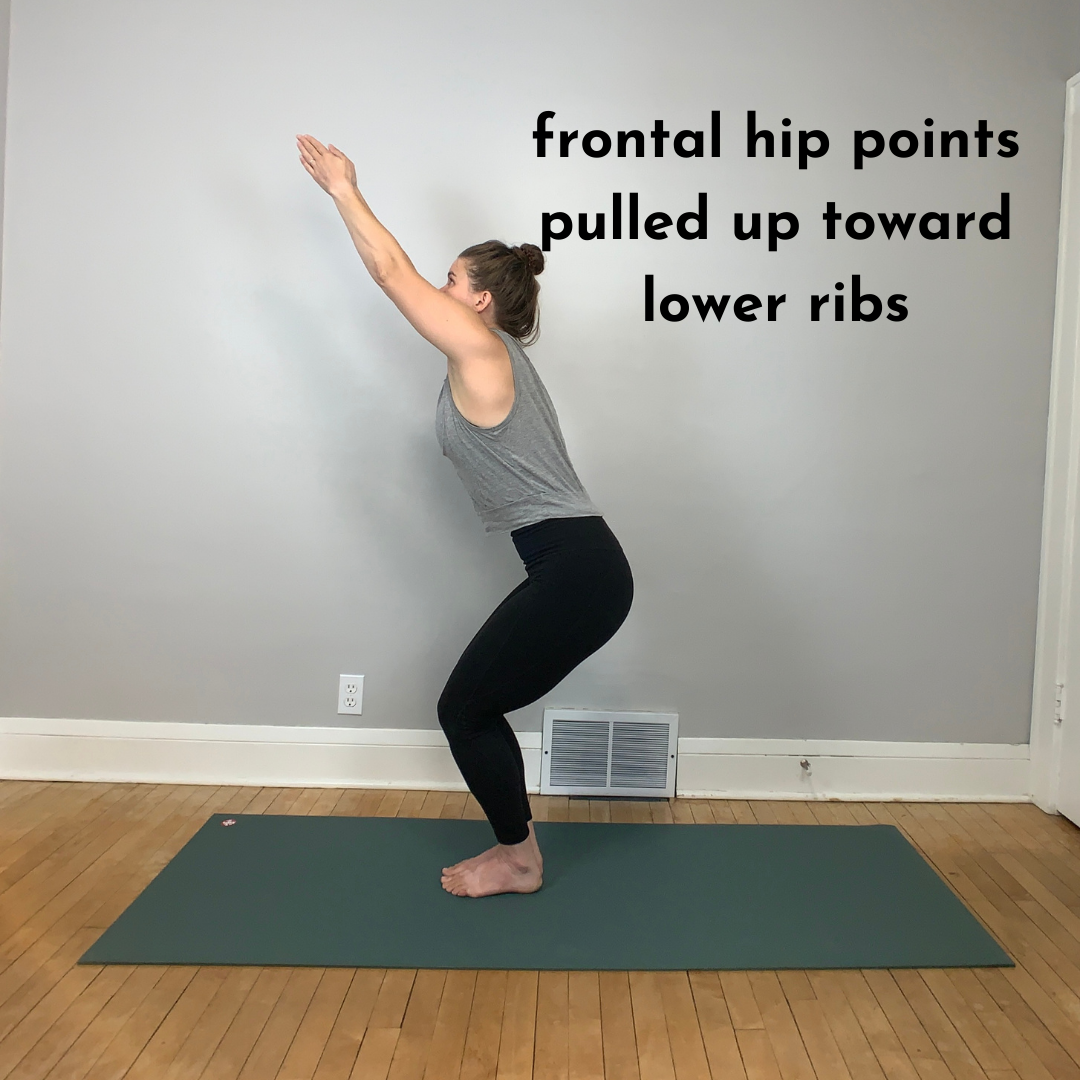
Hands to Head

Posture Pointers.png

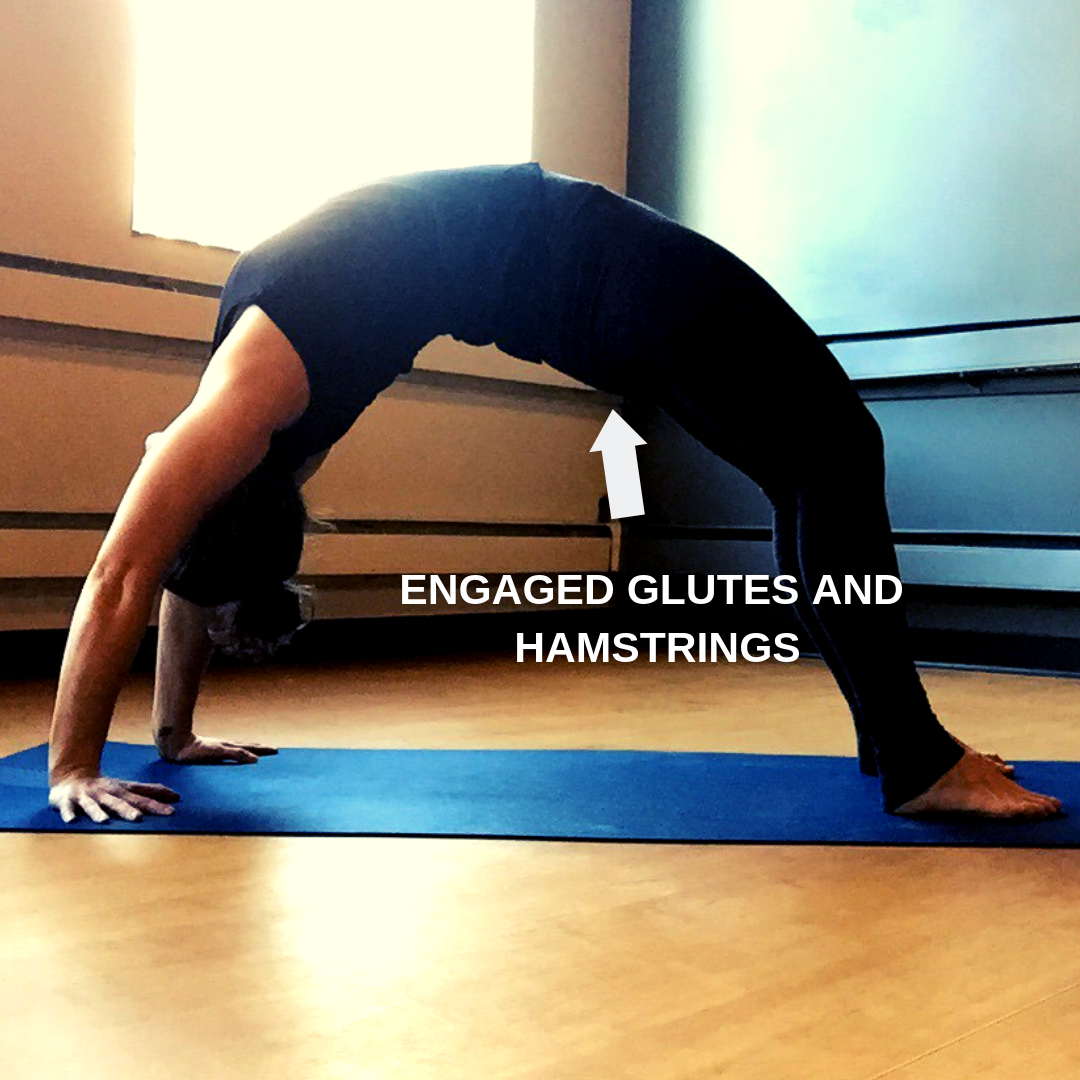
Because this option is not supported by the hands pressing down into something, it requires more activation through the hamstrings and muscles that support the spine. I tend to teach this option when I’m guiding a practice that emphasizes backline engagement.

Almost like doing a deadlift when weightlifting, the weight of the upper body creates a sense of load on the backside of the legs. Like a deadlift, even if you’ve got mobile hamstrings, I highly encourage all folks bend their knees at least a little bit with this variation.

Another option is to take your hands together in front of your heart if your shoulders aren’t loving the hands to head option.


What Option is Best for Me?

Let’s all say it together - “It depends!”

All bodies are different. We’re all bringing different experiences, injuries, limitations, etc. to the practice so your Halfway Lift is going to be different compared to other students. Plus, your Halfway Lift might change with each practice depending on what you’re focusing on in that specific practice.

I invite you to play. Try on all of these options and perhaps you’ll find a favorite option that I didn’t even mention. That’s what’s so great about the practice! It’s going to be different for everyone.

Utkatasana - Fierce Pose

Raise your hand if you grumble every time a yoga teacher cues you into Utkatasana!

Y’all have your hands raised, right?

I would be right there with you, however, at this point in my life I actually enjoy the shape! That’s probably because my practice has been 99% self-led and I’m not doing it 10,000 times in a 60 minute practice…

I also think it’s because I’ve tinkered with the shape so much that I’ve finally found a version of the shape that feels right in my body. Have you taken time to tinker with your Utkatasana?

Sometimes called Fierce Pose or Chair Pose, Utkatasana is pretty prominent in most vinyasa classes. As with a lot of common shapes, when I take guided classes I seem to receive a variety of cues regarding the alignment of the pelvis.

Am I supposed to tuck the pelvis under or stick my butt out behind me?

First, I will eventually give you my opinion on this question, but I want to make it clear that it simply depends on your intention. I won’t say one approach is wrong or bad and one approach is correct or good. All bodies are different, all yoga students have different experiences, and we all are going to approach shapes in different ways based on our individual needs.

Let’s look at the two most common approaches…

Option #1: Tail Back & Frontal Hip Points Down

frontal hip points rocked forward & down over thigh bones.png

Considering the shape is sometimes referred to as Chair Pose, think about what happens in your body when you sit into a chair. You stick your butt behind you and naturally your frontal hip points drop forward over your upper leg bones and your upper body moves slightly forward, right? Right!

This approach puts you into the natural movement of sitting back into something.

Also, this approach follows the natural lumbar curve that most (note - not all) spines already have. Rather than flattening the curve of the spine, your lower spine can just do its thing. Sure, the lumbar curve might be increased, but there’s actually nothing wrong with some increasing of the lumbar curve.

Optional #2: Front Hip Points Up & Tail Under

frontal hip points rocked forward & down over thigh bones (1).png

“Tuck your pelvis” is thankfully a cue that is slowly dissipating like “pull your shoulders away from your ears”. However, this option is kind of the tuck your pelvis option. In this approach the frontal points are drawn up toward the lower ribs.

Some folks find this approach helps alleviate lower back discomfort as the lumbar curve is decreased. Along those same lines, you might find that your upper body can get longer and lift up more when the frontal hip points are pulled up. I mean… look at me! I look way taller than 5’2.5” in this approach!

Lastly, you might find that your anterior core - abdominal muscles - are more inclined to turn on when you pull the frontal hip points up. This approach might limit the ribs from pushing forward.

My Two Cents…

Just so we’re clear IT DEPENDS! All bodies are different and yoga is not a one-size fits most situation. In a shape like Utkatasana, the position of your pelvis might be affected by how closer/far apart your feet are placed and/or how you’re placing your arms.

To lay the foundation for my two cents, I want you to know my brain loves to categorize things. I often categorize shapes based on the orientation of the pelvis and its relationship to the legs and spine. While acknowledging that not all shapes will land in a clear category, Utkatasana could be categorized as a forward folding shape. What do most forward folding shapes have in common? The frontal hip bones rock forward over the thigh bones. And that is exactly what is happening in Option #1 of Utkatasana - sitting bones back and frontal hip points dropped forward and down.

In defense of Option #2, I actually think there’s elements of that approach that are important. As mentioned previously, a lot of folks have told me they feel pressure in their lower back when they focus on rocking the frontal hip points forward. I totally get that. And some might pull the hip points up to alleviate lower back pressure to “engage the core”. I get that too. But what if there was a different way to engage your core without changing the position of the pelvis?

frontal hip points rocked forward & down over thigh bones (2).png

Before you go any further, please marvel at my incredible “graphic design” skills. Ooooh! Aaaaah!

Imagine the rectangle to the left is your torso. You’ve got your head above and your legs below. On the sides you have your ribs and at the bottom of the rectangle is your pelvis. Now imagine this rectangle was pitched forward as your knees bent into Utkatasana. Your sitting bones move back and frontal hip points rock forward over the thigh bones. Without actually changing the position of your pelvis think of pulling the right and left sides of your ribs together. Then think of pulling your lower ribs and frontal hip points together. What do you feel?

All of that “think of” stuff is an action - not a movement. Pulling your frontal hip points up and tucking the pelvis under would be a movement. You can still gain the desired outcomes that many people are seeking in Utkatasana - engaged core, supported lower back, etc. - without actually changing the position of your pelvis.

As with a lot of common yoga shapes, I feel like yoga teachers simply parrot what they were taught in training and don’t think twice about it. That was 100% me 12 years ago! And that’s fine! With time my hope is that teachers and students can think more critically about how they’re approaching shapes and really peel apart the various elements of the shape.

Before I jump off my Utkatasana soap box, my thoughts on the pelvic position in Utkatasana takes into account that there’s not added load or force in the shape. Meaning I’m not talking about the position of the body while holding weight. The assumption is you’re just working with your own body weight. And, lastly, can we all agree that our bodies are incredibly resilient and we don’t have to worry about “protecting the lower back” when doing Utkatasana?

— Fin —

Bakasana - Crow Pose

I initially fell in love with the physical practice of yoga because I loved the challenge of trying on new postures. If I was unable to do the shape when I first learned it I continued to dissect the posture until I could do it. I still appreciate that aspect of the practice - the determination and discipline of finding ease even in new, challenging shapes.

I don’t actually recall the first time I attempted Crow Pose, but I do recall the first time I felt strong and stable in the hand balance.

What changed for me? What details had I missed?

I remember going through my first yoga teacher training and leaving training sessions with massive bruises on my upper arms from doing Crow Pose over and over again. I kept telling myself that like calloused hands that worked hard in the yard, my upper arms would get used to the pressure.

Turns out I just didn’t fully understand what I was doing.

Rounded Squat on Chaturanga Arms

For the longest time I thought Crow Pose was done with a long, flat spine. I’d let me my chest drop forward and downward while my shoulder blades pinched in toward my spine. I could do the shape in that manner but it never felt sustainable.

Then, years ago, my teacher shared in one his workshops that Crow Pose is a squat on top of Chaturanga or Plank arms. Not only is the body in a squat position, it’s in a rounded squat position. This approach required a lot of unlearning for me. If felt awkward at first, but then it started to make sense.

By the rounding the spine the body becomes more compact. The rounded shape draws energy in and up allowing the core muscles to wake up and kick on to support the shape. The rounding of the spine also allows the shoulder blades to protract - move away from the spine - which allows the arms to actually push the mat away.

round+the+upper+spine.jpg

Everyone Has Wiggly Triceps

When I teach Crow Pose, especially to beginners, I like to do this very attractive thing where I grab my triceps and wiggle them around. I inform everyone in the room that no matter how much I, or anyone in the room, works out their upper arms are pretty much guaranteed to wiggle and wobble.

I make this comment, which is typically met with nervous laughter (do I laugh at the teacher’s wiggly arms?), to show that this wiggly spot isn’t going to be the most stable place to balance. Like trying to balance on your tiptoes on a fluffy pillow, balancing your knobby knees on your triceps may not result in a strong, balanced shape.

All bodies are built differently so not all bodies will be able to get their knees higher than the elbows, however, the higher you can get your knees toward your armpits, or even toward your shoulder blades, the more stable you might feel once you’re balancing.

Get Handsy

Crow Pose requires you to bear weight in your hands. Just resting on your hands isn’t enough. You’ve got to use them!

I typically encourage students to place their hands shoulder distance or slightly further apart. Remember, your hands are your base and you want a pretty wide base to balance. On that same note, it’s important to spread your fingers as wide as you can to create the widest base possible.

When you do start to balance, get handsy. Grip your mat with your finger tips. I often find that when I balance on my hands the tips of my fingers turn slightly pale from all the effort.

lift+your+tail.jpg

Lift Up & Shift Forward

Now that your foundation is established, all you have to do is lift up and shift forward.

If you started in the rounded squat shape, you’ll need to lift your tail up to rock the whole shape forward into your hands. When you lift your tail also hug your abdomen to your spine. Keep your shoulder blade broad across your upper back and just shift your gaze forward. The look forward is pretty important. By looking forward you’re preventing your body from instantly somersaulting off your mat.

Take Flight

Once you do find some hang time there’s a few more details to consider.

Remember the wiggly arm situation? You can still balance on that wiggly part, but you’ll find more balance if you engage your inner thighs and draw all that wiggly stuff toward the midline. By hugging the knees and inner thighs toward the middle you’ll also recruit essential aspects of your core to help you feel stronger in the shape.

When you do balance don’t forget about your feet. Of course you might be more concerned with not falling on your face, and that’s important. If you find that you’re able to balance for a few breaths, start to draw your heels toward your tail. The pulling of the feet in keeps the shape compact and strong.

squeeze+inner+thighs+and+knees+toward+center.jpg

Need a Boost?

Students often share with me they don’t think they’re strong enough to do Crow or their hands aren’t meant for balancing. Now some of that might be true, but I’ve found that just getting the knees high enough toward the shoulder blades makes a huge difference.

Consider propping up your feet with a block. Set up the shape in all the same ways, but you’ll find that your knees might be able to bypass the wiggly section of the arms and find a more stable place to balance.

prop+up+your+feet+for+more+height.jpg

Not Interested in Balancing on Your Hands?

Fair enough! It is a totally reasonable thought to keep weight out of your hands.

I love setting up hand balancing postures in ways that do not involve actually balancing on the hands. There’s a few different ways to set up Crow without the fear of falling on your face. One of my preferred methods is from a version of Boat Pose.

From the seated balance take your knees wider than your ribs, keep the inner edges of your feet together, draw your knees toward your armpits and squeeze in. With your arms stretched out in front of you, image you could push the wall you’re facing away to protract the shoulder blades and emphasize the pushing action that occurs in Crow.

Viola! Same shape. Different relationship to gravity.

seated crow.png

Utthita Parsvakonasana - Side Angle Pose

This posture breakdown is going to start like most of my posture breakdowns begin… There’s a lot of yoga postures I once hated. Now, after taking the time to understand them, I thoroughly enjoy them. In a way, yoga postures are kind of like people!

For this post I’m dissecting Utthita Parsvakonasana - Side Angle Pose.

The word utthita means extended. Right away it gives me an image of something long and drawn out. That’s exactly what’s happening in Side Angle Pose. The body is in a long, drawn out shape. However, sometimes I see students take on this shape in class and their bodies look very condensed.

Ready to extend your Side Angle Pose?

press through back edge of back foot.png

Foundation

Side Angle is often set up from Warrior II. It’s a great base to then move into Side Angle Pose. To fine tune your foundation firmly ground your front foot into your mat. Press evenly through the center of your front heel and the base of your big and little toes. This pressure downward will force your front leg to engage and give you more lift and support.

Press the back edge of your back foot into your mat. As you push through the back foot stretch your back leg as much as you can.

As an added bonus, hug your heels toward each other. You’ll instantly feel your inner thighs kick on providing more lift and engagement in the shape.

Front Knee

Sure, working your front knee to a 90 degree angle is taught in just about every yoga class everywhere. However, your knee will not explode if it’s at more or less of a 90 degree angle! You’ll be fine if you over or undershoot that angle.

When you do set up your front knee rather than just bending your knee forward also draw your front knee slightly wide in the direction of your bottom arm and little toe. For you anatomy and physiology nerds, you’re abducting the front thigh. This movement causes your outer hips and thighs to engage and create space for you pelvis to move. We’ll get to that movement shortly…

Twist A Little

Once you have your feet and legs solidified, you can then address the upper body. Side Angle involves a slight twist in the upper body. Without moving the legs or pelvis, turn your top ribs away from the floor. The twist allows you to widen the chest and lengthen away from the strong foundation you’ve established.

draw front sitting bone toward back heel.png

What Happening with the Hips?

This is where I get all sorts of questions about Side Angle Pose. What the heck is going on with the hips? Once i figured out the pelvic orientation of this posture everything changed!

Draw your front sitting bone toward your back heel (if your right foot is forward this will be your right sitting bone). When you do this there’s a good chance your top frontal hip bone is going to turn slightly downward. Good! Let it happen! With this action you might feel that you have more space to lengthen and extend your upper body. It is called Extended Side Angle, right?

Along with drawing the bottom sitting bone back, it’s important to keep the glutes of the front leg engaged. It’s easy to let the tail sway way out behind you. As you engage the glutes of your front leg, pull your buttock into your body.

More Rib Action

Your top ribs aren’t the only ones doing the work. You can invite your bottom ribs to the party too. Turn your bottom ribs under as you continue to lengthen them away from your pelvis.

And there you have it! Extended Side Angle Pose. Try it on! Are you now feeling long and extended?

Prepping for Padmasana

IMG_8374.jpg

Often when people hear the word “yoga” they get an image of a human pretzel. Limbs intertwined with no discernment for how the body actually got into the shape. Padmasana - Lotus Pose - is one of those postures. The pious Buddha sitting in the posture with a look of content. All yogis must strive for this state, right?

I don’t actually recall the first time I attempted Lotus, but I’m certain I cranked my legs into the shape to make it happen and didn’t think twice about my approach. There’s something to be said about just trying a posture, but luckily (most of us) get smarter with time and often find there’s a safer and more sustainable approach.

Interested in trying on Padmasana? First, and I don’t mean this to discourage anyone, Lotus isn’t a posture all bodies should be doing. It’s fairly demanding on the hips, ankles, and knees and not all bodies are ready for such a shape. Luckily there’s options and lots of ways to prep for the posture! Second, Padmasana doesn’t have to be a seated posture. Sure, it could be used as a seated meditation posture. But what I love about Padmasana is that there’s many postures that use a Half Lotus variation. The posture has lots of variations and adaptations. Below on the left you’ve got Ardha Baddha Padmottanasana and on the right Ardha Baddha Padma Paschimottanasana.

Prep Your Hips, Knees, and Ankles

Padmasana is a posture that asks your legs to work as a unit. The hips, knees, and ankles all have to be ready to go to support you in the shape. Below are some of my favorite preparatory postures to make the posture approachable and sustainable.

Inner Hips & Thighs

I have found that the inner thighs in Padmasana have to be open and ready to engage when setting up the shape.

There’s lots of ways to stretch your inner thighs, but my two favorites are Reclined Hand to Foot/Strap Pose B and what I like to call Totally Made Up Inner Thigh Stretch (it’s like a half version of Upavistha Konasana).

Don’t mind my overly sunlit face.

Don’t mind my overly sunlit face.

Along with being mobile, the inner thighs have to be ready to engage in Padmasana. The pretzel-like position of the legs has to stay active once you’re in the shape. I like to add in Boat Pose with a block between the thighs to active the inner thigh muscles. Squeeze that block! Not only does Boat with a block prep your inner thighs to engage, but it also engages your hip flexors. Those are also helpful, supportive players in Padmasana.

Knees & Ankles

For me, the trickiest part of Padmasana is the precarious position of the knees. Again, not all bodies are going to easily get into Lotus and that’s okay! Never force your body into a shape it just doesn’t want to get into. Listen to your knees and be honest with your experience.

The knees are in a tightly closed position in Padmasana so it can be helpful to work postures that put the knees in a similar shape. I like to take Virasana - Hero Pose - to get the knees prepared. Similar to Boat Pose with a block, squeeze your thighs toward the midline to engage your inner thighs.

The great thing about about this posture is that it also can prepare your ankles for the entrance into Padmasana. When in Virasana actively press the tops of your feet down to help lengthen the tops of your feet and ankles.

If you’re unable to enter Virasana with your seat all the way down on your mat, consider sitting on a block. Depending on the day, the support of a block is the only way I can enter the posture.

Outer Hips & Thighs

Padmasana is a posture full of opposition. The inner hips and thighs have to be mobile and active, and the outer hips and thighs have to be ready to do the same. There’s endless ways to open the outer hips, these are just two of my favorites that pair well with Padmasana.

First, Standing Ankle to Thigh Pose. Of course you can explore this shape from a seated or reclined position, but I like the standing version for the the option to press your opposite palm into the sole of your lifted foot. This action helps increase the stretch in the outer hips, plus it creates activation in the muscles around the hips.

Second, Gomukhasana - Cow Face Pose. I don’t actually enjoy this posture, however, it is has a similar set up to Padmasana which makes it a helpful preparatory posture. If this posture doesn’t come easily for you, consider elevating your pelvis on a block. Once you’re in the shape, just like in Boat Pose with a block, squeeze your inner thighs together.

So now you’ve prepped all parts of your legs for the posture, but how the heck do you get into the thing? The details really lie in how you enter the shape. Cranking your feet into your hip creases probably isn’t the best approach. It’s important that you take it step by step and be patient with the process. Remember to pay close attention to how your knees react and consider pausing when it’s best to do so.

How to Enter Padmasana

Ardha Padmasana

Ardha Padmasana

Above all else, just be mindful that Padmasana is simply a shape. It has no more or less value than any other posture. The half version, Ardha Padmasana, is an excellent alternative! Consider trying the half version on both sides for a while before committing the “full” version.

Better Understanding Binds

Raise your hand if you dislike bound yoga postures! Not sure about you, but my hand is most definitely raised.

I have never enjoyed bound postures. I’ve blamed it on my short arms and tight shoulders and just figured bound postures weren’t for me. Although I’m slowly gaining a better understanding of bound postures, I still don’t think I’ll ever fully enjoy working into binds. However, I now have a better appreciation for them.

First, turns out I have been doing and instructing bound postures in a slightly incorrect manner. For the longest time I would pull the elbow of my bound arm away from my body to open the shoulder. Turns out that action was pulling me out of the bind!

You know what you do when something isn’t working? Do the opposite!

Draw Your Forearm Against Your Body

In the last week or so while doing half bound postures I started to pull the forearm and elbow of the bound arm closer to my body. (This isn’t a technique I came up with on my own. It definitely came from my teacher.) Once I started to press my forearm into my body I was able to actually move my hand closer to my opposite hip and I had more freedom in my shoulder.

The images above show you the two different approaches. On the left I’m actively drawing my elbow away from my body. On the right I’m actively drawing my forearm and elbow into my body. The one on the right feels more comfortable in my shoulder plus I’m able to slide my hand over to my opposite hip with more ease.

Use Your Core to Rotate

You’ll notice that when you press your forearm into your body it’ll seem as though you’re unable to get a lot of rotation in your chest and spine. That’s true. However, you’ll just need to get more muscles to join in on the fun! Once you set up your half bound posture press your forearm into your body and then rotate your chest away from the floor by using your core muscles. This approach takes the strain out of your shoulder joint and asks your core to support the posture.

Above on the left I’m working a bound variation of Triangle Pose and drawing my elbow away from my body. I’m forcing the rotation to happen primarily from my shoulder joint. In the image on the right my forearm is pressing into my lower back, I’m able to slide my hand further toward my opposite hip, and I’m using my abdominal core muscles to rotate my chest away from the floor.

This approach has truly changed everything for me!

Want more explanation? I’ve got a short video below with more thoughts on bound postures!

Urdhva Dhanurasana - Wheel Pose

I’m not a strong backbender, but I really enjoy them. Wheel Pose is definitely up there as one of my favorite yoga postures. It’s one of my favorites because I love how it feels in body. I also appreciate how much my understanding of the shape has changed and morphed throughout the years. There’s something special about a posture that keeps you on your toes and forces you to learn and expand your understanding.

Want to prep your body for Wheel? Here’s some of my go-to preparatory postures and stretches:

Half Wind Removing Variation

Untitled design (1).png

It’s important to stretch the front line of your body, specifically your hip flexors when you’re preparing for Wheel. I love this variation of Half Wind Removing Pose! Place a block at its lowest height under your sacrum and extend one leg long onto your mat while drawing the opposite knee toward your shoulder. Be sure to press the heel of your extended leg down and forward toward the front edge of you mat to lengthen the extended leg’s hip flexors.

This can also be done without a block under your sacrum if the prop causes any discomfort.


Puppy Pose Variation

Untitled design (3).png

You’ll need two blocks at their lowest height about shoulder distance apart. From Table Top place the tips of your elbows on the blocks. Move your knees back a bit to create some space and lower your chest and forehead toward your mat. Your forehead may or may rest on your mat.

First, press your elbows down and send your tail back in opposition. After a few breaths like that, lift your chest up a few inches and hug your elbows in towards the midline while continuing to press your elbows down and reach your tail back. Not only does this help you stretch your shoulders for Wheel, but it helps you engage important muscles that are necessary for the backbend.


Warrior I Variation

Untitled+design+%284%29.jpg

It’s definitely not my favorite standing posture, but I appreciate some aspects of Warrior I. When setting it up in preparation for Wheel consider reaching your arms overhead, facing your palms towards the ceiling, and pressing upward. The push upward is the same feeling you want to recreate when upside down in Wheel.

Also, while in Warrior I, think of pulling your frontal hip bones up toward your lower ribs. (Think suspenders for those of you who have taken my class.) That same action will happen in Wheel.


Bridge Pose

Untitled+design+%285%29.jpg

The smaller sibling to Wheel Pose, Bridge, is an excellent prep posture before heading into Wheel.

When setting it up, considering placing a block between your inner thighs. Lightly squeeze the block to get your adductors, inner thighs, to activate. That same engagement will be duplicated when you set up Wheel Pose.


Want to learn more about Wheel Pose? Here’s some of my favorite details of the posture:

Engage Your Backside

Engaged glutes and hamstrings.png

You’ve probably been told to disengage or soften your glutes while doing backbends once or twice in a class. I prefer to teach the opposite. I think it’s very important to use your backside muscles to help elevate your hips and press your body into Wheel Pose.

Without clenching your glutes and hamstrings, activate the posterior chain muscles by grounding your feet and actively, isometrically drawing your heels back.

Trust me, engaging your backside in a mindful, intentional manner in Wheel Pose will not injure you.


Activate Your inner Thighs

Engaged glutes and hamstrings (1).png

Yes engaging your glutes and hamstrings in Wheel is good, however, I can’t disregard that sometimes engaging the backside of the legs causes the knees to wing outward. To combat the press of your knees toward your little toes, you also have to engage your inner thighs.

Imagine you had a yoga block between your thighs. As you engage your backside, at the same time squeeze the imaginary block between your legs. (Also, why imagine when you can actually place a block between your thighs?)


Use Your Hands and Arms to Push the Floor Away

Engaged glutes and hamstrings (2).png

Wheel does require some upper body mobility and strength. When in Wheel use your arms and hands to push the floor away. I find that this movement can be tricky for a lot of students. You’re upside down, in, most likely, an unfamiliar orientation so the idea of pushing the floor away while your arms are overhead can be challenging for your mind to compute. Similar to Downward Facing Dog, push your mat away rather than just resting on your arms.


Externally Rotate the Upper Arms

Engaged glutes and hamstrings (3).png

Once you figure out how to push the floor away, consider the position of your upper arm bones. This can be a tricky one. Since your arms are in an overhead position in Wheel Pose, you’re working to narrow your chest and widen your shoulder blades away from your spine. This takes time and some coordination to figure out.

Something I encourage students to do is turn the hands a little outward toward the long edges of your mat. The turn of your hands outward can help inform your arms to move in the direction of external rotation.

Craving a deeper understanding of Wheel Pose? Check out my three-part series: Wonderful Wheel.

A monthly subscription to Erin Jorich Yoga On Demand gives you access to all of the content. You can also rent each video individually.

Dive into Dancer Pose

Oh, Dancer Pose. It’s kind of the quintessential yoga posture. It’s a balancing backbend that requires focus, flexibility, and strength. The great thing about Dancer, or Lord of the Dance Pose, is that there’s so many variations that can be explored. Below there’s Sri BKS Iyengar holding his foot with his hands. And then there’s me. It’s clear that I’ve lost some range of motion since I’ve started weight training, but I have no issues using a strap to help me out.

Standing Backbend

Although there’s different ways of exploring Dancer Pose, the posture is a standing backbend. The spine is in extension and, with his grand range of motion, Iyengar is able to hold his foot with his hands to create a continued circular energy. (Please note that the ability to hold your foot will not extend the length of your life, give you special powers, or make you a better person so we can all set aside our obsession with holding the foot.)

I might like to deemphasize the holding of the foot, however the image shows the backbending nature of the shape. In some bodies, the backbend is less defined. The posture is almost like a version of Warrior III with a foot grab. Often this occurs when there’s more effort on dropping the chest and less emphasis on the lift of the back leg. Think you’re in this boat? Then I’ve got the perfect variation for you!

Unsatisfying Dancer Pose

IMG_7794.jpg

I think the name says it all. This version of Dancer Pose is not exactly enjoyable, but it is effective. To set this one up enter the posture just as you would set up your traditional Dancer Pose. Reach your arm back and bend your knee back on the same side. Rather than holding onto to the foot as you typically would, simply touch the pads of your fingers to the inside of your heel. While maintaining that very light connection begin to enter the posture. The key is that you have to kick and use the glutes and hamstrings of your lifted leg. With this unsatisfying version you take your grip out of the equation and you’re forced to work really hard!

I’ve been teaching this version for a few years now and the responses vary from, “I really did not like that Dancer Pose thing you made us do” to “That was awesome! Can we do that again?” You truly cannot please everyone.

Although the approach is not loved by all, everyone can agree that it is effective and limits the initial reaction to drop the chest in order to enter the posture.

Deepen Your Dancer

Are you looking to explore other variations of your Dancer Pose? Perhaps you feel like you’ve hit a rut and not sure where to go next? Here’s a few postures and exercises that might help you explore other aspects of Dancer:

  • Do more backside strengthening - Unsatisfying Dancer Pose is a great example, but there’s plenty of ways for you activate the muscles around your spine, glutes, and hamstrings in postures like Locust and Bridge Variations.

  • Lengthen your midsection - Many of us, myself included, do so much to strengthen the abdominals and we often ignore that the abdominals need to be lengthened too. Don’t let Dancer Pose be the first time you lengthen your frontside in a practice. Warm up with postures like Supported Fish, Sphinx, and lunge variations.

  • Open your shoulders - If you are on the quest to hold your foot be patient with the process. Holding onto your foot and hoping for the best is not a sustainable approach. Often the limitation is in the shoulder joints when the arms are in an overhead position. Take the time to open your shoulders and lats with things like Archer Arms, variations on Puppy Pose, and Side Bends.

IMG_7801.jpg

As always, every yoga posture will be unique and individual based on the student. Don’t let the images on social media make you feel like your version of Dancer Pose is less than. Embrace what you bring to the practice and give yourself permission to explore further when you’re ready.

Ardha Chandrasana - Half Moon Pose

Untitled design (4).jpg

Throughout my many years of practice I have fallen in and out of love with many yoga postures. Postures I once resisted have now become some of my favorites. Postures I once craved have now been eliminated from my practice. The practice, of course, evolves as we do.

Ardha Chandrasana - Half Moon Pose - is an exception within my practice. I have always loved this balancing posture. When I’m in it I feel big and expansive. I love the huge oppositional energies that are necessary when working the posture.

Let’s break this pose down a little deeper.

Find Your Footing

Untitled design (5).jpg

As with any one-legged balancing posture it’s important to establish a solid foundation. There’s a lot of approaches on how to ground the feet. I sit in the three-point camp. Think of your foot as a tripod. The tripod of your foot is made up of the base of your big toe, the base of your little toe, and the center of your heel. From those three points evenly and actively press down. The even pressure through the tripod of your foot sets up the stability for everything above it and accentuates the natural arch of your foot.

Fire Your Glutes

Untitled design (6).jpg

Your glutes are important muscles that move you through space and offer stability for your hips. Your butt should be utilized! Not just in yoga, but in everyday life. One-legged balancing postures will surely challenge your butt’s ability to activate. In Half Moon firm the backside of your standing leg and simultaneously draw your standing leg thigh bone up toward your standing leg hip.

The action of anchoring your standing foot and simultaneously drawing your thigh bone up toward your hip helps to elongate the standing leg and offer optimal stability.

In Half Moon you’re reaching your body in all sorts of directions. By reaching your body in oppositional directions you’ll create more length and stability throughout your entire body.

Opposition - Head to Heel

When balancing work to reach your head away from your lifted heel and reach your heel away from your head. The stretch toward the front and back edges of your mat will increase the length in your spine and ribs and give you a better sense of balance.

Opposition - Hand to Hand

Another oppositional reach that’s happening in Half Moon occurs between both of your arms and through your hands. I’m a fan of placing the bottom hand on something. If you’re unable to place your hand on the floor use a block. By placing your bottom hand on something you’re creating a more stable position in which you can then refine the posture and find your fullest length through your spine and ribs. Although the bottom hand to something is encouraged, it’s not meant to act as a crutch. Reach in opposition through your top hand to help widen your chest and rotate your top ribs away from the floor.

Untitled design (7).jpg
Untitled design (8).jpg

What’s with the Hips?

I regularly get asked about the hips in Half Moon. Do I turn the top hip away from the floor? Do I turn the top hip down to the floor? Want my honest opinion? It depends! I don’t see a tremendous amount of value in working toward completely stacked hips. However, some bodies could benefit from angling the top hip slightly away from the floor. Similar to Triangle Pose, the hips are tricky and it often requires some experimentation to find the best position for your hips.

So there you have it. Half Moon. Next time it appears in your practice take some time to enjoy the subtleties of this big balancing posture.

Hip Tips in Warrior II

Often the most complicated postures are the ones we do the most. And the postures we do the most are often the ones that don't get the attention they deserve. 

Although it seems like a basic pose, Warrior II is less than basic!

I could deconstruct the whole posture, but I figured I'd just tackle the hips for now.

Square the Hips?

In my experience, there's no need to "square" your hips to the long edge of your yoga mat. In most bodies when the frontal hip bones are oriented toward the long edge of your mat the front knee is forced inward and unnecessary pressure is put on the lower spine. 

Play with letting your hips go where they naturally want to go. As long as your feet are in a solid foundation your hips will angle in a functional, safe manner. Most likely your frontal hip bones will slightly orientate toward the front corner of your yoga mat. 

Soup Bowl Pelvis

When I was a dancer a lot of analogies and images were thrown around. The most common image was the idea of your pelvis as a soup bowl. You don't want to spill your soup forward, backward, over the sides so the image encourages the pelvis to sit in a level, "neutral" position. 

Turns out the soup bowl image is also really helpful in yoga!

In Warrior II play with keeping your frontal hip bones level to each other. In other words, keep the right and left hip bones parallel to the floor. If one hip is too high the soup would spill out the side. As one hip sitting higher than the other won't add a tremendous amount of stress to the spine or pelvis I'm actually not too concerned with this aspect of the posture, but it's something worth considering in your practice. 

Still using the soup bowl image, there's a slight pull of your frontal hip bones up toward your lower ribs to prevent the soup from spilling forward over the front of the pelvis. The opposite, soup spilling out the backside of the pelvis, is a less common occurrence, however, something to still consider in your own posture. 

To give you a better idea and more clarity, I put together a short video for you! Check it out!

Tips on Floating from Downward Facing Dog

Looking to add some flight to your vinyasa practice? Floating or jumping forward from downward facing dog into a standing forward fold can be daunting. For me, it was one of those transitions I just tried because everyone around me was doing it, but I never actually understood the finer details and mechanics until someone took the time to break it down for me. 

I've had a lot of breakthroughs with my students while working on this transition over the last few weeks. Here's some of the key points on how to get light and stable while floating forward. Enjoy!

Shoulders in Downward Facing Dog

Over the years I've realized that "advancing" your practice isn't about doing the big, fancy, cover of Yoga Journal postures. It's more about refining your practice. As a student and teacher I'm excited by deepening my understanding of the "basic" postures. I like to get into the tiniest details of alignment and I thoroughly enjoy the process of helping students find their own unique alignment in common postures. 

This brings us to Downward Facing Dog. What a complex posture! For the first five or so years of my practice I didn't appreciate Down Dog. I felt like I was working too hard and wanted to quickly move out of it. Now I feel very differently. Down Dog feels free and supportive in my body. I am definitely still working physically, but my body seems to be working in such a balanced manner that nothing seems to be over-working. 

What helped me get to this point? Figuring out what my shoulders were doing in Downward Facing Dog! I truly think the shoulders are the missing link in this common posture. To help you find more joy and freedom in your Downward Facing Dog I put together a short video explaining the movements of your shoulder joints while you're upside-down with your arms in an overhead position. Check it out! 

Half Pigeon Pose

I never understood the excitement over Half Pigeon Pose. For the longest time it was a posture that just frustrated me. It never felt comfortable for my body and no matter how much the teacher asked me to surrender I just couldn't. It wasn't exactly pain I was experiencing, there just never was a sense of ease in the posture. That's until I took the time to actually understand the various aspects of Half Pigeon. 

As I've gotten older I've developed more patience with my practice. If I don't like a posture I take the time to investigate the reason behind my distaste. It took a lot of experimentation for Half Pigeon to feel decent in my body. Through my trial and error approach I've started to teach Half Pigeon in my classes in a way that feels right in my body. Luckily, my approach has been met with a lot of appreciation.

Just a couple weeks ago I had a student pull me aside after class. She told me she's never liked Half Pigeon because she never knew what to do in the posture. For the entire class the teacher was telling her exactly what to do, but when it came to Half Pigeon she got radio silence. Of course I understand the many reasons why a teacher would back off with the instructions in Half Pigeon, but I like to give some very specific directions in the posture to keep students engaged physically and mentally. She shared with me that my class was the first time she actually enjoyed Half Pigeon because she understood what was going on. 

Here's my approach:

Press the front shin bone and foot into your mat.jpg

By pressing your front shin bone into your mat you're establishing some buoyancy in your body. Allowing gravity to just pull me down just never felt right. In my experiments I decided to do the opposite (a little trick I learned from my teacher--if something's not working, do the opposite). Viola! The posture already felt different in my body. When you press your shin down you'll get muscles around your hips to fire. Engaging and stretching your muscles aren't actions that have to happen independently. Because you engage a muscle doesn't mean you can't stretch it and the surrounding muscles at the same time. 

Hug the inner thighs towards each other.jpg

There's the tendency in Half Pigeon to let the hips sway heavily to one side or the other. To help stabilize and level out your pelvis squeeze your inner thighs toward each other. If you're favoring one hip due to pain in your front knee then you'll want to reevaluate the posture. I have suggestions below on how to deal with knee discomfort.

reach the sitting bone of your front leg back.jpg

The adjustment that changed the whole posture for me? Reach the sitting bone of your front leg back. For most bodies the shift is tiny and not a lot will happen physically. However, the smallest shift of your sitting bone back will increase the stretch deep into the outer hip and glutes for most bodies. In my opinion this adjustment in the posture is what takes Half Pigeon from a blah hip opening posture to a useful, targeted hip opening posture. It's incredible how many times I've had students lift out of their posture, make eye contact with me, and nod their head when I've given this instruction like they're saying, "I get it now!" 

I definitely don't want to take away the softening, surrendering aspect of Half Pigeon from my students. Although the legs and hips are working in this specific approach, there's plenty of space to let the arms, neck, and abdomen relax. This might just be the case for me, but when I get hyper-focused with my physical body, my mind is able to do the same. 

Knee pain got you down?

Sometimes it's not misunderstanding that keeps yoga students away from Half Pigeon. Often the posture can cause knee discomfort. There's a few ways to alleviate that issue. 

Your body is structurally pretty incredible. It's made up of domes and angles to keep you supported and stable. In yoga, even when you manipulate your body into various shapes, it's best to work with those natural structural supports. When it comes to your joints, they are most stable and supported when they're at a 0, 90, or 180 degree angle. In Half Pigeon I encourage students to place their front shin at an angle that seems right for their knee, but often it's a challenge to find that just-right angle. If you are experiencing knee pain, try one of these options.

First, try to reduce the angle of the front knee a lot. Without actually sitting on your foot, pull your front foot closer to your groin and see if that increases, decreases, or doesn't change the discomfort. Narrowing the angle of the knee is also incredibly helpful if you plan to transition Half Pigeon into King Pigeon Pose. Although so many of us are striving to get that shin as far forward as possible, it's okay to back off a lot. Backing off might be exactly what your body needs. 

Although backing off on the front knee's angle is a very good choice, in most bodies it reduces the outer hip stretch. You could maintain the outer hip stretch while taking care of the front knee by increasing the angle in your front knee up to 90 degrees. As someone who has a history of knee pain I used to cringe whenever an instructor would tell me to get my shin parallel to the front edge of my mat. There's no way my body will do that! Of course at the time I didn't understand the power of props. Most bodies aren't going to move their shin that far forward without distorting their pelvis, so the posture needs to be propped up. Place one block at its lowest height under the sitting bone of your front leg. You might even want a second block under your front knee to keep that supported. Even better, if you have a bolster you can lay your whole front thigh bone across the bolster. Props, just like postures, require some experimentation. Play with the placement of your props so that it works for you. 

Reduce the angle.jpg

The picture above is how I do Half Pigeon in practice. Any knee pain I once felt is now gone, I get a deep stretch in my outer hip, and if I go through the various actions and engagements of the posture I am able to settle in and focus. My hips will never touch my mat in this posture, but that's not the point!

We as students have painted ideal images of postures like Half Pigeon in our heads. Sometimes it's nice to have a goal and something to strive for, but at the end of the day none of the postures are one-size-fits-all. As Leslie Kaminoff so beautifully states, "Asanas don't have alignment". Your body, however, does have alignment. Your body has its own unique, individual alignment for each asana. Stop forcing your body into cookie-cutter shapes. Take the time to experiment and play. Your body will thank you for it. 

Looking for a step-by-step tutorial? You can access the following video by subscribing to Erin Jorich Yoga On Demand, or rent the video for 24 hours.

Skills & Drills: Handstand Swing & Hops

For a long time this was one my least favorite methods to get into Handstand. I never felt like I had enough control and I'd end up cartwheeling instantly out of the posture. Now it tends to be my go-to approach, but it does require a lot of focus and control. It's a method I occasionally offer in my own group classes as most students can at least get a tiny sense of lift even if it's only an inch or two from the floor. 

Handstand Swing & Hops

From a Standing Splits position:

  • Lift your standing heel as high as you can

  • Bend your standing knee enough so that your belly touches, or comes close to touching, your standing thigh

  • Be mindful to keep your pelvis as level to the floor as possible and turn your lifted hip down

  • It's not always necessary, but a slight gaze forward is helpful in most bodies

  • With your hands about shoulder distance apart, grip your mat with your fingertips and get ready to bear weight

  • Keep your arms straight and push your mat away from you

  • At the bottom of you exhalation (when your lungs are empty) use the power of your bent, standing leg to lift you up


Skills & Drills: Handstand at the Wall

For the longest time I told myself I shouldn't work postures like Handstand and Forearm Balance at the wall. It was a crutch and my goal was to do the postures in the middle of the room. Once I figured out the mechanics of the postures at the wall it was time to take the training wheels off, right?

Turns out I was kind of wrong. 

Handstand1.jpeg

Even though Handstand is a pretty reliable posture in my practice I have found that timing myself at the wall helps me develop a deeper understanding of the posture and gain more strength. At the wall I'm not concerned about potentially kicking my neighbor or falling down in a spectacular display. At the wall I'm able to focus on where my weight is being distributed and ways to finesse the posture. What's engaged? What's starting to disengage? What small shifts can I make in my physical alignment so that I can breathe more deeply

Even better, I can time myself and work toward a goal. Balancing in the middle of the room in Handstand is one thing, but holding Handstand at the wall for two whole minutes is another thing. Start small. Perhaps you set a timer for 15 seconds. Eventually add an additional 15 seconds and see how it goes. It's a great exercise in focus and concentration. Try it out! 

Virabhadrasana II--Warrior II

Often it's the postures we do the most that we understand the least. When was the last time you held Warrior II for more than five breaths? (Iyengar students, you can put your hands down.) I'm guilty of it too, but if you have a regular yoga practice there's a good chance you drown out your teacher's instructions in familiar postures like Warrior II and just settle into what's most familiar. The main reason my own practice and teaching took a big leap last year is because I gave myself time to focus on the basics. I got subtle with my practice and it changed everything! 

File_001 (6).jpeg

Let's get nitty gritty with Warrior II and check out some areas that often need further investigation:

Foundation

  • Align the heel of your front foot with the arch of your back foot. Doesn't feel right? Well luckily this isn't a one-fits-all kind of practice and you can experiment with the position of your feet. But this is a good starting point.
  • Angle your front foot straight forward to the front edge of your yoga mat.
  • Angle your back toes slightly forward toward the front edge of your mat. You can play with not angling your foot forward and instead line up your back pinky toe with the back edge of your mat. The latter isn't my preferred alignment, but, again, it might be worth trying. 
  • Press down through the center of your heel and the base of your big and little toes on the front foot evenly.
  • Press more through the back edge of your back foot while still firmly pressing the big toe side of your foot into your mat. 
  • Ideally the weight between each foot will feel evenly distributed. If it doesn't feel balanced, experiment! 

Legs & Pelvis

Misalignment: Front knee dropped in.Tip: Be mindful of the front knee. Abduct it toward the pinky toe side of your front foot.

Misalignment: Front knee dropped in.

Tip: Be mindful of the front knee. Abduct it toward the pinky toe side of your front foot.

Misalignment: Front hip dropped lower than back hip. Tip: Keep your frontal hip points level to each other. 

Misalignment: Front hip dropped lower than back hip. 

Tip: Keep your frontal hip points level to each other. 

  • Press through the back foot to straighten and engage the back leg.
  • Bend your front knee to a right angle at its deepest. Not all bodies are able to get this deep, so only go as far as your body allows without pressing the front knee beyond the front ankle. 
  • Guide the front knee slightly toward the pinky toe side of the front foot. Often the knee collapses down, but by engaging your outer hip and thigh muscles you'll be able to abduct your knee into a more sustainable alignment. 
  • Your hips definitely do not have to be square to any specific point. Forcing your hips square to the long side of your mat isn't attainable for most bodies without putting unnecessary pressure on the front knee. Let your back hip turn slightly forward if it naturally wants to go there.  
  • You DO want your frontal hip points level to each other. The tendency is for the front hip to sag. 
  • Keep your lower spine in its neutral curve. No need to over tuck the pelvis, but most bodies can benefit from a slight draw of the frontal hip bones up toward the ribs. 

Torso, Arms, & Head

Misalignment: Reaching too far forward with the front hand. Tip: Stack your shoulders directly over your hips and reach in opposition with both hands. 

Misalignment: Reaching too far forward with the front hand. 

Tip: Stack your shoulders directly over your hips and reach in opposition with both hands. 

  • Stack your shoulders directly over your hips and square your chest to the long edge of your mat. (Notice that the shoulders are square to the long edge, but NOT the hips.)
  • Draw your ribs in and your navel back toward your spine to contain your abdominal core. 
  • Play with your gaze. Traditionally the gaze is forward over the front hand, however, in my own practice I prefer not turning my neck. 
  • Reach with strong opposition through both hands. It's common to reach too far forward with the front hand.

Final thoughts

That was a lot of information for one posture! There's a lot going on in Warrior II. You probably visit this posture in most vinyasa yoga classes so it's easy to fall into habits, but why not take on some of the more subtle details? Perhaps in one practice you focus primarily on your legs then, in another practice, focus primarily on your arms. Tackling everything at once can be maddening, but taking the time to get subtle and emphasize details can bring some life into even the most mundane postures. 

Skills & Drills: Inchworms

As my teacher often preaches yoga is a skill-based discipline. Yoga isn't just about stretching your legs or going upside down. Yoga takes time. Yoga takes practice. Yoga takes skill. 

My handstand practice has made it clear that skills are an essential part of the practice. Sure I could aimlessly kick up into handstand for days, but it'll probably result in the same flailing each and every time. Taking the time to work through drills and strengthen my hands, shoulders, and core benefit me more than setting the intention of simply sticking handstand. 

This Inchworm Drill is one of my go-to handstand preps. It's quite simple and really easy to integrate into your vinyasa yoga practice. 

Start in plank. Before moving drive through your hands and actively push your mat away from you. Then tiptoe your feet toward your wrists. Continue to push through your hands and engage your abdominal core. Walk your feet in as close as you can with straight legs and straight arms. If you have tighter hamstrings just walk your feet in as close as you can. Be patient with yourself and the process. You could even prop up each hand on a block to give you more clearance. Eventually you might be able to walk your feet all the way to your wrists while still feeling the push of your hands into your mat.